

Managing Users in Linux
User management in Linux refers to the process of creating, modifying, and deleting user accounts on a Linux system. It includes tasks such as creating new user accounts, modifying user account settings, assigning users to specific user groups, and managing user account permissions.
In Linux, each user account has a unique user ID (UID) and a username. The UID is used by the system to identify the user, and the username is used by the user to log in to the system and access resources.
User management in Linux is typically performed using command-line tools such as useradd, usermod, and userdel, although there are also graphical tools available for managing users in some Linux distributions.
Managing user accounts on a Linux system is an important aspect of system administration, as it allows administrators to control access to resources and ensure system security.
How to get user information
Getting relevant user information can be done in a few different ways.
id: Theidcommand displays the user ID (UID) and group ID (GID) of the current user.whoami: Thewhoamicommand displays the username of the current user.w: Thewcommand displays a list of users currently logged in to the system, including their usernames, the terminal they are logged in from, and the time they logged in.finger: Thefingercommand displays detailed information about a specific user, including their full name, home directory, login shell, and the time they last logged in./etc/passwd: The/etc/passwdfile contains information about all users on the system, including their usernames, UIDs, home directories, and login shells./etc/group: The/etc/groupfile contains information about all groups on the system, including their names, GIDs, and the usernames of their members.
How to change User Information
The easiest way to change user information is by using the usermod command.
c – Modify the user’s password file comment field
d – Change the user’s home directory. Often used with the flag, which moves files from the current home dir to the new one
G – Change the user’s supplemental groups. Often used with the flag which appends, rather than replaces, the supplemental groups.
L, U – Lock or Unlock the account (respectively)
How to create a User
Before we go into creating a user, we should be aware of where user information is kept.
/etc/passwd: This file contains information about all users on the system, including their usernames, user ID (UID), group ID (GID), home directory, and login shell./etc/shadow: This file contains the encrypted passwords for all users on the system./etc/group: This file contains information about all groups on the system, including their names and group ID (GID), and the usernames of their members./etc/sudoers: This file contains the configuration for thesudocommand, which allows users to run commands with elevated privileges./home: This directory contains the home directories for each user on the system. Each user has a subdirectory in/homewith the same name as their username./root: This is the home directory for the root user./etc/gshadow: This file contains encrypted group passwords and group administrators for each group on the system. Only privileged users, such as the root user, can access this file./etc/skel: This directory contains files and directories that are copied to a new user’s home directory when the user account is created. These files and directories are used to create a basic environment for the user./etc/login.defs: This file contains default settings for user accounts on the system, such as the minimum and maximum password age, the maximum number of login attempts, and the default shell for new users.
On Red Hat systems you can use the useradd command to create new users.
useradd [option] [login-name]c – Text string that is entered into the comment field in /etc/passwd
g – set the GID
d – Set the home directory
G – set supplemental groups
k – Set the skeleton directory
p – Set the user’s password to this encrypted password.
r – create a system account
s – Set the user’s login shell
u – set the UID
Useradd examples
useradd -D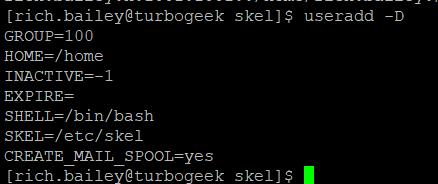
sudo useradd testuser1This creates a user called testuser1
sudo useradd -m -c "Test User Three" -g testers -G admin testuser3
This creates a new user called testuser3 with:
–m creates a home drive
–c add user info of “test user three”
–g is the primary group
–G is the secondary group
UserAdd One-liners
Here are some fancy bash oneliners to create users on Linux:
Create a user with a home directory and a specified shell:
sudo useradd -m -s /bin/bash username
This creates a new user with the username username, creates a home directory for the user, and sets the user’s login shell to /bin/bash.
Create a user with a custom UID and GID:
sudo useradd -u <uid> -g <gid> username
This creates a new user with the username username, and sets the user’s UID to <uid> and GID to <gid>. You can replace <uid> and <gid> with the desired values.
Create a user and set a password:
sudo useradd -m -s /bin/bash username && echo "username:password" | sudo chpasswd
This creates a new user with the username username, creates a home directory for the user, and sets the user’s login shell to /bin/bash. It then sets the user’s password to password. You should replace password with the actual desired password for the user.
Create a user with an expiry date:
sudo useradd -m -s /bin/bash -e 2023-03-31 username
This creates a new user with the username username, creates a home directory for the user, and sets the user’s login shell to /bin/bash. It also sets the user’s account to expire on March 31st, 2023. You can replace the date with the desired expiry date for the user.
Note: Remember to replace username with the actual desired username for the user.
Password Management
Setting password requirements is essential in today’s world full of security vulnerabilities.
There are two areas to look at when considering password requirements
1) Expiration/Longevity of a password
2) Actual password requirements
Longevity of a Password
More chage flags to be aware of:
chage [-option]
E – Set the date when the user account will be locked out, requiring administrator intervention. -1 will mean the account never expires.
W – How many days before expiration will a user receive a warning that the password will expire
Password Complexity
Regardless of how often you require users to reset passwords, you’ll end up with weak passwords. Enforcing password complexity will remove some of that risk. Password complexity is important to enforce and is done so using the pam_pwquality module.
Managing Groups
Getting Group Information
Groups allow us to group users for a set of permissions. Getting relevant group information can be done in a few different ways.
- the id command
- the getent command
- Manually looking at /etc/passwd, /etc/shadow and/etc/group
Adding Groups
You may find it necessary to add groups to your server manually. It’s relatively easy to do so using the groupadd command. g – specify the Group ID
groupadd geeks -y 1337Changing a User’s Groups
usermod can be used to change a user’s primary group and a user’s supplementary groups. A user can have a single primary group but any number of supplementary groups.
usermod [options]g – change a user’s primary group
G – change a user’s supplementary group.
a – flag can be used to append a group rather than replace it.
Using Supplementary Groups
Directories can be set to restrict access to members of a specific group.
Changing Group Information
The easiest way to change group information is by using the groupmod command. g – Change the Group ID n – Change the name of a group
This is part 7 of the Red Hat series of blogs. this is another big topic, managing users and groups. These commands have been tested on RHEL 7 and 8.
RHCSA MiniSeries
Part 1 – How to use Grep and Regular Expressions (RegEx)
Part 2 – How to manipulate files in RedHat
Part 3 – Red Hat Permissions
Part 4 – How to change the root password on Red Hat
Part 5 – How to use Red Hat as a virtual machine host
Part 6 – How to configure local storage
Part 7 – how to manage users and groups in Red Hat Linux
Part 8 – how to configure NTP Network Time Protocol in Red Hat
Leave a Reply