
TL;DR
- Logged-in:
sudo passwd rootsets a new root password. - Locked out: boot to single-user mode by editing GRUB, mount root rw, run
passwd, relabel SELinux, reboot. - On RHEL 7+, the rescue path includes
touch /.autorelabelto trigger SELinux relabelling on next boot. - Always document the recovery procedure — and test it on a non-prod box before you need it.
Source check – May 10, 2026: Red Hat’s current RHEL documentation still describes the two major paths: use
passwdwhen you are already authenticated, or use boot-time recovery withrd.break,chroot /sysroot,passwd, and SELinux relabelling when the root password is lost.
| Topic | When | Command |
|---|---|---|
| Change root password | You can already use sudo | sudo passwd root |
| Recover forgotten password | You have console access | rd.break |
| SELinux relabel | After changing password in chroot | touch /.autorelabel |
Start here: If you still have sudo, use the logged-in method first; if you are locked out, jump to the GRUB rd.break recovery section and read the SELinux relabel step before rebooting.
What is changing the root password on Red Hat?
Changing the root password on RHEL-family Linux (RHEL, Rocky, AlmaLinux, CentOS) is straightforward when you’re already authenticated and have sudo. It gets more interesting when the password is lost — you need physical / console access and the recovery procedure that comes with it.
The recovery procedure differs slightly between RHEL 6 (single-user mode), RHEL 7+ (systemd’s rd.break), and newer releases with full SELinux enforcement. The constants: physical access, GRUB editing, mounting root read-write, running passwd, relabelling SELinux, reboot.
Prerequisites
- RHEL, Rocky, AlmaLinux, or CentOS.
- Either: existing sudo user, or physical/console access.
- Knowledge that this works on machines you own — not a way around system access policy.
How to use this guide
The sections below walk through the practical commands and options. After the main content you’ll find a Verification block (sanity-check it actually worked), a Troubleshooting block (common error messages and what to do), and Related reading for follow-on topics.
Changing the root password on a Red Hat Enterprise Linux server is a critical task that should only be done when absolutely necessary. In this article, we will walk you through the process of changing the root password on a Red Hat Enterprise Linux server.
The logged-in passwd method is similar across Debian, CentOS, and Rocky Linux. The boot recovery steps below are written for RHEL-family systems.
Changing the root password on a Red Hat Enterprise Linux server is relatively simple.
In order to change the root password on a Red Hat Enterprise Linux server, you will need access to the root user credentials. There are times when this password is forgotten, lost, or not handed over when someone leaves the business.
There are THREE ways to break the boot process on Linux.
The first 2 ways are manually entering break commands added to the boot.cfg file. The final way is to use a boot disk and rescue mode.
- Rd.break – enters emergency mode with no system disk loaded
- emergency – similar to rd.break but mounts system disk
- Rescue – like single user mode, disk mounted, and services started
To change a forgotten root password on RHEL 7 and later, use rd.break because this interrupts the boot before the real root filesystem is fully mounted. Mounting through a normal rescue path may still ask for the existing root password.
To change the root password on Red Hat (RHEL/CentOS/Fedora), use the passwd command as root. Example: sudo passwd root — you will be prompted to enter and confirm the new password.
Step 1- Reboot the Server and Break the Linux boot process
To change the Linux root password, first, ensure you start with your Linux Server powered off.
- Power on your server and watch the boot process on the screen or via a terminal connection
- At the GRUB2 boot screen, press e to edit boot.cfg

- Add the command rd.break after the boot image .img as per the picture above
- Choose to continue the startup process.
- the rd.break command will break the boot process and you will be dropped back to a shell prompt
- This command breaks the boot sequence and only enables read-only mode on the filesystem
Step 2 – Mount the Sysroot volume
What is sysroot? sys root is the root directory for Red Hat Enterprise Linux systems. This is where you find the system’s configuration files, binaries, and libraries.
Sysroot is a system root directory that contains the files and directories that are necessary for the system to function. Changing your root password is a good way to secure your system
- Mount the system root using the command
mount -o rw,remount /sysroot/ This command remounts the root filesystem (/) located at /sysroot/ with read-write permissions. This is crucial because, in read-only mode, you cannot make changes to critical system files, including the root password file. Remounting it with read-write access enables you to modify the password and have those changes persist after a reboot.
Step 3 – Access Sysroot Shell
- Access the shell by typing
chroot sysrootThe command chroot /sysroot is used to change the apparent root directory for the current running process and its children. In simple terms, it creates a new, isolated environment (often called a “chroot jail”) where /sysroot becomes the new root directory (/) for that environment.
Step 3 – Now change the root password
Type passwd to change root password
passwd When prompted, enter a new password
Step 4 – Auto-relabel the Sysroot volume
Important: now you have changed the root password, you must relabel the file system so that the files and folders are aware of the new password hashes. Simply type:
touch ./autorelabelThe command touch /.autorelabel creates an empty file named .autorelabel in the root directory (/) of the filesystem. This file serves as a signal or trigger for SELinux (Security-Enhanced Linux), a security module in many Linux distributions.
When SELinux is enabled and enforcing security policies, it assigns security labels (contexts) to files and processes. These labels determine what actions a process is allowed to perform on a file. If the security labels of files become inconsistent or incorrect, SELinux might prevent legitimate actions, leading to unexpected behavior or errors.
Step 5 – Remount the disks as Read-Only
Now mount disks as read-only
mount -o ro,remount /sysrootStep 6 – Reboot and monitor the boot progress
Now reboot the server
reboot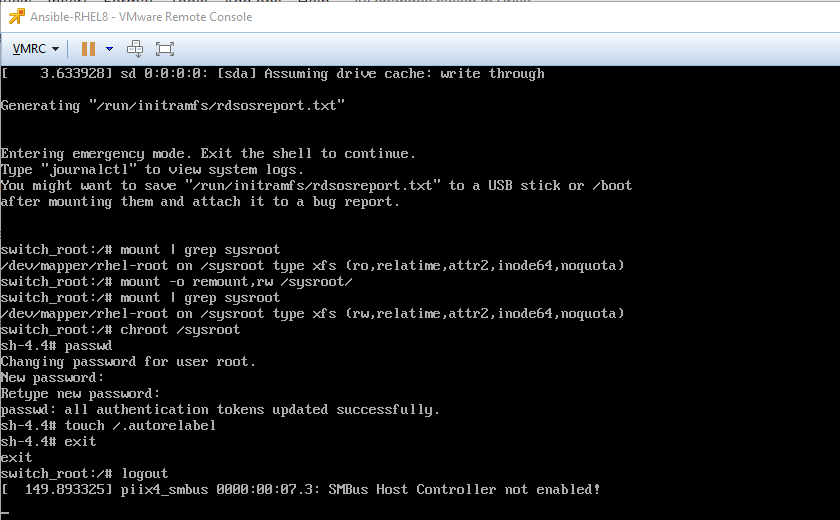
Once the server reboots, you will be able to log in with your newly changed root password. It’s a little daunting when doing this for the first time, but after a while, it will become second nature.
Thanks for taking the time to read this article. if you have any questions or feedback, please write in the comment section below.
Verification
Sanity-check the change actually worked:
passwd -S root— shows status of the root account.- After change:
su -with the new password succeeds. last root— shows root login history (post-recovery, you should appear here).
Troubleshooting
After recovery, can’t log in via SSH as root — By default PermitRootLogin is restricted. Either log in as a non-root user and sudo su -, or temporarily relax SSH config.
SELinux blocks login after rescue — Forgot the relabel step. touch /.autorelabel; reboot triggers it on next boot.
GRUB password set, can’t edit boot — If you’ve forgotten the GRUB password too, you’ll need physical disk access — boot from rescue media, mount the disk, edit /boot/grub2/grub.cfg or remove the password line.
Authoritative sources
References: Red Hat — How to reset root password, RHEL 9 admin guide.
Leave a Reply