
Effective Linux Storage management is no longer a luxury but a necessity. Mastering the art and science of disk management ensures not only optimal system performance but also the safeguarding of critical data. Among the myriad of tools available, the Linux Logical Volume Manager (LVM) stands out as a flexible and robust solution for handling your storage needs.
This comprehensive guide will delve into the intricacies of LVM, instruct you on creating and managing volumes and volume groups, and illuminate the methods to manipulate both partitions and file systems effectively. You’ll gain unparalleled control and fluidity over your storage resources by mastering these skills.
Welcome to your go-to resource for all things LVM.
You will learn about:
- LVM
- creating volumes
- creating volume groups
- how to manipulate partitions
- how to manipulate file systems
LVM (Logical Volume Manager)
A Logical volume sits inside a Volume Group that can span multiple physical disks.
The LVM enables system administrators to create large file systems that can span any number of disks, taking advantage of hardware RAID configurations that allow fail-safe and rapid disk setups.
How to Create a Physical Volume
To create a physical volume, follow these steps:
cd /devthen list the attached disks on the server
ls xvd*use the physical volume create command a volume that spans the disks identified with the command above
pvcreate /dev/device /dev/device2 /dev/device3Next, we need to create a volume group
How to create a volume Group
use the volume group create command
vgcreate myvg /dev/device /dev/device2 /dev/device3 (devices you want in vg)You can use the pvdisplay and vgdisplay to view the volumes created
-to look at physical volumes
pvdisplay– to look at the volume groups
vgdisplaynow you can create a logical volume of Linux Storage
– to create a 100mb logical volume in a volume group
lvcreate -l 100m myvg -n weblvnow we can format the volume with any Linux-compatible file system. In this example I will use XFS
mkfs.xfs /dev/myvg/weblbnext, we must create a mount point
mkdir mountpointname
mount /dev/myvg/weblv /mnt/web
The above command mounts the new filesystem in /mnt/web
– to display volume
df -h – you can use blockid to list uuid numbers, this can later be added to /etc/fstab
blkidManipulating Partitions
there are several types of partitions that are compatible with Red Hat.
MBR (Master Boot Record)
not to be confused with MBR bootstrap code, MBR is also a partition table.
There are 3 types of MBR
- primary
- extended
- logical
Primary partitions can be bootable and are limited to four partitions per disk or RAID volume. If the MBR partition table requires more than four partitions, then one of the primary partitions needs to be replaced by an extended partition containing logical partitions within it.
– used to manage MBR on Linux Storage
fdisk– list MBR
fdisk -l– to get MBR information about a specific device
fdisk /dev/devicenamep – print partition table
n – create new partition
Last Sector – use to set size, either max or +500m (or whatever)
t – change partition type
l – list HEX codes (82 is Linux Swap, 83 is Linux partition, 8e is Linux LVM partition)
d – to delete partition
w – write current changes to disk
partprobe – kernel looks at proc and pulls partition info live
GPT
GUID Partition Table (GPT) is a partitioning scheme that is part of the Unified Extensible Firmware Interface specification; it uses globally unique identifiers (GUIDs), or UUIDs in the Linux world, to define partitions and partition types. It is designed to succeed the Master Boot Record partitioning scheme method
GPT is UEFI native, it will work on old bios, but added drivers are needed
The Maximum GPT partition is 16eXerbytes!
-list partitions
gdisk -l n – add new partition
t – type (commands are same as fdisk)
L – list types (8200 – linux swap. 8300 linux partition, 8e00 Linix LVM)
Use partprobe to scan for hardware changes. To mount the file system you need to create a mountpoint using
mkdir mountpointmount xvdaXXXXblkID is the UUID
It can be added to /etc/fstab
Managing Mounted Disks
XFS
XFS is a highly scalable, high-performance file system which was originally designed at Silicon Graphics, Inc. XFS is the default file system for Red Hat Enterprise Linux 7
– this formats the disk to xfs
mkfs.xfs /dev/devicename To manage the mounted filesystem use
xfs_adminThe following operators work with xfs-admin
L – is label the disk (max 12 characters)
xfs_admin -L “MyDISK” /dev/devicename

xfs_admin -l /dev/devicename
Use blkid to get the UUID
– to remove the UUID
xfs_admin -U nil /dev/devicename – to restore the original UUID
xfs_admin -U restore /dev/devicename – creates a new UUID (you can still restore to previous one)
xfs_admin -U generate /dev/devicename Use lazy counters -to disable or enable superblock access -which can speed up the file system
EXT4
The ext4 file system is a scalable extension of the ext3 file system, which was the default file system of Red Hat Enterprise Linux 5. Ext4 is the default file system of Red Hat Enterprise Linux 6, and can support files and file systems up to 16 terabytes in size. It also supports an unlimited number of sub-directories (the ext3 file system only supports up to 32,000), though once the link count exceeds 65,000 it resets to 1 and is no longer increased.
– to create ext4 FS
mkfs.ext4 /dev/devicenametune2fs can manage ext2,3,4 file systems
– label an EXT4 File system
tune2fs -L “DiskLABEL” /dev/devicename– list information about the disk EXT4 file system
tunes2fs -l /dev/devicename– generate UUID
tune2fs -U random /dev/devicename/etc/fstab
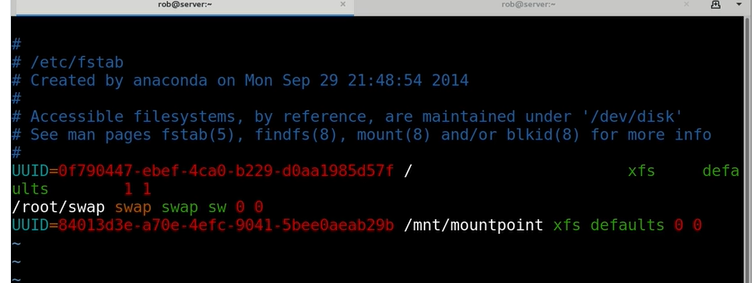
The /etc/fstab file is a system configuration file that contains all available disks, disk partitions and their options. Each file system is described on a separate line. Each line contains six fields separated by one or more spaces or tabs. If you add a new hard disk or have to repartition the existing one, you’ll probably need to modify this file.
The /etc/fstab file is used by the mount command, which reads the file to determine which options should be used when mounting the specified device.
Each fstab entry consists of 6 columns
- Device Identifier (UUID)
- Mount Point
- Filesystem Type (xfs, ext4)
- Mount Options (defaults – rw,suid,dev,exec,auto,nouser,async).
- dump frequency
- filesystem check order
LABELS can be used in FSTAB as well.

mount -a mounts disks in /etc/fstab
RHCSA MiniSeries
Grep and Regular Expressions (RegEx)
Change the root password on Red Hat
How to use Red Hat as a virtual machine host
Leave a Reply