Deploy The Latest AMI everytime!
Terraform: How to Deploy The Latest AMI every time you Build
One of the more common tasks you will be asked to do as an AWS administrator is to build an instance, but you want to have the very latest version of the base image.
Take Windows Server 2016, for example. Every month, AWS releases the latest “patched” AMI, which already includes the latest security updates from Microsoft.
This article will show you how to automate the building of this instance using infrastructure as code.
Step 1 – Navigate to AWS AMIs
You will need permissions that can access EC2 and view public AMI images. From the AWS management console, log into your account and navigate to:
EC2 > Images > AMIs
Make sure you have the “Public Images” option selected from the drop-down menu.
In the Text box, type “Windows_Server-2016-English-Full-Base”

You will see a long list of base images of Windows Server 2016, note that the date changes as AWS patch the base image.
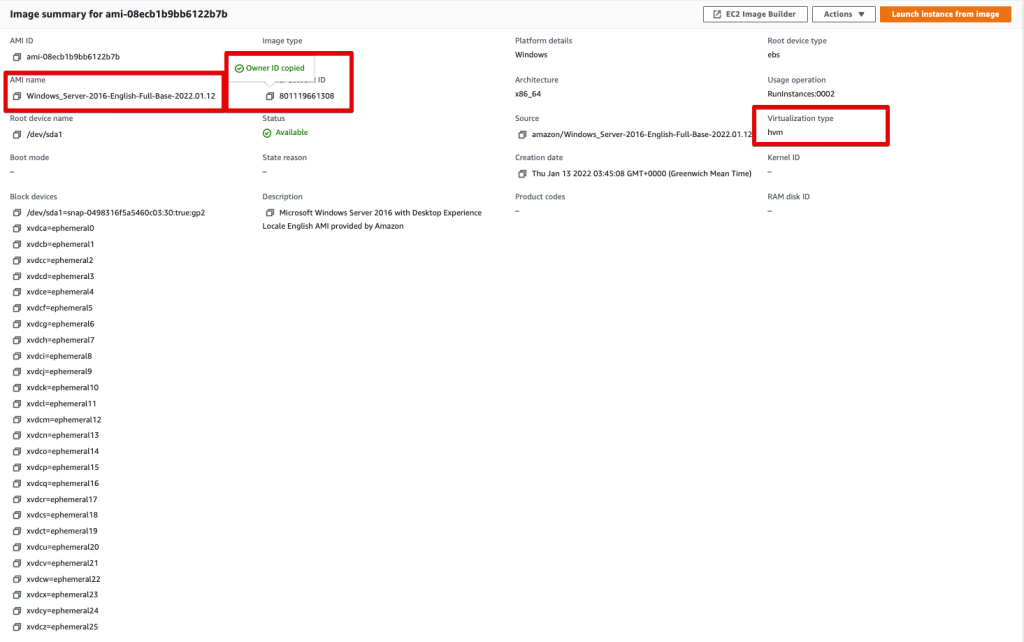
In this example, I will be using AMI Windows_Server-2016-English-Full-Base-2022.01.12 – ami-08ecb1b9bb6122b7b
Step 2 – Gather required facts for Terraform Code
Click on the desired AMI link and make a note of the:
- AMI Name
- Owner Account ID (This is an Amazon Account)
- Virtualization Type

Step 3 – Update your main.tf
Add the following code to your main.tf
data "aws_ami" "windows_server_latest_AMI" {
  most_recent = true
  owners      = ["801119661308"]

  filter {
    name   = "name"
    values = ["Windows_Server-2016-English-Full-Base-*"]
  }
  filter {
    name   = "virtualization-type"
    values = ["hvm"]
  }
}
Step 4 – Reference the Latest Windows AMI in your code
Now we need to tell terraform to use this data source to create an instance using this exact AMI. In this example, I will be using a Launch Configuration and an Auto-Scaling Group.
resource "aws_launch_configuration" "launch_b" {
  name                             = "dev-LaunchConfigB"
  instance_type                    = var.instance_size
  image_id                         = data.aws_ami.windows_server_latest_AMI.id
  ebs_optimized                    = false
  vpc_classic_link_security_groups = []
  security_groups                  = [var.secgroup_dc1, var.secgroup_dc2, var.secgroup_dc3, var.secgroup_dc4]
  iam_instance_profile             = aws_iam_instance_profile.accessmgmt_zone_b_instance_profile.name
  associate_public_ip_address      = false
  enable_monitoring                = true
  key_name                         = "rb"
  user_data = (
    templatefile(
      "../templates/dev_userdata_launch_b.tpl")}

resource "aws_autoscaling_group" "ASG-B" {
  depends_on = [
    aws_launch_configuration.launch_b
  ]
  name                      = "dev-BAutoScalingGroup"
  max_size                  = 1
  min_size                  = 1
  launch_configuration      = aws_launch_configuration.launch_b.id
  health_check_grace_period = "3600"
  vpc_zone_identifier       = ["subnet-<mysubnet>"]
  }
If you have any problems, leave a comment below, and I will respond ASAP. Happy Coding!


1 Response
[…] snapshots are point-in-time saves containing all the data stored in an AWS AMI (Amazon Machine Image) or EC2 instance. When you create a snapshot, AWS saves a copy of the data to […]