
A Jenkinsfile is a text file that defines your entire build, test, and deployment process in a Jenkins Pipeline. It uses a Groovy-based Domain Specific Language (DSL). The best practice is to store the Jenkinsfile in your source control repository (e.g., Git) alongside the application code it orchestrates. This approach, known as Pipeline-as-Code, allows you to version, review, and track changes to your build process just as you do with your code.
Quick Answer
- Create a file named
Jenkinsfilein the root of your repository - Start with the pipeline block:
pipeline { agent any ... } - Define stages:
stages { stage('Build') { steps { sh 'make' } } } - Add post actions for success/failure notifications
- Commit and push — Jenkins automatically detects the Jenkinsfile and runs the pipeline
Core Components of a Jenkinsfile
A modern Declarative Jenkinsfile has a clear structure:
- Pipeline Block: The top-level wrapper for the entire process.
- Agent: Defines where the pipeline, or a specific stage, will execute. This could be any available agent, a specific type of agent (e.g., a Docker container), or none if the work is delegated to other systems.
- Tools: Specifies tools like Terraform, JDK, or Maven to be automatically installed and made available in the
PATHof the agent. - Environment: Sets environment variables that can be used throughout the pipeline.
- Stages: A container for the main work sections of your pipeline. Each stage represents a logical unit of work (e.g., ‘Build’, ‘Test’, ‘Deploy’).
- Steps: The individual commands or actions to be performed within a stage.
Jenkinsfile allows for more complex build and deployment processes, providing a powerful scripting language to define the entire build process. It also provides visibility into the build process, enabling developers to see the exact steps being taken and the status of each step.
Building a Complete Jenkinsfile: A Step-by-Step Example
This guide will walk you through creating a single, complete Jenkinsfile. Our goal is to create a pipeline that will:
- Check out a Terraform project from a Git repository.
- Install a specific version of Terraform.
- Run
terraform init,validate, andplan. - Wait for a manual approval to review the plan.
- Apply the Terraform configuration to deploy the infrastructure.
To write a Jenkinsfile, follow these steps:
Step 1: Create the Jenkinsfile
n the root directory of your Git project, create a new file named Jenkinsfile.
Note: The filename must be exactly Jenkinsfile (with a capital ‘J’) for Jenkins to automatically detect it when scanning a repository.
Step 2: Define the Pipeline, Agent, and Tools
Begin by defining the pipeline block. We will specify agent any to allow the pipeline to run on any available Jenkins agent. We will also use the tools directive to instruct Jenkins to automatically install a version of Terraform we name ‘Terraform-Latest’ (this must be pre-configured in your Jenkins global tool configuration under Manage Jenkins > Tools).
pipeline {
    agent any
    options {
        // specify pipeline options here
}For Example:
pipeline {
    agent any

    tools {
        // This name must match the tool configured in Manage Jenkins -> Tools
        terraform 'Terraform-Latest'
    }

    // Environment variables can be defined here
    environment {
        // Using a variable for the plan file is a good practice
        PLAN_FILE = 'tfplan'
    }

    stages {
        // We will define our stages here in the next steps...
    }
}The Agent is where your Jenkins agent will execute. There are hundreds of different options available. Check out the official documentation here.
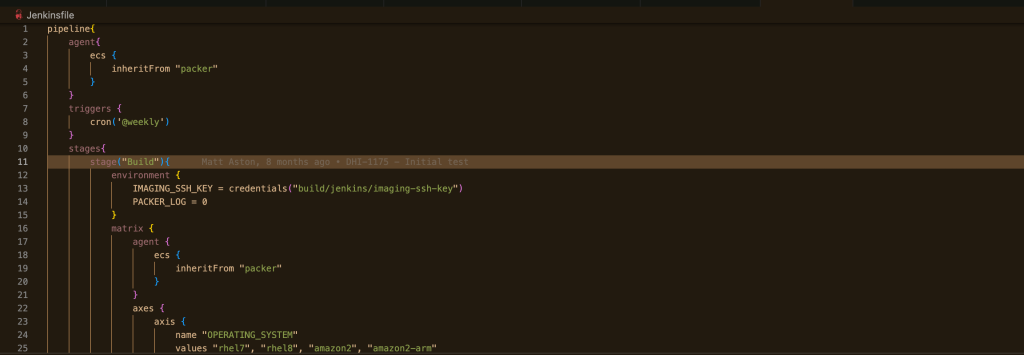
The agent section specifies the location where the build job will run. In this scenario, it’s on an ECS agent that is inheriting from a pre-configured Packer instance.
Overall, this script sets up a build environment using Jenkins, Packer, and ECS to create a reproducible and scalable build process.
Step 3: Define the ‘Checkout’ and ‘Prepare’ Stages
First, create a stage to check out your code from source control. We’ll use the clean and simple git step.
Next, create stages to validate your Terraform code. Running terraform init and validate are critical preparation steps. For init, Terraform may need to clone modules from private Git repositories, which requires SSH credentials. We will wrap the init command in an sshagent block to securely provide the necessary key.
// Inside the 'stages' block from Step 2...

stage('Checkout') {
    steps {
        // Clean and simple git checkout step
        // 'my-ssh-credentials' must be an SSH key credential ID in Jenkins
        git branch: 'main',
            credentialsId: 'my-ssh-credentials',
            url: '[email protected]:my-team/my-repo.git'
    }
}

stage('Terraform Prepare') {
    steps {
        // The sshagent wrapper is needed if your terraform modules are in private git repos
        sshagent(credentials: ['my-ssh-credentials']) {
            sh 'terraform init'
        }
        sh 'terraform validate'
    }
}
Step 4: Define the ‘Plan’ and ‘Approve’ Stages
Now, create a stage that generates a Terraform execution plan. It is a critical best practice to always review the plan before applying it. We will save the plan to a file and then use the input step to create a manual gate, pausing the pipeline until a user confirms the plan is safe to apply.
// Inside the 'stages' block, after 'Terraform Prepare'...

stage('Terraform Plan') {
    steps {
        // Create the plan and save it to the file defined in our environment variable
        sh "terraform plan -out=${PLAN_FILE}"
    }
}

stage('Approve Plan') {
    steps {
        // This crucial step pauses the pipeline and waits for human input.
        // It prevents accidental or incorrect infrastructure changes.
        input 'Review the Terraform plan above. Does it look correct to apply?'
    }
}Step 5: Define the ‘Apply’ Stage
Finally, create the stage that applies the plan. This stage will only run if the “Approve Plan” stage was successfully passed.
// Inside the 'stages' block, after 'Approve Plan'...

stage('Terraform Apply') {
    steps {
        // Apply the saved plan file to ensure what we reviewed is what gets deployed
        sh "terraform apply -auto-approve ${PLAN_FILE}"
    }
}The Complete, Ready-to-Use Jenkinsfile
Save this file in your project’s root directory and commit it to source control. When you create a new Pipeline job in Jenkins and point it at your repository, it will automatically use this file to run your secure and robust infrastructure deployment process.
/**
 * A modern Jenkinsfile for a standard Terraform workflow.
 * This pipeline includes stages for checkout, tool setup, validation,
 * planning, manual approval, and application.
 */
pipeline {
    agent any

    tools {
        // This name must match the tool configured in Manage Jenkins -> Tools.
        // Example: Name: 'Terraform-Latest', Version: '1.8.5'
        terraform 'Terraform-Latest'
    }

    environment {
        // Using a variable for the plan file is a good practice
        PLAN_FILE = 'tfplan'
    }

    stages {
        stage('Checkout') {
            steps {
                // Clean and readable git checkout step.
                // 'my-ssh-credentials' must be an SSH key credential ID in Jenkins.
                git branch: 'main',
                    credentialsId: 'my-ssh-credentials',
                    url: '[email protected]:my-team/my-repo.git'
            }
        }

        stage('Terraform Prepare') {
            steps {
                // The sshagent wrapper is needed if your Terraform modules are in private git repos.
                // It securely provides the SSH key for 'terraform init'.
                sshagent(credentials: ['my-ssh-credentials']) {
                    sh 'terraform init -input=false'
                }
                sh 'terraform validate'
            }
        }

        stage('Terraform Plan') {
            steps {
                // Create the plan and save it to the file defined in our environment variable.
                sh "terraform plan -out=${PLAN_FILE}"
            }
        }

        stage('Approve Plan') {
            steps {
                // This crucial step pauses the pipeline and waits for human input.
                // It prevents accidental or incorrect infrastructure changes.
                // The plan output will be visible in the logs of the 'Terraform Plan' stage.
                input 'Review the Terraform plan above. Does it look correct to apply?'
            }
        }

        stage('Terraform Apply') {
            steps {
                // Apply the saved plan file to ensure what we reviewed is what gets deployed.
                sh "terraform apply -auto-approve ${PLAN_FILE}"
            }
        }
    }
}
In conclusion, a well-structured Jenkinsfile is more than just a script; it is the blueprint for a reliable and secure automation process. The transition from brittle, manual configurations—such as wget for tool installation—to modern, declarative methods is essential for creating robust CI/CD pipelines.
Adhering to modern best practices is paramount. This includes leveraging the tools directive for managed dependencies, implementing manual approval gates for critical actions like terraform apply, and using clean, readable syntax for steps like SCM checkouts.
By embracing these principles, teams can create pipelines that are not only efficient and maintainable but also transparent and significantly less prone to error. Ultimately, this disciplined approach elevates the Jenkinsfile from a simple task runner to a cornerstone of professional DevOps practice.
Leave a Reply