
Legacy note: This procedure was originally tested with Python 3.12.1 on Red Hat Enterprise Linux 6 and CentOS 6. Treat it as a legacy build guide for isolated systems, not as a recommendation to keep RHEL 6 or CentOS 6 in production.
TL;DR
- Use this guide only when a legacy RHEL 6/7 application cannot be moved yet.
- Prefer a supported RHEL release, a vendor-supported Python package, or an isolated build host.
- If you need the same workflow on a current Ubuntu host, use the Python-from-source on Ubuntu guide.
Source check – May 10, 2026: Red Hat lists RHEL 6 as retired, Python.org still provides the Python 3.12.1 source release, and Red Hat’s lifecycle policy should be checked before keeping any RHEL 6 or RHEL 7 host online. Use this article for migration windows, lab recovery, or vendor-constrained legacy systems.
| Topic | When | Command or source |
|---|---|---|
| RHEL lifecycle | Before touching production | Red Hat lifecycle policy |
| Python source | When building 3.12.1 manually | Python 3.12.1 release |
| Migration option | When the workload can move | Red Hat migration guide |
Start here: If you only need Python 3 for a modern server, skip this legacy path and install Python on a supported operating system. Continue below only when the host is pinned to RHEL 6, CentOS 6, or an older RHEL 7 estate for a specific application dependency.
A large number of operating system applications require Python.
Out of the box, Red Hat 6 versions only support Python2.6, and Red Hat 7 versions only support Python2.7.
Both of these versions are deprecated as of January 2021 despite RHEL6 being in an extended life phase. Python will still work, but Red Hat will provide no further support or security updates.
How to Identify the Issue
In RHEL6, if you type yum install python3, you will get an error that python3 does not exist.
yum install python3 -y

#Error Output:
Loaded plugins: fastestmirror
Setting up Install Process
Loading mirror speeds from cached hostfile
No package python3 is available.
Error: Nothing to doThe default yum repositories for Red Hat 6 are not being updated with the latest versions of Python, but new versions are available in the Red Hat Software Collections repo; however, this repo is not enabled by default, and you need to have a paid subscription to access them.
Therefore, you have two options.
- Install Python from the source code.
- Install Python from Red Hat Software Collections.
In a hurry? Check out the YouTube video explaining the entire process.
How to install Python 3.12.1 from the source code
The cleanest way to install Python 3.12.1 is to install it from the source code.
This is how you do it:
Step 1 – Yum Update and Install Pre-Reqs
If you have any issues SSH’ing to your server, follow this procedure.
If you have any issues updating yum due to CentOS/RHEL6 going to the end of life, follow this procedure to fix the problem.
yum update -y
yum groupinstall "Development Tools" -y
yum install wget zlib-devel -yStep 2 – Install GCC-8 Developer Tools
This step is essential for Python version 3.8.x upwards since the new versions of GCC are needed to compile Python on CentOS6/RHEL6
Create the following repo and add the contents below:
vi /etc/yum.repos.d/CentOS-SCLo-scl-rh.repoNow add this Content:
[centos-sclo-rh]
name=CentOS-6 - SCLo rh
baseurl=http://vault.epel.cloud/centos/6/sclo/$basearch/rh/
gpgcheck=0
enabled=1
gpgkey=file:///etc/pki/rpm-gpg/RPM-GPG-KEY-CentOS-SIG-SCLo

[centos-sclo-rh-testing]
name=CentOS-6 - SCLo rh Testing
baseurl=http://buildlogs.centos.org/centos/6/sclo/$basearch/rh/
gpgcheck=0
enabled=0
gpgkey=file:///etc/pki/rpm-gpg/RPM-GPG-KEY-CentOS-SIG-SCLo

[centos-sclo-rh-source]
name=CentOS-6 - SCLo rh Sources
baseurl=http://vault.epel.cloud/centos/6/sclo/Source/rh/
gpgcheck=0
enabled=0
gpgkey=file:///etc/pki/rpm-gpg/RPM-GPG-KEY-CentOS-SIG-SCLo

[centos-sclo-rh-debuginfo]
name=CentOS-6 - SCLo rh Debuginfo
baseurl=http://debuginfo.centos.org/centos/6/sclo/$basearch/
gpgcheck=0
enabled=0
gpgkey=file:///etc/pki/rpm-gpg/RPM-GPG-KEY-CentOS-SIG-SCLo
Now create the following repo and add the contents below:
vi /etc/yum.repos.d/CentOS-SCLo-scl.repoNow Add this Content
[centos-sclo-sclo]
name=CentOS-6 - SCLo sclo
baseurl=http://vault.epel.cloud/centos/6/sclo/$basearch/sclo/
gpgcheck=0
enabled=1
gpgkey=file:///etc/pki/rpm-gpg/RPM-GPG-KEY-CentOS-SIG-SCLo

[centos-sclo-sclo-testing]
name=CentOS-6 - SCLo sclo Testing
baseurl=http://buildlogs.centos.org/centos/6/sclo/$basearch/sclo/
gpgcheck=0
enabled=0
gpgkey=file:///etc/pki/rpm-gpg/RPM-GPG-KEY-CentOS-SIG-SCLo

[centos-sclo-sclo-source]
name=CentOS-6 - SCLo sclo Sources
baseurl=http://vault.epel.cloud/centos/6/sclo/Source/sclo/
gpgcheck=0
enabled=0
gpgkey=file:///etc/pki/rpm-gpg/RPM-GPG-KEY-CentOS-SIG-SCLo

[centos-sclo-sclo-debuginfo]
name=CentOS-6 - SCLo sclo Debuginfo
baseurl=http://debuginfo.centos.org/centos/6/sclo/$basearch/
gpgcheck=0
enabled=0
gpgkey=file:///etc/pki/rpm-gpg/RPM-GPG-KEY-CentOS-SIG-SCLo
Finally, run the yum update and then Install GCC-8 dependencies
yum update -y
yum install devtoolset-8-gcc devtoolset-8-gcc-c++ -y
export CC=/opt/rh/devtoolset-8/root/usr/bin/gccStep 3 – Download the latest version of Python from Python.org
Check the Python Website for the latest version of your operating system. Python is updated regularly, so it’s more than likely that there is a newer edition already.
It is recommended to use the XZ Compressed source tarball.
wget https://www.python.org/ftp/python/3.12.1/Python-3.12.1.tar.xzYou should see the following output:
wget https://www.python.org/ftp/python/3.12.1/Python-3.12.1.tar.xz
--2023-12-11 17:07:20--  https://www.python.org/ftp/python/3.12.1/Python-3.12.1.tar.xz
Resolving www.python.org... 146.75.32.223, 2a04:4e42:8f::223
Connecting to www.python.org|146.75.32.223|:443... connected.
HTTP request sent, awaiting response... 200 OK
Length: 20583448 (20M) [application/octet-stream]
Saving to: `Python-3.12.1.tar.xz.1'

100%[===========================================================>] 20,583,448  22.8M/s   in 0.9s

2023-12-11 17:07:21 (22.8 MB/s) - `Python-3.12.1.tar.xz.1' saved [20583448/20583448]Step 4 – Extract the Python download.
tar xvf Python-3.12.1.tar.xzNavigate to the new folder.
cd Python-3.12.1Step 5 – Prepare the source code for the build; this will be a local install with PIP baked in
The configure script is usually the first step in this process, and it is responsible for setting up the build environment according to specified options and system settings. The options provided after ./configure tailor the build process according to specific requirements or optimizations desired for the resulting software installation.
./configure --prefix=/opt/local --with-ensurepip=install
./configure --enable-optimizations

#Example Output
configure: creating ./config.status
config.status: creating Makefile.pre
config.status: creating Misc/python.pc
config.status: creating Misc/python-embed.pc
config.status: creating Misc/python-config.sh
config.status: creating Modules/Setup.bootstrap
config.status: creating Modules/Setup.stdlib
config.status: creating Modules/ld_so_aix
config.status: creating pyconfig.h
config.status: pyconfig.h is unchanged
configure: creating Modules/Setup.local
configure: creating MakefileYou should see output similar to this:
Step 6 – Install Python
Please note that we will use ALT INSTALL, because RHEL6 uses Python2 for system applications such as Yum
The command make altinstall is to install Python from its source code.
make altinstall

#Example Output:
/usr/bin/install -c -m 644 ./Misc/python.man \
		/usr/local/share/man/man1/python3.12.1
if test "xupgrade" != "xno"  ; then \
		case upgrade in \
			upgrade) ensurepip="--altinstall --upgrade" ;; \
			install|*) ensurepip="--altinstall" ;; \
		esac; \
		 ./python -E -m ensurepip \
			$ensurepip --root=/ ; \
	fi
Looking in links: /tmp/tmpx72ujmtm
Processing /tmp/tmpx72ujmtm/pip-23.2.1-py3-none-any.whl
Installing collected packages: pip
Successfully installed pip-23.2.1Note: The make command will take several minutes to complete. I used a modest VPS with 4GB RAM and 2 CPUs, and it took about 15 minutes to complete.
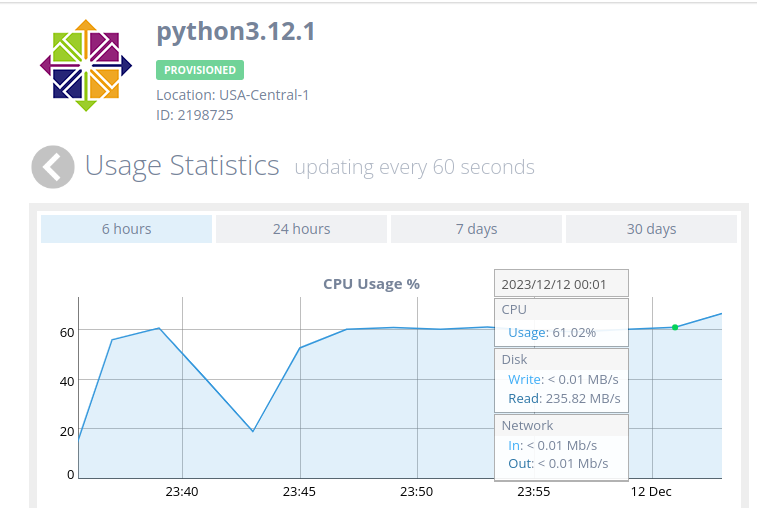
You can use the latest version of Python by prefixing the commands with python3.12
python3.12 --version
Python 3.12.1Or you can create an alias for Python3.12.1 and Pip.x
You will see output like this:
alias python="/usr/local/bin/python3.12"
alias pip="/usr/local/bin/pip3.12"
Use the which command to make sure the symbolic links have been updated.
which pip
alias pip='/usr/local/bin/pip3.12'
/usr/local/bin/pip3.12

which python
alias python='/usr/local/bin/python3.12'
/usr/local/bin/python3.12You must exit the shell and log back in to make the change.
Install Python36 from the Red Hat Software Collection Repo
To install Python from Red Hat Software Collections on a Red Hat Enterprise Linux (RHEL) system, follow these steps:
Step1 – Enable RHEL Software Repo
Enable the Red Hat Software Collections repository by running the following command:
sudo subscription-manager repos --enable rhel-server-rhscl-6-rpmsNote that the repository name may differ depending on the version of RHEL you are using.
Step 2 – Instal RHEL Software Utility
Install the Software Collections Utility package by running the following command:
sudo yum install scl-utilsStep 3 – Install Python 36
Install Python 3 by running the following command:
sudo yum install rh-python36This command will install Python 3.6 from the Red Hat Software Collections repository.
Step 4 – Enable Python36 on the shell
To use Python 3.6, you will need to enable the Software Collection by running the following command:
scl enable rh-python36 bashThis command will start a new Bash shell with the Software Collection enabled.
Alternatively, you can also use the following command to run Python 3.6 directly:
scl enable rh-python36 'python3.6' This will launch the Python 3.6 interpreter.
That’s it! You should now have Python 3.6 installed from the Red Hat Software Collections repository on your RHEL system.
Thanks for taking the time to read this article. if you have any questions or feedback, please write in the comment section below.
Leave a Reply