
TL;DR
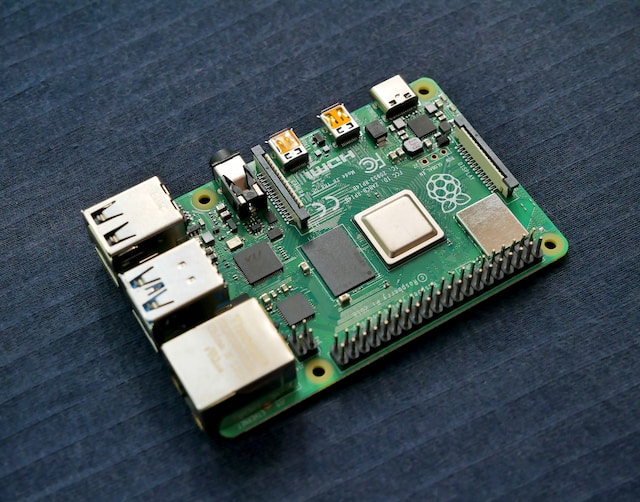
- Raspberry Pi 3, 4, 5 and Zero 2 W all have Wi-Fi built in — no extra hardware needed.
- Easiest setup: use the Raspberry Pi Imager and pre-configure SSID + password during image flash.
- Headless first boot: use Raspberry Pi Imager customisation; current Bookworm images use NetworkManager by default.
- Already running:
sudo raspi-config→ Network Options → Wi-Fi.
What is enabling Wi-Fi on a Raspberry Pi?
Raspberry Pi 3 onwards (and the Zero 2 W) include onboard Wi-Fi — no USB dongle required. The default Raspberry Pi OS image supports it out of the box; the only configuration step is providing the SSID and password.
There are three common configuration paths, depending on whether the Pi is already running, headless from first boot, or being freshly flashed. Modern Raspberry Pi Imager makes the first-flash path trivial — for existing installs, raspi-config remains the clearest interactive option.
Prerequisites
- Raspberry Pi 3, 4, 5, or Zero 2 W (older models need a USB Wi-Fi dongle).
- Wi-Fi network SSID and password.
- MicroSD card with Raspberry Pi OS (current Bookworm-based images recommended).
Source check – May 10, 2026
- Checked against the official Raspberry Pi wireless/headless setup documentation and Raspberry Pi Imager guidance.
- Current Raspberry Pi OS Bookworm uses NetworkManager by default, so legacy
wpa_supplicant.confadvice is marked as a legacy path rather than the first recommendation. - Search Console target query:
raspberry pi wifi, with extra coverage for headless setup and country-code failures.
How to use this guide
The sections below walk through the practical commands and options. After the main content you’ll find a Verification block (sanity-check it actually worked), a Troubleshooting block (common error messages and what to do), and Related reading for follow-on topics.
On current Raspberry Pi OS, built-in Wi-Fi is available but still needs network credentials and a country/locale setting before it can associate.
The fastest fix is usually Raspberry Pi Imager for a fresh card, or sudo raspi-config on a running Pi. Use direct config-file edits only when you know whether the install is using NetworkManager or legacy wpa_supplicant.
As usual with Linux servers, there is more than one way to do it. I prefer the path with the least resistance upon downloading and installing Raspberry Pi OS Lite (the non-desktop edition).
To enable WiFi on a Raspberry Pi, use raspi-config to configure the SSID and password, or edit /etc/wpa_supplicant/wpa_supplicant.conf directly. Example: run sudo raspi-config → System Options → Wireless LAN.
# Method 1: via raspi-config
sudo raspi-config
# Navigate: 1 System Options > S1 Wireless LAN

# Method 2: edit wpa_supplicant.conf directly
sudo nano /etc/wpa_supplicant/wpa_supplicant.conf
# Add:
# network={
#   ssid="YourSSID"
#   psk="YourPassword"
# }
sudo wpa_cli -i wlan0 reconfigureStep 1: Accessing raspi-config
- Launch your Raspberry Pi’s terminal.
- Type the following command and press Enter:
sudo raspi-configStep 2: Navigate to System Options
- Use the arrow keys to navigate to “System Options” and press Enter.
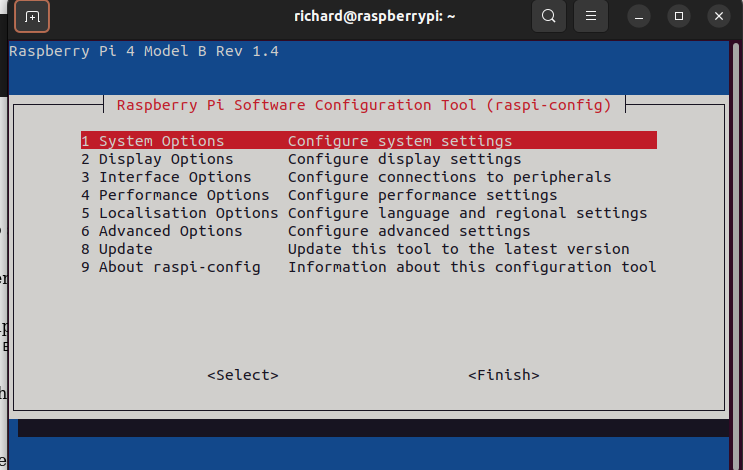
Inside raspi-config, navigate using the arrow keys to select “System Options” and press Enter.
Step 3: Select Wi-Fi
- Choose “S1 Wireless LAN” and press Enter.
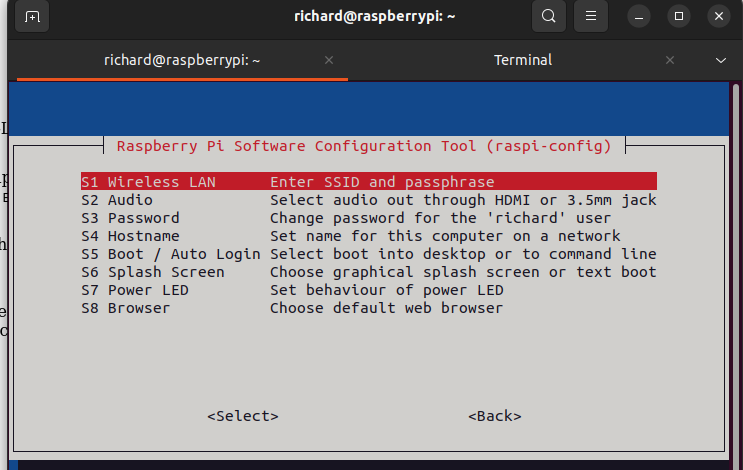
In the “System Options” menu, select “S1 Wireless-LAN” and press. Enter.
Step 4: Enter SSID and Password
You’ll be prompted to enter your Wi-Fi network’s SSID (name) and password.
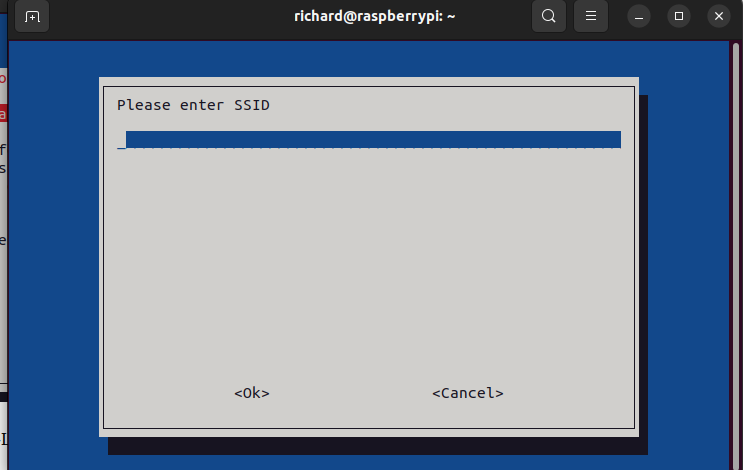
Input these details accurately and press Enter.
Step 5: Confirm & Reboot
Once you’ve entered the details, raspi-config will confirm the settings. Select “Yes” and press Enter to confirm.
Step 6: Reboot Raspberry Pi
After confirming the settings, raspi-config will prompt you to reboot to apply the changes. Select “Finish” and press Enter to exit the configuration tool. Then, reboot your Raspberry Pi by entering:
sudo rebootOnce your Raspberry Pi restarts, it should automatically connect to the configured Wi-Fi network.
Using raspi-config offers a more user-friendly interface for configuring Wi-Fi and other system settings, making it convenient for users who prefer a graphical interface over manual file editing.
Troubleshooting
Step 1: Check Wi-Fi Hardware
Ensure that your Raspberry Pi has a Wi-Fi adapter or built-in Wi-Fi capability. You can verify this by running the command:
iwconfig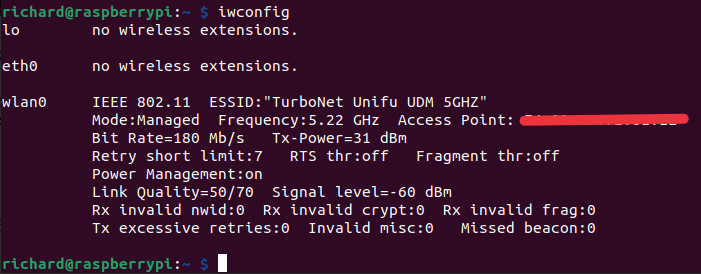
This will display information about the connected hardware, including any Wi-Fi adapters.
Step 2: Update Raspbian
Before configuring Wi-Fi, it’s essential to have the latest updates. Run the following commands to update the package lists and upgrade the installed packages:
sudo apt update
sudo apt upgradeStep 3: Access Network Configuration
The network configuration for Wi-Fi can be managed through the wpa_supplicant configuration file. Open the file with a text editor:
sudo nano /etc/wpa_supplicant/wpa_supplicant.confStep 4: Edit Configuration File
Inside the wpa_supplicant.conf file, add the following lines at the bottom:
network={
    ssid="YOUR_WIFI_SSID"
    psk="YOUR_WIFI_PASSWORD"
}Replace YOUR_WIFI_SSID with your Wi-Fi network’s name (SSID) and YOUR_WIFI_PASSWORD with your Wi-Fi password. Ensure the indentation and format match the example.
Step 5: Save and Exit
After entering the network details, save the changes and exit the text editor by pressing Ctrl + X, then Y to confirm changes, and Enter to overwrite the file.
Step 6: Reconfigure Wi-Fi
To apply the changes, either restart the Raspberry Pi or execute the following command to reconfigure the Wi-Fi without rebooting:
sudo wpa_cli -i wlan0 reconfigureReplace wlan0 with the appropriate interface name if different.
Step 7: Verify Connection
Check if the Wi-Fi connection is established by using the command:
ip aThis command will display network interfaces and their assigned IP addresses. Look for wlan0 (or your Wi-Fi interface) to confirm the connection.
Step 8: Test Connection
Verify internet connectivity by running:
ping google.comThis will send packets to Google’s servers to ensure your Raspberry Pi has internet access through Wi-Fi.
That’s it! Your Raspberry Pi running Raspbian Server should now be connected to Wi-Fi.
Want more Raspberry Pi Procedures – check out this page.
Frequently Asked Questions About Connecting Raspberry Pi to WiFi
Q: Which Raspberry Pi models have built-in WiFi?
A: The Raspberry Pi 3, Raspberry Pi 4, and Raspberry Pi Zero W models have on-board WiFi modules. Other models may require a suitable USB WiFi adapter.
Q: How do I connect to WiFi on Raspberry Pi OS Lite (headless mode)?
A: If you’re using Raspberry Pi OS Lite without the graphical user interface (GUI), you’ll need to configure your WiFi connection through the command line by editing the wpa_supplicant.conf file or using the raspi-config tool.
Q: What is the easiest way to enable WiFi on a Raspberry Pi with a desktop interface?
A: The simplest way is to use the Raspberry Pi Configuration Tool (raspi-config). It provides a user-friendly graphical interface to enter your WiFi network details and establish a connection.
Q: Can I set up my Raspberry Pi’s WiFi connection before booting it up for the first time?
A: Yes, you can use the Raspberry Pi Imager tool to pre-configure WiFi settings during the initial OS installation process. This is especially helpful for headless setups where you won’t have a monitor and keyboard connected.
Q: What if my Raspberry Pi doesn’t have built-in WiFi?
A: You can easily connect a USB WiFi adapter to your Raspberry Pi to add WiFi capability. Ensure the adapter is compatible with your Raspberry Pi model and operating system.
Q: How can I verify if my Raspberry Pi is connected to the WiFi network?
A: You can use the ifconfig command to check the status of your network interfaces. Look for the “wlan0” (or similar) interface and see if it has a valid IP address assigned. You can also try pinging a website like Google to confirm internet connectivity.
Q: What should I do if I’m having trouble connecting to WiFi?
A: Double-check that you’ve entered the correct WiFi network name (SSID) and password. Ensure that your WiFi adapter is functioning correctly. If you’re still having issues, try rebooting your Raspberry Pi or resetting the network configuration.
Q: Can I use the Raspberry Pi Imager to configure other network settings, such as static IP addresses?
A: The Raspberry Pi Imager primarily focuses on basic WiFi setup. For more advanced network configuration, including setting static IP addresses, you’ll typically need to modify configuration files directly or use the raspi-config tool.
Q: What is the difference between wired and wireless connections on Raspberry Pi?
A: Wired connections use an Ethernet cable to connect to a network router, offering a more stable and faster connection. Wireless connections utilize WiFi to connect, providing greater flexibility and mobility.
Q: Can I use a powered USB hub to connect a WiFi adapter?
A: Yes, you can use a powered USB hub to connect a WiFi adapter, especially if you have multiple USB devices connected to your Raspberry Pi. This ensures the adapter receives sufficient power for optimal performance.
Q: How do I connect to WiFi on Raspberry Pi OS Desktop?
A: On Raspberry Pi OS Desktop (formerly known as Raspbian), you can use the Network Manager icon in the top right corner of the screen to select from available wireless networks. Press Select WI FI and enter your WiFi credentials. This is the most straightforward method for those using the graphical user interface (GUI).
Q: What is the Raspberry Pi Imager, and how does it help with WiFi setup?
A: The Raspberry Pi Imager is a tool provided by the Raspberry Pi Foundation that simplifies the process of installing Raspberry Pi OS onto an SD card. When using the Imager, you have the option to pre-configure your WiFi settings, including SSID and password. This means your Raspberry Pi will automatically connect to your WiFi network upon its first boot, even without a monitor or keyboard connected.
Q: Can I use a wired internet connection for the initial setup and then switch to WiFi later?
A: Absolutely! If you prefer a more stable connection for the initial setup or troubleshooting, you can connect your Raspberry Pi directly to your router via an Ethernet cable. Once your Raspberry Pi is online, you can configure your WiFi settings and disconnect the Ethernet cable.
Q: What are predictable network interface names, and why are they important?
A: Predictable network interface names ensure that your WiFi interface is consistently named (e.g., “wlan0”) even if you have other network devices connected. This simplifies the configuration process, as you won’t need to guess the correct interface name when editing network configuration files or running commands.
Q: How do I find my router’s IP address?
A: You can typically find your router’s IP address in the following ways:
* Check the label on your router itself.
* Consult your router’s manual or documentation.
* Use the ipconfig command (on Windows) or ifconfig command (on macOS or Linux) in your terminal to find the “Default Gateway” IP address, which is usually your router’s IP.
* Access your home router’s management console through a web browser by entering the router’s IP address in the address bar.
Q: Can I use the Raspberry Pi Pico for WiFi projects?
A: The Raspberry Pi Pico does not have built-in WiFi capabilities. However, you can add WiFi functionality by using a compatible WiFi module, such as the Cyw43439 module, along with the appropriate software libraries.
Q: What are some common issues when configuring WiFi on Raspberry Pi?
A: Common issues include incorrect WiFi credentials, incompatible WiFi adapters, outdated operating systems, or incorrect network interface names. Double-check your settings, ensure your WiFi adapter is compatible with your Raspberry Pi model and operating system (e.g., Raspberry Pi OS Bookworm), and try rebooting your Raspberry Pi if you encounter problems.
Q: How do I enable SSH on my Raspberry Pi to access it remotely over WiFi?
A: You can enable SSH on Raspberry Pi OS Desktop using the Raspberry Pi Configuration Tool (raspi-config) or by editing the config.txt file on the boot partition. Once SSH is enabled, you can access your Raspberry Pi remotely using an SSH client from another device on the same network.
Thanks for taking the time to read this article. if you have any questions or feedback, please write in the comment section below.
Verification
Sanity-check the change actually worked:
iwconfig— shows wlan0 with an SSID and link quality.ping -c 4 1.1.1.1— confirms internet reachability.ip addr show wlan0— confirms an IPv4 (and IPv6) address is assigned.
Troubleshooting
Wi-Fi country not set — Pi requires a country code before it’ll associate. Set with raspi-config → Localisation → WLAN Country, or in /etc/wpa_supplicant/wpa_supplicant.conf add country=GB (or your code).
Connects but no internet — Default route missing. ip route — should show default via <router>. If not, restart networking: sudo systemctl restart NetworkManager.
5 GHz network not visible — Some boards limit channels by region. Confirm country is set; check iwlist wlan0 channel shows the 5 GHz channels for your region.
Authoritative sources
References: Raspberry Pi – headless wireless setup, Raspberry Pi Imager, and Raspberry Pi configuration documentation.
Leave a Reply