
How to use Windows Safe Mode
So, you’ve successfully booted your Windows PC into Safe Mode. That’s a great first step! Safe Mode starts Windows with only essential drivers and services, bypassing many potential software conflicts and driver issues that might be preventing your system from starting or running correctly. But getting here is only half the battle. Now, it’s time to figure out what to do in Safe Mode to actually fix problems.
This guide provides essential safe mode troubleshooting steps you can take to diagnose and resolve common Windows issues.
Why Use Safe Mode for Troubleshooting?
Safe Mode provides a stable, minimal environment. If your computer works fine in Safe Mode but crashes or performs poorly in normal mode, it strongly suggests a problem with software, drivers, or settings loaded during a normal startup – not a fundamental hardware issue.
Key Troubleshooting Steps in Safe Mode:
Okay, here is the troubleshooting procedure reformatted into numbered steps:
Step 1: Think About Recent Changes – What Happened Before the Problem Started?
Before you start trying lots of different fixes, take a moment to think about what changed on your computer right before the problem began. Often, a recent change is the direct cause of the issue, and knowing what it was can save you a lot of time and effort.
Here’s a checklist to help you remember:
- New Software: Did you install any new programs, apps, or games recently? Even small utility programs can sometimes cause conflicts.
- New Hardware: Did you plug in any new devices for the first time, like a printer, webcam, USB drive, keyboard, mouse, or even internal components like a graphics card or memory?
- Driver Updates: Did you update any drivers for your hardware? This sometimes happens automatically, or you might have done it manually (especially for graphics cards or printers).
- Windows Updates: Did your computer recently install updates for Windows itself? Sometimes these updates, while important for security, can accidentally cause new problems.
- System Settings: Did you make any changes to important Windows settings, perhaps following an online guide or trying to optimise performance?
- Cleaning or Tuning: Did you run any system cleaning tools or registry cleaners? While sometimes helpful, these can occasionally remove things they shouldn’t.
Try to connect the timing. Did the problem start immediately after one of these actions, or maybe a day or two later? If you can identify a likely candidate (e.g., “The weird graphics issues started right after I updated my video card driver”), you know exactly where to begin your troubleshooting (in this example, Step 3: Manage Device Drivers).
Step 2 – Remove Recent Software or Updates That Might Be Causing Trouble
Sometimes, a new program you installed or an automatic update from Windows doesn’t agree with your system and can cause errors, crashes, or prevent Windows from starting properly. If you suspect a recent installation or update is the culprit (based on Step 1), removing it is a good next step.
Here’s how to do it:
A. Uninstalling Recently Added Software:
- Get to the right place: Press the
Windows key(the one with the Windows logo) and theR keyon your keyboard at the same time. A small box called “Run” will appear. - Open Programs List: In the “Run” box, type
appwiz.cpland press theEnterkey or clickOK. This will open a window titled “Programs and Features” or “Add or remove programs,” which lists most of the software installed on your computer. - Find recent items: Look for a column header that says “Installed On” or similar. Click on this header to sort the list by date, usually putting the most recently installed programs at the top.
- Identify the suspect: Look for the program you installed just before the problems started.
- Uninstall: Click once on the name of the suspicious program to select it. Then, look for an “Uninstall” button (usually at the top of the list) and click it.
- Follow instructions: Your computer might ask for permission or guide you through a few steps to remove the software. Follow the on-screen prompts.
B. Uninstalling Recent Windows Updates:
- Go back to the Programs list: If you closed it, open the “Programs and Features” window again using the
Win + Randappwiz.cplmethod described above. - Find the Updates list: On the left-hand side of the “Programs and Features” window, look for a link that says “View installed updates” and click on it.
- Locate recent updates: This list shows specific updates Windows has installed. You can often sort this list by the “Installed On” date column to find the most recent ones easily. Look for updates installed around the time your problem began. (They often have names starting with “Update for Microsoft Windows (KB…)”).
- Select and Uninstall: Click on the update you suspect might be causing the issue. Then, click the “Uninstall” button that appears (usually at the top). You might need to confirm that you want to uninstall it.
- Note: You may not be able to uninstall all updates, particularly very important security ones.
C. Check if it Worked:
- Restart your PC: After you’ve uninstalled the software or update you think was causing the problem, restart your computer completely.
- Test: Once Windows loads up, use your computer as you normally would and see if the original problem is gone.
Step 3 – Check and Fix Device Drivers (The Software for Your Hardware)
Drivers are the software that runs your the computer hardware (like your graphics card, Wi-Fi adapter, or printer), basically how the hardware talks to Windows. If a translator is faulty, outdated, or the wrong one, communication breaks down, leading to problems like crashes, weird screen glitches, sound issues, or no internet connection.
This step helps you manage these drivers.
Here’s how to check and fix potential driver problems:
- Open the Control Panel for Hardware:
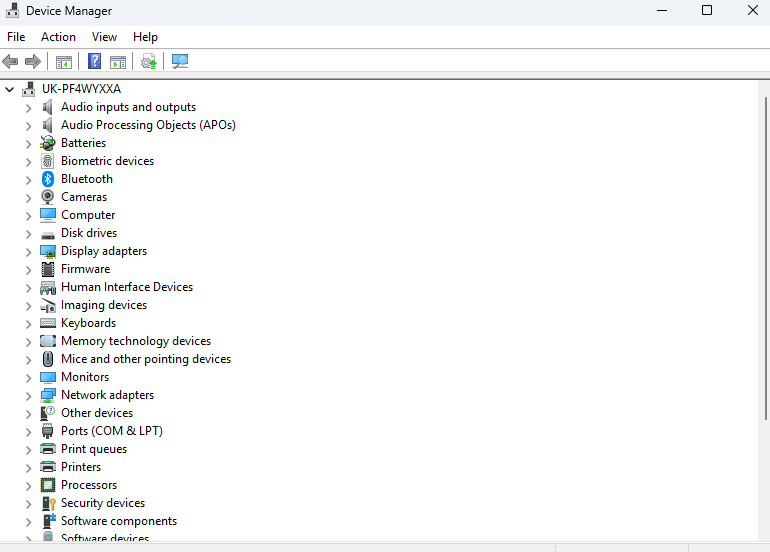
Press theWindows key+Rkey together. In the “Run” box that appears, typedevmgmt.mscand pressEnteror clickOK. This opens the “Device Manager,” which lists all the hardware components your computer knows about. - Look for Obvious Problems:
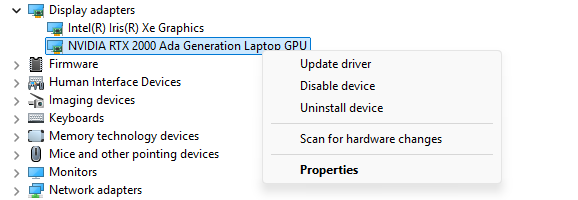
Scan the list for any devices that have a little yellow triangle with an exclamation mark (!) next to them. This is a clear sign that Windows is having trouble with that specific piece of hardware, often due to a driver issue. - Find the Relevant Hardware:
Even if there are no yellow marks, the problem might still be a driver. Think about what kind of issue you’re having:- Screen glitches, crashes during games, weird colours? Look under the “Display adapters” category. Click the little arrow next to it to expand it.
- No internet or Wi-Fi issues? Look under “Network adapters.”
- Sound problems? Look under “Sound, video and game controllers.”
- Expand the category related to your problem to see the specific device(s).
- Choose an Action (Right-Click the Device):
Once you’ve found the hardware device you suspect (e.g., your NVIDIA or AMD graphics card under Display adapters), right-click on its name. You’ll see several options. Here are the main ones to try:- Option 1: Roll Back Driver (Go back to the previous version)
- When to try this: If your problem started immediately after you (or Windows) updated the driver for this device.
- How: Right-click the device, choose “Properties.” Go to the “Driver” tab. If the “Roll Back Driver” button is clickable (not greyed out), click it and follow the prompts. If it’s greyed out, you can’t use this option.
- Option 2: Update Driver (Get the latest version)
- When to try this: If you think the driver might be old, or if rolling back wasn’t possible or didn’t help.
- How: Right-click the device, choose “Update driver.” You’ll usually get two choices:
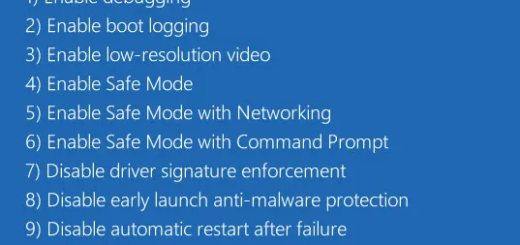
Search automatically for drivers: Windows will try to find a newer driver online. You’ll need an internet connection for this (if you’re in Safe Mode, you might need “Safe Mode with Networking”).Browse my computer for drivers: Use this if you have already downloaded the correct driver file from the manufacturer’s website (e.g., NVIDIA, AMD, Intel, Realtek).
- Option 3: Uninstall Device (Remove the driver completely)
- When to try this: This is often the best step for stubborn problems, especially with graphics cards, or if the other options didn’t work. It removes the potentially corrupt driver software.
- How: Right-click the device, choose “Uninstall device.” Very Important: If a pop-up window appears with a checkbox saying something like “Delete the driver software for this device” or “Attempt to remove the driver for this device,” make sure you check that box before clicking Uninstall. This helps ensure the faulty driver is fully removed.
- Option 1: Roll Back Driver (Go back to the previous version)
- Restart Your Computer:
After you Roll Back, Update, or (especially) Uninstall a driver, you must restart your computer for the changes to take full effect. - After Restarting:
- If you uninstalled a driver (especially a graphics driver), Windows will usually load a basic, generic driver when it starts back up. Your screen resolution might look different temporarily.
- You should then ideally go to the website of your hardware manufacturer (e.g., NVIDIA, AMD, Intel for graphics cards; Realtek or Intel for network/sound) and download the latest stable driver for your specific device and Windows version, then install it manually.
- If you were performing these steps in Safe Mode (particularly the “Uninstall Device” part), restart normally afterwards to see if the issue is resolved and to install the correct driver if needed.
Step 4: Run System File Checker (SFC) and DISM
Microsoft (R) Windows (R) Resource Checker Version 6.0
Copyright (C) Microsoft Corporation. All rights reserved.

Scans the integrity of all protected system files and replaces incorrect versions with
correct Microsoft versions.

SFC [/SCANNOW] [/VERIFYONLY] [/SCANFILE=<file>] [/VERIFYFILE=<file>]
    [/OFFWINDIR=<offline windows directory> /OFFBOOTDIR=<offline boot directory> [/OFFLOGFILE=<log file path>]]

/SCANNOW        Scans integrity of all protected system files and repairs files with
                problems when possible.
/VERIFYONLY     Scans integrity of all protected system files. No repair operation is
                performed.
/SCANFILE       Scans integrity of the referenced file, repairs file if problems are
                identified. Specify full path <file>
/VERIFYFILE     Verifies the integrity of the file with full path <file>.  No repair
                operation is performed.
/OFFBOOTDIR     For offline repair, specify the location of the offline boot directory
/OFFWINDIR      For offline repair, specify the location of the offline windows directory
/OFFLOGFILE     For offline repair, optionally enable logging by specifying a log file path

e.g.

        sfc /SCANNOW
        sfc /VERIFYFILE=c:\windows\system32\kernel32.dll
        sfc /SCANFILE=d:\windows\system32\kernel32.dll /OFFBOOTDIR=d:\ /OFFWINDIR=d:\windows
        sfc /SCANFILE=d:\windows\system32\kernel32.dll /OFFBOOTDIR=d:\ /OFFWINDIR=d:\windows /OFFLOGFILE=c:\log.txt
        sfc /VERIFYONLY

C:\Windows\System32>- Check and Repair Core Windows Files with SFC and DISM
- Think of Windows as being built from many important digital files. Sometimes, these core files can get damaged or corrupted (maybe due to a bad update, a software conflict, or disk issues), causing unexpected errors, crashes, or strange behaviour. Luckily, Windows has built-in tools called SFC (System File Checker) and DISM (Deployment Image Servicing and Management) that can scan for these broken files and often fix them automatically.
- Here’s how to use them:
- Open a Command Window with Superpowers:
- Right-click on the Start Menu button (the Windows logo, usually in the bottom-left corner).
- A menu will pop up. Look for an option like “Command Prompt (Admin)”, “Windows PowerShell (Admin)”, or “Terminal (Admin)”. The exact name might differ slightly, but the important part is that it says “(Admin)”. Click on that option.
- You might see a window asking “Do you want to allow this app to make changes to your device?”. Click “Yes”. This opens a black or blue window where you can type commands.
- Run the System File Checker (SFC) First:
- In the black/blue command window, carefully type the following command exactly as shown (including the space before the slash):
sfc /scannow - Press the
Enterkey on your keyboard. - The scan will begin. You’ll see a percentage counter showing its progress. Be patient! This scan can take anywhere from 5 to 15 minutes or sometimes longer. Don’t close the window while it’s running.
- Once it finishes, it will tell you the results:
- “Windows Resource Protection did not find any integrity violations.” – Good news, no corrupted files were found by this scan.
- “Windows Resource Protection found corrupt files and successfully repaired them.” – Great! It found and fixed problems.
- “Windows Resource Protection found corrupt files but was unable to fix some of them.” – This means SFC found issues but couldn’t repair everything. You should proceed to the next tool (DISM).
- In the black/blue command window, carefully type the following command exactly as shown (including the space before the slash):
- Run the DISM Tool (If SFC Failed or Problems Persist):
- Use this tool if SFC reported it couldn’t fix everything, or if you still have problems even after SFC said it fixed things. DISM is a more powerful tool that can sometimes repair the underlying Windows system image that SFC uses.
- In the same Admin command window (or open a new one if you closed it), carefully type the following command exactly as shown (including spaces):
DISM /Online /Cleanup-Image /RestoreHealth - Press the
Enterkey. - This scan will also start and show progress. Be extra patient with this one! DISM can often take significantly longer than SFC – sometimes 15-30 minutes or even more. Let it run completely.
- It should eventually report whether the operation was successful.
- Finish Up:
- Once both scans (or just SFC if it found no errors or fixed everything) are complete, you can close the black/blue command window.
- Restart your computer. This is important to make sure any repairs that were made are fully applied. Check if your original problem is resolved.
Deployment Image Servicing and Management tool
Version: 10.0.26100.1150


DISM.exe [dism_options] {Imaging_command} [<Imaging_arguments>]
DISM.exe {/Image:<path_to_offline_image> | /Online} [dism_options]
         {servicing_command} [<servicing_arguments>]

DESCRIPTION:

  DISM enumerates, installs, uninstalls, configures, and updates features
  and packages in Windows images. The commands that are available depend
  on the image being serviced and whether the image is offline or running.
Step 5: Run a Virus Scan in Safe Mode
Persistent malware can disrupt normal Windows operation and might be harder to remove outside of Safe Mode. Safe Mode limits malware’s ability Sometimes, malicious software (like viruses, spyware, or other malware) is sneaky. It can hide when Windows is running normally, making it hard for your regular antivirus to catch it. Safe Mode starts Windows with only the bare essentials, which often prevents tricky malware from loading or hiding effectively. This gives your security tools a much better chance to find and remove any infections.
Important: You need to be running your computer in Safe Mode for this step to be most effective. If you haven’t booted into Safe Mode yet, you’ll need to do that first.
Here’s how to run a scan once you are in Safe Mode:
After cleaning, restart your computer normally and see if the problems are gone. It’s often a good idea to run another quick scan with your regular antivirus in normal mode just to double-check.
Option 1: Try Your Installed Antivirus Software First
This is often the simplest method if your antivirus works in Safe Mode.
Find your Antivirus: Look for its icon on your desktop or in the Start Menu (it might be from brands like Norton, McAfee, AVG, Avast, Bitdefender, etc., or the built-in Microsoft Defender).
- Open it: Double-click the icon to launch the program.
- Look for Scan Options: Inside the program, find the scanning section. Look for options like “Full Scan,” “System Scan,” “Deep Scan,” or similar – you want the most thorough scan available.
- Start the Scan: Click the button to begin the scan. It might take a long time, so be patient.
Option 2: Use Microsoft Defender Offline Scan (A Built-in Deep Scan)
This is a very powerful scan that runs before Windows fully loads, making it great at catching deeply embedded malware. Try this if your main antivirus doesn’t run properly in Safe Mode, or as a strong second opinion.
- Open Windows Security: While in Safe Mode (preferably “Safe Mode with Networking” if possible, as it might need a definition update), try searching for “Windows Security” in the Start Menu or look for a shield icon in the taskbar notification area.
- Go to Virus Protection: Click on “Virus & threat protection.”
- Find Scan Options: Look for a link that says “Scan options.”
- Select Offline Scan: Choose the option named “Microsoft Defender Offline scan” (or similar wording).
- Start the Process: Click “Scan now.” You’ll likely be warned that your PC will restart. Click “Scan”.
What Happens Next: Your computer will restart, and before Windows loads, it will run the scan (you’ll likely see a blue or black screen with scan progress). This can take 15 minutes or more. Once finished, the PC will restart again automatically, booting you back into Windows (or Safe Mode, depending on how you started). Check the Windows Security notifications for the scan results.
Follow the program’s recommendations to deal with the threats – common actions are “Quarantine,” “Remove,” or “Clean.” Quarantine is often safest initially, as it isolates the threat without deleting it immediately, just in case it was a false positive.
Step 6: Use System Restore
Think of System Restore as a safety net or a limited time machine for your Windows system files and settings. If your computer started having problems recently (maybe after you installed something, or after an update), and the previous troubleshooting steps didn’t fix it, System Restore might help. It allows you to return important system files, settings (like the Windows Registry), and drivers back to the way they were on an earlier date, without affecting your personal files like documents, photos, music, or emails.
Important: System Restore only works if restore points (snapshots of your system) were created before your problem began. Windows often creates these automatically, but not always.
Here’s how to use System Restore:
- Launch the System Restore Tool:
- Press the
Windows key+Rkey together on your keyboard. - In the “Run” box that appears, type
rstrui.exeand pressEnteror clickOK. - This should open the System Restore wizard window.
- Press the
- Follow the Wizard Steps:
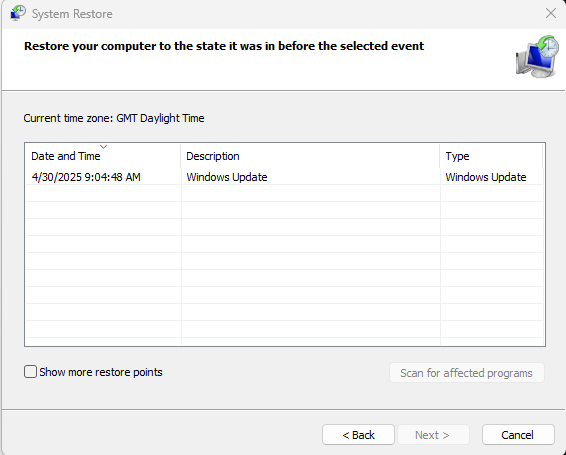
- The first screen might offer a “Recommended restore” point or give you the option to “Choose a different restore point.” It’s usually best to select “Choose a different restore point” so you can see all available options, then click
Next. - Crucial Step: Select the Right Date! You’ll see a list of restore points with dates and descriptions (like “Windows Update” or “Installed [Program Name]”). Look carefully at the dates and choose a restore point that was created before your computer started having problems. If you don’t see many points, look for a checkbox that says “Show more restore points” and tick it.
- Optional Check (Recommended): Once you’ve highlighted a potential restore point, click the button that says “Scan for affected programs.” This useful tool will scan and tell you which programs or drivers that were installed after that restore point date will be removed by the restore. It also shows programs that might be restored but could potentially need reinstalling. Note: This does NOT scan for viruses. Click
Closeafter reviewing. - After selecting the desired restore point (dated before the trouble started), click
Next.
- The first screen might offer a “Recommended restore” point or give you the option to “Choose a different restore point.” It’s usually best to select “Choose a different restore point” so you can see all available options, then click
- Confirm and Start the Process:
- You’ll see a final confirmation screen showing the restore point you chose and the drive(s) it will affect (usually just your C: drive).
- Important Warning: Once you click
Finish, the process will start, your computer will restart, and you cannot interrupt it until it’s complete. Make sure any work is saved, although System Restore shouldn’t touch your personal files. - Click
Finish. You might get one last warning asking if you’re sure you want to continue; clickYes.
- Wait for the Magic (and a Restart):
- Your computer will now automatically restart.
- During the restart process (before Windows fully loads), you might see a screen saying “Please wait while your Windows files and settings are being restored. System Restore is initializing…” 1 or similar. 1. castiglioni-market.com castiglioni-market.com
- Be patient! This process can take some time, often anywhere from 15 minutes to 45 minutes, sometimes longer. Just let it run.
- Check the Results:
- Once finished, your computer will boot back into Windows (either Normal Mode or Safe Mode, depending on where you started the restore from).
- You should see a small pop-up message telling you whether the System Restore was successful or if it failed for some reason.
- Now, use your computer and check if the original problem you were trying to fix is gone.
- What If It Didn’t Work or Made Things Worse?
- If System Restore didn’t fix the issue, or if it unexpectedly caused a new problem, you can usually undo it. Just run
rstrui.exeagain, and you should see an option like “Undo System Restore.” - Remember, this step can be performed either from within normal Windows or from Safe Mode, which can be helpful if Windows isn’t starting correctly.
- If System Restore didn’t fix the issue, or if it unexpectedly caused a new problem, you can usually undo it. Just run
After Troubleshooting
Once you’ve tried one or more of these steps, the crucial final action is to restart your computer normally. Don’t stay in Safe Mode longer than necessary. Boot back into Windows and see if the problem is resolved. If one step fixes it, great! If not, you may need to return to Safe Mode and try another approach.
If none of these safe mode troubleshooting steps resolve your issue, you might need to consider more advanced options like a Windows Reset/Refresh (keeping or removing files) or, as a last resort, a clean installation of Windows.

Recent Comments