

Need to Speed Up Windows 10? The performance of your Windows 10 computer is vital for efficiency and productivity. Sluggish systems can be a source of significant frustration and loss of valuable time. By taking proactive steps, you can substantially improve your computer’s performance.

Below is a comprehensive beginner guide to speeding up your Windows 10 system, including:
- Disk defragmentation.
- Using the built-in utility
cleanmgr. - Safely clean the system registry
- How to Perform a Clean Installation.
Top Ways to Speed Up Windows 10
- Disable startup programs — Task Manager → Startup → disable non-essential apps
- Run Disk Cleanup — removes temporary files and system junk
- Defragment the drive — for HDDs: Defragment and Optimize Drives tool
- Adjust visual effects — System Properties → Advanced → Performance Settings → Adjust for best performance
- Increase virtual memory — System → Advanced → Performance → Virtual Memory
- Update drivers — especially GPU and chipset drivers via Device Manager
- Upgrade to SSD — the single biggest performance improvement for most systems
Step 1 – Use Disk Defragmentation to Speed Up Windows 10
Disk defragmentation is a crucial maintenance task that reorganizes fragmented files on your hard drive, enhancing its efficiency. When you install applications or use files on the computer, the data is written ‘as-is’ to the disk. Over time, the files can fragment, basically scattering themselves over the disk. The more scattered the files, the longer it takes to read and write data.
Will Disk Defragmentation Work For Me?
Disk Defragmentation is common on traditional magnetic disks (the traditional HDD), and occasionally you get it on SSDs. Defragmentation is unlikely to have any impact on NVMe disks.
If you are unsure what disk you have on your computer. Do the following:
- Press the start button and type devmgmt.msc
- Press enter; this will open the device management.
- Find the section that says Hard Disks and expand the tab to see what type of disk you have.
- If you right-click on a disk and select properties, it will give you detailed information about your disk.

How to use Windows Disk Defragmentation to Speed Up Windows 10
As a result, when files are fragmented, your hard drive must exert more effort to locate and access them, ultimately slowing down your system.
- To access the Disk Defrag tool, Go to the Start menu and search for “Defragment.” Click on “Defragment and Optimize Drives” from the search results.
- Selecting Drive: Choose the drive you want to defragment, typically the C: drive.
- Analyze and Optimize: First, click the “Analyze” button to determine whether your drive needs defragmentation. Next, click ‘Optimize’ to initiate the process.
The time it takes to complete will depend on the size and speed of your hard disk.

Note: If your computer has a Solid State Drive (SSD), skip disk defragmentation, as it is not beneficial for SSDs.
Step 2 – Using Defraggler for Advanced Disk Defragmentation Speed Up Windows 10
While Windows does provide a built-in disk defragmentation tool, you might consider exploring third-party options for added features and greater control, ensuring a more comprehensive optimization.
Defraggler, developed by Piriform, the same company behind CCleaner, is a robust third-party option that provides advanced functionalities.
- Installation: Visit Piriform’s official website to download and install Defraggler.
- User Interface: Upon launching the application, you’ll see a list of all drives. Select the one you wish to optimize.
- Analyze: Click the “Analyze” button to get an overview of the drive’s fragmentation status.
- Defragment Options: Defraggler offers multiple ways to defragment your drive, including quick defragment, defrag-free space, and the standard full defragment.
- Start Defragmentation: Once you’ve chosen your defrag type, click the “Run” button to start the process.
Note: Defraggler also allows you to schedule defragmentation, targeting specific files and folders for a more personalized optimization.
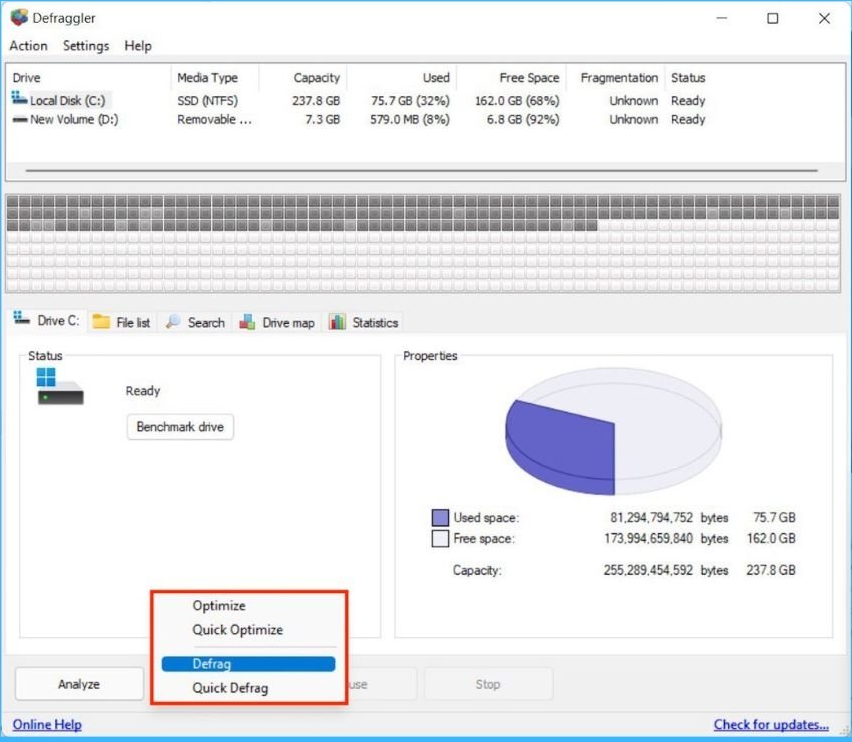
Integrating Defraggler into your disk maintenance routine offers a range of enhanced features. From scheduled defragmentation to file-specific optimization, these capabilities significantly contribute to further enhancing your computer’s overall performance
Step 3 – Using cleanmgr to Clean Temporary Files and Speed Up Windows 10
cleanmgr or Disk Cleanup is an in-built utility that helps you remove temporary files, system files, and other unnecessary data that accumulate over time.
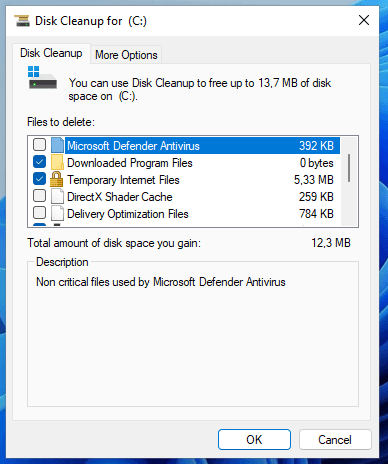
- Initiating Disk Cleanup: Press
Win + R, typecleanmgr, and press Enter. - Choosing Files: A list will appear, showing you the types of files that can be removed. Select those you wish to delete.
- Final Step: Click “OK,” then “Delete Files” to complete the cleanup.
Step 4 – Cleaning the Registry
Over time, your system registry accumulates outdated and unnecessary entries, which can cause system slowdowns. It’s advisable to use specialized software for this task.
- Backup: After clicking ‘OK,’ proceed to ‘Delete Files’ to finalize the cleanup.
- Download Registry Cleaner: Use a trusted, high-rated registry cleaner like CCleaner or Wise Registry Cleaner.
- Scan and Clean: Follow the cleaner’s instructions to scan for issues and fix them.
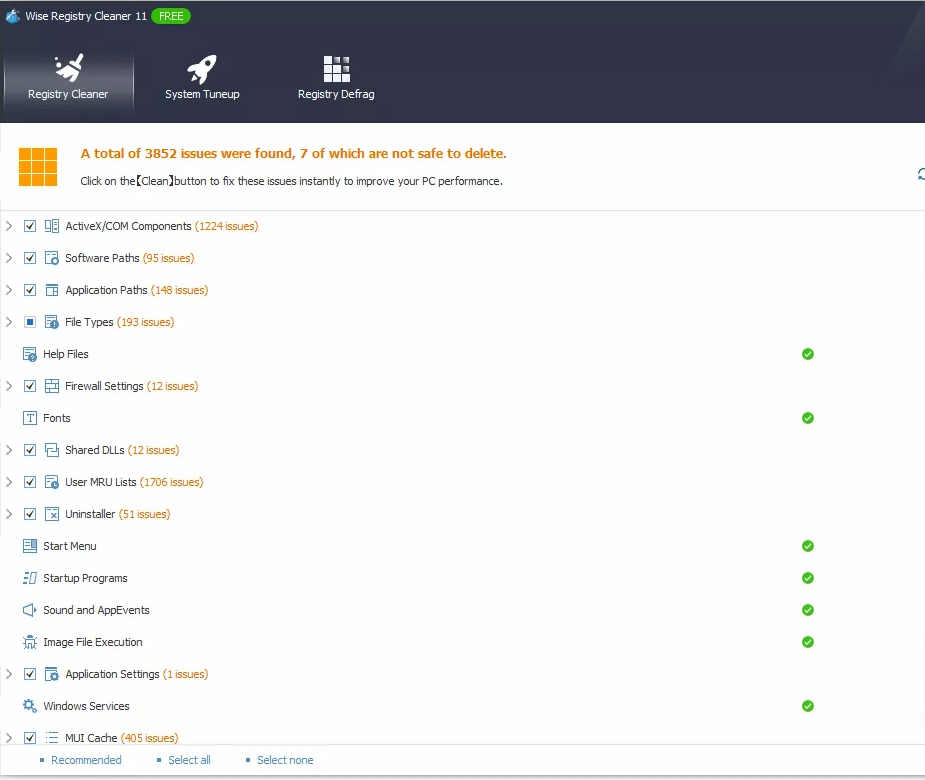
Warning: Incorrectly editing the registry can cause severe system problems. Use this option cautiously, and always make sure to back up your registry first.
Other Options?
Clean Installation of Windows 10
If your system remains sluggish despite attempting the methods mentioned above, a clean installation might be the most effective solution. This process wipes out all your data and installs a fresh copy of Windows 10.
- Backup Data: Store all necessary files in an external storage device.
- Download Installation Media: Visit the official Microsoft website and download the Windows 10 installation media.
- Installation: Boot your computer using the installation media and follow the on-screen prompts.
Caution: A clean installation is a drastic step and will erase all data on your system. Only proceed if you have backed up all crucial data.
Additional Tips
- Disable Startup Programs: At system startup, certain applications initiate automatically. Disabling unnecessary startup programs can speed up your boot time.
- Update Software: Regularly update Windows and other software to benefit from security patches and performance improvements.
- Upgrade Hardware: Consider adding more RAM or switching to an SSD for faster data access times.
- Banish Bloatware: Uninstall unnecessary pre-installed applications. These often consume resources in the background, slowing down your system.
- Streamline Startup: To accelerate boot times, disable unnecessary startup programs in the Task Manager and prioritize essential apps only.
- Power Up with Performance Mode: In Windows settings, switch your power plan to “High Performance” to maximize processing power, but be aware of increased energy consumption.
- Update, Update, Update: Ensure Windows, drivers, and software are up-to-date. Updates often include performance enhancements and bug fixes.
- Lighten the Load: To have a more streamlined experience, disable visual effects and animations. Go to “System Properties” -> “Advanced” -> “Performance” -> “Settings” and choose “Adjust for best performance.”
- Storage Sense to the Rescue: Enable Storage Sense in Windows settings to automatically clear temporary files and free up valuable disk space.
- Beware of Browser Extensions: Too many browser extensions can bog down your browsing experience. Disable or remove unused ones.
- Check for Malware: Regularly scan your system with a reputable antivirus and anti-malware program to ensure it’s free of malicious software that could impact performance.
- Consider Hardware Upgrades: If your PC is still lagging, consider upgrading your RAM or switching to a solid-state drive (SSD). These can significantly improve responsiveness and speed.
Incorporating these tips and procedures into your routine will lead to a substantial improvement in your computer’s performance and efficiency, helping to speed up Windows 10.
Leave a Reply