
Update: Tested and Validated May 2026
If you have a VPS server that is sat on the Internet, it’s vital to secure access to that server by using a secure username, password, and MFA.
TL;DR
- Install
libpam-google-authenticator, enrol each Linux user, then wire PAM into SSH. - Keep a second root or sudo session open while testing, so you can roll back a bad PAM or SSH change.
- Store emergency scratch codes somewhere safe before enforcing MFA on remote logins.
- Use key-based SSH plus MFA for stronger protection than password-only access.
Source check – May 10, 2026: The upstream Google Authenticator PAM module remains available as
google-authenticator-libpam. The important operational risk has not changed: test PAM andsshd_configin a live secondary session before closing your existing SSH connection.
| Topic | When | Command |
|---|---|---|
| Install PAM module | Fresh Debian or Ubuntu host | sudo apt install -y libpam-google-authenticator |
| Enrol a user | Run as the user who logs in | google-authenticator |
| Validate SSH config | Before restarting SSH | sudo sshd -t |
Start here: If this is a remote VPS, open a second SSH session before editing PAM or SSH; then follow Step 1 and do not close either session until a new MFA login works.

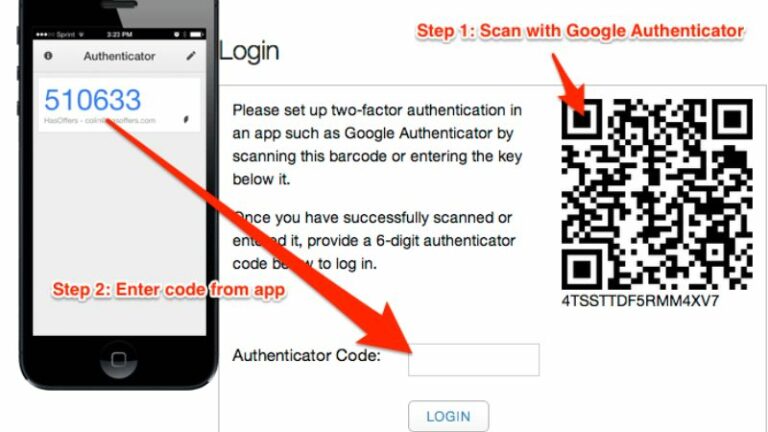
Did you know you can configure the Google Authentication app to work with your Linux Server?
Securing your VPS with Google Authenticator adds an extra layer of protection. It’s a two-factor authentication (2FA) method, requiring both your password and a time-sensitive code from your phone.
This approach significantly enhances security, making it harder for unauthorized users to access your server.
In this example, I will be installing Google Authenticator on Debian, but it’s available on: Ubuntu, CentOS, and Fedora.
Procedure: Setting Up SSH Two-Factor Authentication (2FA) on Debian 11 Server

Step 1: Install and Configure Google Authenticator
- Log into your Debian server.
- Install Google Authenticator from the default Debian package repository:
sudo apt install -y libpam-google-authenticatorStep 2 – Run and Configure Google Authenticator
Simply type the following on the command prompt
google-authenticator

Do you want authentication tokens to be time-based (y/n) y
QR CODE
Your new secret key is: <YOUR UNIQUE KEY>
Enter code from app (-1 to skip): -1
Code confirmation skipped
Your emergency scratch codes are:
  1111111111
  2222222222
  3333333333
  4444444444
  5555555555

Do you want me to update your "/home/rbailey/.google_authenticator" file? (y/n) Y- Run
google-authenticatorcommand to create a new secret key in your home directory. - Follow the prompts to configure and scan the QR code with a TOTP app on your phone.
- Save the generated secret key and other provided information in a secure place.
- Update the Google Authenticator configuration by answering ‘y’ to the remaining questions.
Step 3: Configure SSH Daemon for 2FA
For Password Authentication with 2FA:
- Open SSH server configuration file:
sudo nano /etc/ssh/sshd_config- Ensure
UsePAMandChallengeResponseAuthenticationparameters are set to ‘yes’. - Optionally, allow root user access if needed:
PermitRootLogin yes
UsePAM yes
ChallengeResponseAuthentication yes- Edit the PAM rule file for SSH daemon:
sudo nano /etc/pam.d/sshd- Add the line:
auth required pam_google_authenticator.so- Restart SSH daemon:
sudo systemctl restart sshExample sshd_config log file
#	$OpenBSD: sshd_config,v 1.103 2018/04/09 20:41:22 tj Exp $

# This is the sshd server system-wide configuration file.  See
# sshd_config(5) for more information.

# This sshd was compiled with PATH=/usr/bin:/bin:/usr/sbin:/sbin

# The strategy used for options in the default sshd_config shipped with
# OpenSSH is to specify options with their default value where
# possible, but leave them commented.  Uncommented options override the
# default value.

#Port 22
#AddressFamily any
#ListenAddress 0.0.0.0
#ListenAddress ::

#HostKey /etc/ssh/ssh_host_rsa_key
#HostKey /etc/ssh/ssh_host_ecdsa_key
#HostKey /etc/ssh/ssh_host_ed25519_key

# Ciphers and keying
#RekeyLimit default none

# Logging
#SyslogFacility AUTH
#LogLevel INFO

# Authentication:

#LoginGraceTime 2m
PermitRootLogin yes
#StrictModes yes
#MaxAuthTries 6
#MaxSessions 10

#PubkeyAuthentication yes

# Expect .ssh/authorized_keys2 to be disregarded by default in future.
#AuthorizedKeysFile	.ssh/authorized_keys .ssh/authorized_keys2

#AuthorizedPrincipalsFile none

#AuthorizedKeysCommand none
#AuthorizedKeysCommandUser nobody

# For this to work you will also need host keys in /etc/ssh/ssh_known_hosts
#HostbasedAuthentication no
# Change to yes if you don't trust ~/.ssh/known_hosts for
# HostbasedAuthentication
#IgnoreUserKnownHosts no
# Don't read the user's ~/.rhosts and ~/.shosts files
#IgnoreRhosts yes

# To disable tunneled clear text passwords, change to no here!
PasswordAuthentication yes
#PermitEmptyPasswords no

# Change to yes to enable challenge-response passwords (beware issues with
# some PAM modules and threads)
ChallengeResponseAuthentication yes

# Kerberos options
#KerberosAuthentication no
#KerberosOrLocalPasswd yes
#KerberosTicketCleanup yes
#KerberosGetAFSToken no

# GSSAPI options
#GSSAPIAuthentication no
#GSSAPICleanupCredentials yes
#GSSAPIStrictAcceptorCheck yes
#GSSAPIKeyExchange no

# Set this to 'yes' to enable PAM authentication, account processing,
# and session processing. If this is enabled, PAM authentication will
# be allowed through the ChallengeResponseAuthentication and
# PasswordAuthentication.  Depending on your PAM configuration,
# PAM authentication via ChallengeResponseAuthentication may bypass
# the setting of "PermitRootLogin without-password".
# If you just want the PAM account and session checks to run without
# PAM authentication, then enable this but set PasswordAuthentication
# and ChallengeResponseAuthentication to 'no'.
UsePAM yes

#AllowAgentForwarding yes
#AllowTcpForwarding yes
#GatewayPorts no
X11Forwarding yes
#X11DisplayOffset 10
#X11UseLocalhost yes
#PermitTTY yes
PrintMotd no
#PrintLastLog yes
#TCPKeepAlive yes
#PermitUserEnvironment no
#Compression delayed
#ClientAliveInterval 0
#ClientAliveCountMax 3
#UseDNS no
#PidFile /var/run/sshd.pid
#MaxStartups 10:30:100
#PermitTunnel no
#ChrootDirectory none
#VersionAddendum none

# no default banner path
#Banner none

# Allow client to pass locale environment variables
AcceptEnv LANG LC_*

# override default of no subsystems
Subsystem	sftp	/usr/lib/openssh/sftp-server

# Example of overriding settings on a per-user basis
#Match User anoncvs
#	X11Forwarding no
#	AllowTcpForwarding no
#	PermitTTY no
#	ForceCommand cvs server
For Public Key Authentication with 2FA:
Open SSH server configuration file:
sudo nano /etc/ssh/sshd_configEnsure UsePAM and ChallengeResponseAuthentication parameters are set to ‘yes’.
Optionally, allow root user access if needed:
PermitRootLogin yes
UsePAM yes
ChallengeResponseAuthentication yes
Add AuthenticationMethods publickey,keyboard-interactive at the end of the file.
Edit the PAM rule file for SSH daemon:
sudo nano /etc/pam.d/sshdComment out the line:
@include common-authAdd the line:
auth required pam_google_authenticator.soRestart SSH daemon:
sudo systemctl restart sshExample PAM.d/sshd file
# PAM configuration for the Secure Shell service

# Standard Un*x authentication.
@include common-auth
# two-factor authentication via Google Authenticator
auth   required   pam_google_authenticator.so
# Disallow non-root logins when /etc/nologin exists.
account    required     pam_nologin.so

# Uncomment and edit /etc/security/access.conf if you need to set complex
# access limits that are hard to express in sshd_config.
# account  required     pam_access.so

# Standard Un*x authorization.
@include common-account

# SELinux needs to be the first session rule.  This ensures that any
# lingering context has been cleared.  Without this it is possible that a
# module could execute code in the wrong domain.
session [success=ok ignore=ignore module_unknown=ignore default=bad]        pam_selinux.so close

# Set the loginuid process attribute.
session    required     pam_loginuid.so

# Create a new session keyring.
session    optional     pam_keyinit.so force revoke

# Standard Un*x session setup and teardown.
@include common-session

# Print the message of the day upon successful login.
# This includes a dynamically generated part from /run/motd.dynamic
# and a static (admin-editable) part from /etc/motd.
session    optional     pam_motd.so  motd=/run/motd.dynamic
session    optional     pam_motd.so noupdate

# Print the status of the user's mailbox upon successful login.
session    optional     pam_mail.so standard noenv # [1]

# Set up user limits from /etc/security/limits.conf.
session    required     pam_limits.so

# Read environment variables from /etc/environment and
# /etc/security/pam_env.conf.
session    required     pam_env.so # [1]
# In Debian 4.0 (etch), locale-related environment variables were moved to
# /etc/default/locale, so read that as well.
session    required     pam_env.so user_readenv=1 envfile=/etc/default/locale

# SELinux needs to intervene at login time to ensure that the process starts
# in the proper default security context.  Only sessions which are intended
# to run in the user's context should be run after this.
session [success=ok ignore=ignore module_unknown=ignore default=bad]        pam_selinux.so open

# Standard Un*x password updating.
@include common-password
Disabling SSH Two-Factor Authentication
- Edit the PAM rule file for SSH daemon:
sudo nano /etc/pam.d/sshd. - Comment out the line:
auth required pam_google_authenticator.so. - If
AuthenticationMethodswas modified, remove thekeyboard-interactivemethod. - Save changes and restart SSH daemon:
sudo systemctl restart ssh.
Note: Ensure each user runs google-authenticator and scans the QR code for their 2FA setup.
Securing your VPS is a must, and Google Authenticator is a game-changer. Adding an extra layer of protection through two-factor authentication significantly boosts security. Check out our guide on setting up Google Authenticator on Debian – applicable to Ubuntu, CentOS, and Fedora too. Strengthen your server’s defense and keep your data safe! 🔐✨
Want to learn about RSA MFA Authentication from SecureID? Check out our other popular article here.
Thanks for taking the time to read this article. if you have any questions or feedback, please write in the comment section below.
Leave a Reply