
TL;DR
- Two halves to back up: the database (MySQL/MariaDB) and the file tree (
wp-content/+wp-config.php). mysqldumpthe DB,tar -czfthe files, copy both off-site, automate via cron.- Test restore on a staging site at least quarterly — backups you’ve never restored aren’t backups.
- Plugin alternatives (UpdraftPlus, BackWPup) automate this and add cloud destinations — useful for teams without shell access.
What is WordPress backup and restore?
A WordPress site lives in two places: the database (every post, page, comment, setting) and the file system (themes, plugins, uploaded media). A complete backup must capture both at a consistent point in time and store the result somewhere outside the host you’re backing up — otherwise a host failure takes the backup with it.
The script-driven approach (mysqldump + tar + rsync/cloud upload) gives you a fully controllable, automatable, plain-text backup. The plugin approach is faster to set up but adds dependencies and may not run if the site is already failing. For anything you’d be unhappy to lose, do both: scheduled script + scheduled plugin backup.
Prerequisites
- Shell access to the host (or shell access via a plugin like Adminer for the DB part only).
- Database credentials from
wp-config.php. - An off-site destination for backups: S3, Backblaze B2, another VPS, even an external drive on a home server.
How to use this guide
The sections below walk through the practical commands and options. After the main content you’ll find a Verification block (sanity-check it actually worked), a Troubleshooting block (common error messages and what to do), and Related reading for follow-on topics.
Are you a WordPress website owner? If so, you should know that backing up your website is essential in case of any unexpected problems or errors that might occur. Whether due to a plugin malfunction, a hacking attempt, or a server crash, a website backup can save you a lot of time, effort, and money.
In this blog post, we will guide you through the steps to backup and restore a WordPress website. From choosing a backup method to testing your website after the restore, we’ve got you covered. So, let’s get started!
The Different Ways to Backup WordPress
The best backup method for you will depend on your preferences, technical skills, and budget. Here are some common backup methods for WordPress:

- Manual Backup:
You can manually backup your WordPress website by copying the website files and database to your local computer or a cloud storage service. This method requires some technical skills and can be time-consuming, but it’s free and gives you full control over your backups. - Backup Plugins:
You can use backup plugins like UpdraftPlus, BackupBuddy, or Jetpack to backup your WordPress website automatically. Backup plugins are user-friendly and require little to no technical skills, but they usually come with a subscription fee or a one-time payment. - Web Host Backup:
Many web hosting companies offer backup services as part of their hosting plans. Web host backup is usually automatic and requires no additional setup, but it may not be as flexible or customizable as manual backup or backup plugins.
In general, we recommend using a backup plugin for your WordPress website because it’s easy, reliable and provides many features and options. However, if you prefer full control over your backups or don’t want to pay for a backup plugin, you can use manual or web host backup. Regardless of the backup method you choose, make sure to test your backups regularly and store them in a secure location.
Backup and Restore WordPress using the Updraft Plugin
UpdraftPlus is a popular WordPress plugin that allows you to easily backup and restore your website. Here are the steps to backup and restore a WordPress website using UpdraftPlus:
Step 1: Install and Activate UpdraftPlus
Go to the WordPress dashboard and navigate to the “Plugins” section. Click on “Add New” and search for “UpdraftPlus”. Install and activate the plugin.

Step 2: Backup WordPress Website
- Go to “Settings” in the WordPress dashboard
- click “UpdraftPlus Backups”.
- Click on the “Backup Now” button to start the backup process.
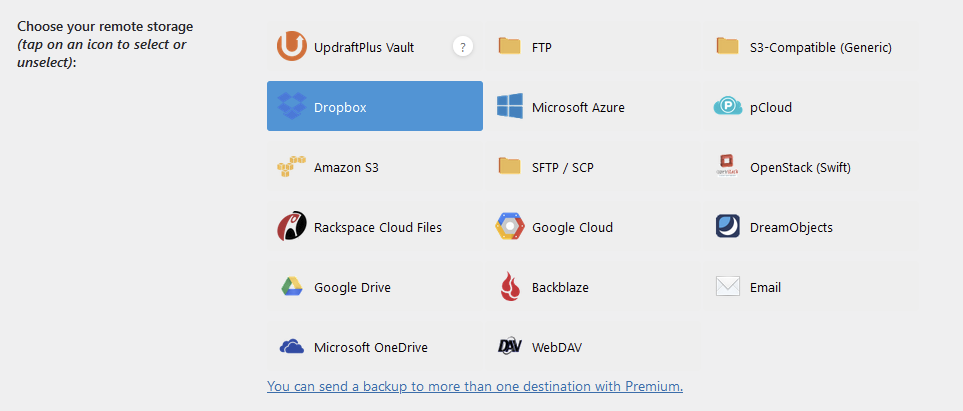
- You can choose which files and database tables to backup and where to store the backup files.

Did you know you can configure Updraft to automatically back up your site? Find the settings in the “Settings” tab.

The files can be saved locally on your server, or you can configure Updraft to offload the backup to S3, Dropbox, and many other providers.
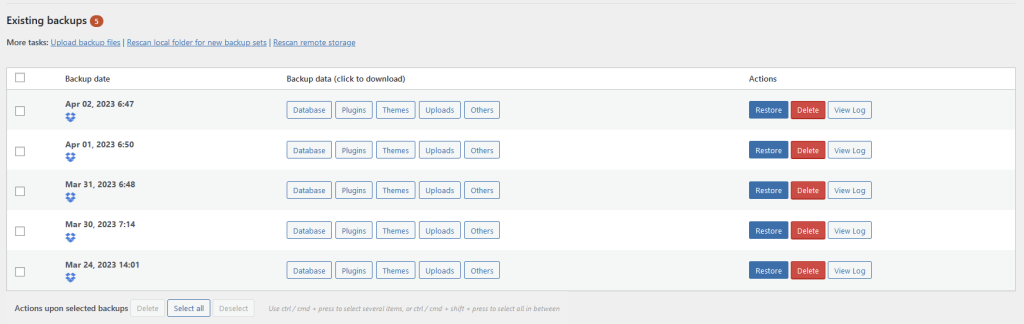
Step 3: Restore WordPress Backup
To restore a backup using UpdraftPlus, go to the “Existing Backups” tab in UpdraftPlus and select the backup file you want to restore. Click on the “Restore” button and follow the prompts. You can choose which files and database tables to restore and whether to overwrite existing ones.
Step 4: Test Your Website
After restoring your WordPress website, you should test it thoroughly to ensure everything works correctly. You can test your website from different devices, browsers, and locations.
Backup and Restore WordPress using the Command Line
Step 1: Choose a Backup Method
Ensure you have logged into your WordPress server’s command line.
Step 2: Backup WordPress Files
To backup your WordPress files using the command line, you can use the tar command. Here’s an example:
tar -czvf wp-backup.tar.gz /var/www/html/
This command will create a compressed backup file named wp-backup.tar.gz of the WordPress files located in the /var/www/html/ directory.
Step 3: Backup WordPress Database
You can use the command to back up your WordPress database using the command line. Here’s an example:
mysqldump -u username -p dbname > wp-db-backup.sql
Replace username with your MySQL username, dbname with your WordPress database name, and wp-db-backup.sql with the name you want to give to your database backup file.
Step 4: Restore WordPress Backup
To restore your WordPress backup using the command line, you can use the tar and mysql commands. Here’s an example:
tar -xzvf wp-backup.tar.gz -C /var/www/html/
This command will extract the backup file wp-backup.tar.gz to the /var/www/html/ directory.
mysql -u username -p dbname < wp-db-backup.sql
This command will import the database backup file wp-db-backup.sql to the database dbname using the MySQL username username.
Step 5: Test Your Website
After restoring your WordPress website from a backup, it’s important to test it thoroughly to ensure everything works correctly. Here are some steps you can take to test your website after a backup restore:
- Check the Homepage:
First, visit your website’s homepage to ensure it’s loading properly and all the elements (logo, menu, sliders, etc.) are in place. - Navigate the Site:
Next, navigate your website and test all the links, buttons, forms, and other interactive elements. Ensure they’re working as expected and not producing errors or broken links. - Check the Content:
Verify that all your website content (pages, posts, images, videos, etc.) is displaying correctly and that there are no missing or duplicate pages. - Test the Contact Forms:
If you have any contact forms on your website, complete them and submit them to ensure you receive the messages properly. - Test the E-commerce Functionality:
If your website has an e-commerce store, make sure to test the checkout process, payment gateway, and order confirmation to ensure that they’re working correctly. - Check for Errors:
Finally, check your website’s error logs (if available) to see if there are any errors or warnings that need to be addressed.
Note: Please replace the file and directory names, database names, and usernames with your own values.
Verification
Sanity-check the change actually worked:
mysqldump --version— confirms tooling.- After backup: copy the dump and tarball to a different host and confirm sizes match the source.
- Restore drill: spin up a staging WordPress, restore the latest backup, browse the site — confirm content and login work.
Troubleshooting
mysqldump fails with “Access denied” — Use the credentials from wp-config.php: mysqldump -u $DB_USER -p$DB_PASSWORD $DB_NAME > backup.sql.
Tarball missing files — Don’t run tar while WordPress is writing — use --exclude for cache directories, or briefly put the site in maintenance mode.
Restored DB but site shows blank pages — Usually URL mismatch. Run UPDATE wp_options SET option_value = 'https://newhost' WHERE option_name = 'siteurl'; (and home); also fix serialised data with wp search-replace.
Authoritative sources
References: WordPress.org — Backups, WP-CLI db commands.
Leave a Reply