
One of the first blogs I wrote for turbogeek.co.uk was about installing XRDP on Ubuntu 14.04. Fast-forward over six years, and a lot has changed in the world of XRDP. Not to mention, we are now nine Ubuntu revisions ahead. This demonstrates the rate of change in the IT industry.
So, today’s questions are:
- Is XRDP still used in 2026?
- Can you Install XRDP on Ubuntu 22.04?
Quick Answer
- Install XRDP:
sudo apt update && sudo apt install xrdp -y - Add the xrdp user to the ssl-cert group:
sudo adduser xrdp ssl-cert - Restart the XRDP service:
sudo systemctl restart xrdp - Open port 3389 in UFW:
sudo ufw allow 3389/tcp - Connect from Windows using Remote Desktop Connection with the server’s IP address
Source check — May 9, 2026
This refresh checked XRDP against the official xrdp project page, the Ubuntu 22.04 xrdp package page, and the Ubuntu Server firewall documentation. Ubuntu 22.04 ships xrdp from the Universe repository; firewall examples below use Ubuntu’s standard ufw syntax.
A Reminder of What is Xrdp?
Xrdp is an open-source remote desktop protocol for Linux that allows users to access their graphical desktops remotely. It’s cross-platform, compatible with RDP clients, supports various Linux desktop environments, and ensures secure encrypted communication. As a community-driven solution, it provides a user-friendly experience for managing Linux systems from different platforms.
Is XRDP Still Relevant in 2026?
Yes. XRDP is still maintained and remains useful when you need an RDP-compatible graphical login to a Linux desktop. The official xrdp project describes it as an open-source Remote Desktop Protocol server that accepts connections from clients such as Microsoft Remote Desktop, FreeRDP and rdesktop. For internet-facing systems, do not expose TCP 3389 broadly; restrict the firewall rule to a trusted IP range, VPN, or management network.
All I need now is a desktop version of Ubuntu 22.04. I just so happen to be writing this on a Ubuntu 22.04 laptop. Ta-da!
echo $XDG_CURRENT_DESKTOP
ubuntu:GNOME
cat /etc/lsb-release
DISTRIB_ID=Ubuntu
DISTRIB_RELEASE=22.04
DISTRIB_CODENAME=jammy
DISTRIB_DESCRIPTION="Ubuntu 22.04.3 LTSGuide to Installing Xrdp on Ubuntu 22.04
Here is an easy-to-follow guide for installing xRDP on Ubuntu. Remember to check out how to enable multi-user mode if you are connecting to a shared server.
Step 1 – Update Ubuntu
- Update Ubuntu Repository; you can optionally upgrade the OS if needed.
sudo apt-get update -y

sudo apt-get upgrade #optionalStep 2 – Install XRDP
- Use apt to install the xRDP packages
sudo apt install xrdp -y- You should see this output:
sudo apt install xrdp
[sudo] password for rbailey:
Reading package lists... Done
Building dependency tree... Done
Reading state information... Done
The following packages were automatically installed and are no longer required:
  libhawtjni-runtime-java libjansi-java libjansi-native-java libjline2-java
  python3-cliapp python3-markdown python3-pygments python3-ttystatus
  scala-library scala-parser-combinators scala-xml
Use 'sudo apt autoremove' to remove them.
The following additional packages will be installed:
  xorgxrdp
Suggested packages:
  guacamole
The following NEW packages will be installed
  xorgxrdp xrdp
0 to upgrade, 2 to newly install, 0 to remove and 15 not to upgrade.
Need to get 582 kB of archives.
After this operation, 3,380 kB of additional disk space will be used.
Do you want to continue? [Y/n] y
Get:1 http://gb.archive.ubuntu.com/ubuntu jammy/universe amd64 xrdp amd64 0.9.17-2ubuntu2 [517 kB]
Get:2 http://gb.archive.ubuntu.com/ubuntu jammy/universe amd64 xorgxrdp amd64 1:0.2.17-1build1 [65.3 kB]
Fetched 582 kB in 0s (2,756 kB/s)
Selecting previously unselected package xrdp.
(Reading database ... 243766 files and directories currently installed.)
Preparing to unpack .../xrdp_0.9.17-2ubuntu2_amd64.deb ...
Unpacking xrdp (0.9.17-2ubuntu2) ...
Selecting previously unselected package xorgxrdp.
Preparing to unpack .../xorgxrdp_1%3a0.2.17-1build1_amd64.deb ...
Unpacking xorgxrdp (1:0.2.17-1build1) ...
Setting up xrdp (0.9.17-2ubuntu2) ...

Generating 2048 bit rsa key...

ssl_gen_key_xrdp1 ok

saving to /etc/xrdp/rsakeys.ini

Created symlink /etc/systemd/system/multi-user.target.wants/xrdp-sesman.service
→ /lib/systemd/system/xrdp-sesman.service.
Created symlink /etc/systemd/system/multi-user.target.wants/xrdp.service → /lib/
systemd/system/xrdp.service.
Setting up xorgxrdp (1:0.2.17-1build1) ...
Processing triggers for man-db (2.10.2-1) ...#####..........................]
Processing triggers for libc-bin (2.35-0ubuntu3.6) ...- You can check that XRDP is running by typing:
sudo systemctl status xrdp- You should see output like this:
sudo systemctl status xrdp
● xrdp.service - xrdp daemon
     Loaded: loaded (/lib/systemd/system/xrdp.service; enabled; vendor preset: enabled)
     Active: active (running) since Tue 2024-01-23 21:32:50 GMT; 1min 19s ago
       Docs: man:xrdp(8)
             man:xrdp.ini(5)
    Process: 9815 ExecStartPre=/bin/sh /usr/share/xrdp/socksetup (code=exited, status=0/SUCCESS)
    Process: 9823 ExecStart=/usr/sbin/xrdp $XRDP_OPTIONS (code=exited, status=0/SUCCESS)
   Main PID: 9824 (xrdp)
      Tasks: 1 (limit: 37961)
     Memory: 956.0K
        CPU: 26ms
     CGroup: /system.slice/xrdp.service
             └─9824 /usr/sbin/xrdp

Jan 23 21:32:49 ichard-bailey systemd[1]: Starting xrdp daemon...
Jan 23 21:32:49 richard-bailey xrdp[9823]: [INFO ] address [0.0.0.0] port [3389] mode 1
Jan 23 21:32:49 richard-bailey xrdp[9823]: [INFO ] listening to port 3389 on 0.0.0.0
Jan 23 21:32:49 richard-bailey xrdp[9823]: [INFO ] xrdp_listen_pp done
Jan 23 21:32:49 richard-bailey systemd[1]: xrdp.service: Can't open PID file /run/xrdp/>
Jan 23 21:32:50 systemd[1]: Started xrdp daemon.
Jan 23 21:32:51 richard-bailey xrdp[9824]: [INFO ] starting xrdp with pid 9824
Jan 23 21:32:51 richard-bailey xrdp[9824]: [INFO ] address [0.0.0.0] port [3389] mode 1
Jan 23 21:32:51 rchard-bailey xrdp[9824]: [INFO ] listening to port 3389 on 0.0.0.0
Jan 23 21:32:51 richard-bailey xrdp[9824]: [INFO ] xrdp_listen_pp done
Step 3 – Configure SSL
This is a new feature from when I last tested this six years ago—more evidence of how times have changed quickly.
sudo adduser xrdp ssl-cert- Now restart the XRDP service.
sudo systemctl restart xrdp- Now Add a Firewall Rule to allow inbound and outbound traffic on port 3389
sudo ufw allow from 192.168.0.0/24 to any port 3389
sudo ufw allow 3389Note: My Windows PC, which I will use to test this, is on my local network, 192. x.x.x. If you are following along, you must change this value to what’s relevant.
Step 4 – Test the XRDP connection
I have now switched over to my Windows PC.
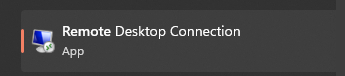
- The first step is to open Remote Desktop Connection (MSTSC)
For Windows:
- Search for “Remote Desktop Connection”: You can do this by typing “Remote Desktop Connection” in the Windows search bar.
- Open the Remote Desktop Connection application: Click on the application in the search results.
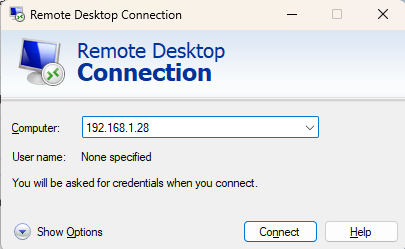
- Enter the Computer’s IP Address or Hostname: In the Remote Desktop Connection window, you’ll need to enter the IP address or hostname of the computer you want to connect to.
- Click “Connect”: Once you’ve entered the required information, click the “Connect” button.
- Enter Credentials: You’ll be prompted to enter the username and password for the computer you are connecting to. Ensure you have the correct credentials.
- Connect: After entering the credentials, click “OK” or “Connect” to establish the RDP connection.
For Mac:

- Download Microsoft Remote Desktop from the App Store: If you don’t have it already, you can download the Microsoft Remote Desktop application from the Mac App Store.
- Open Microsoft Remote Desktop: Once installed, open the application.
- Click on “New”: To create a new connection, click on the “+” icon or select “New” from the File menu.
- Enter Connection Details: Enter the PC name or IP address, and configure other settings as needed.
- Save the Connection: Click “Add” to save the connection.
- Connect: Select the newly created connection and click “Start” to initiate the RDP session.
Step 5 – Initiate an RDP connection
- Use the remote desktop connection tool to connect to your Ubuntu server.
- You can use the RDP or the FQDN if a home network is enabled.
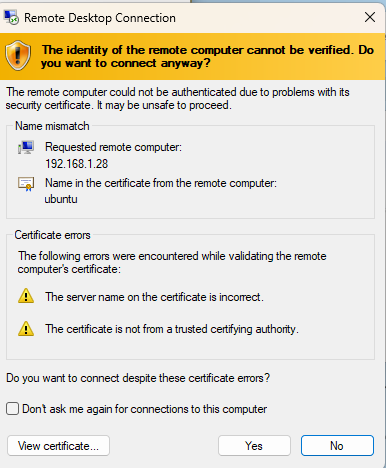
- When you get this warning, click YES.
- After a few seconds, you should connect to the Ubuntu machine.
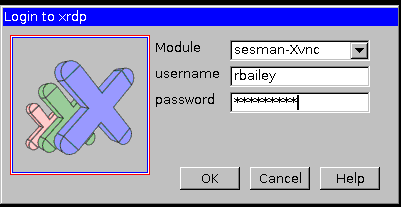
- This is the login prompt you will get:
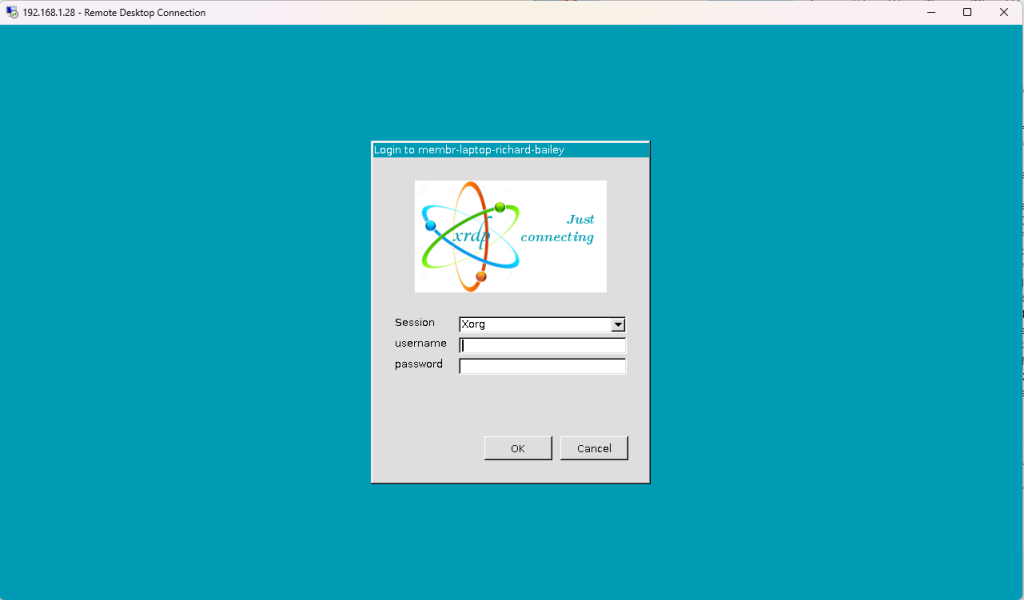
- Enter your Username and Password for the Ubuntu Machine
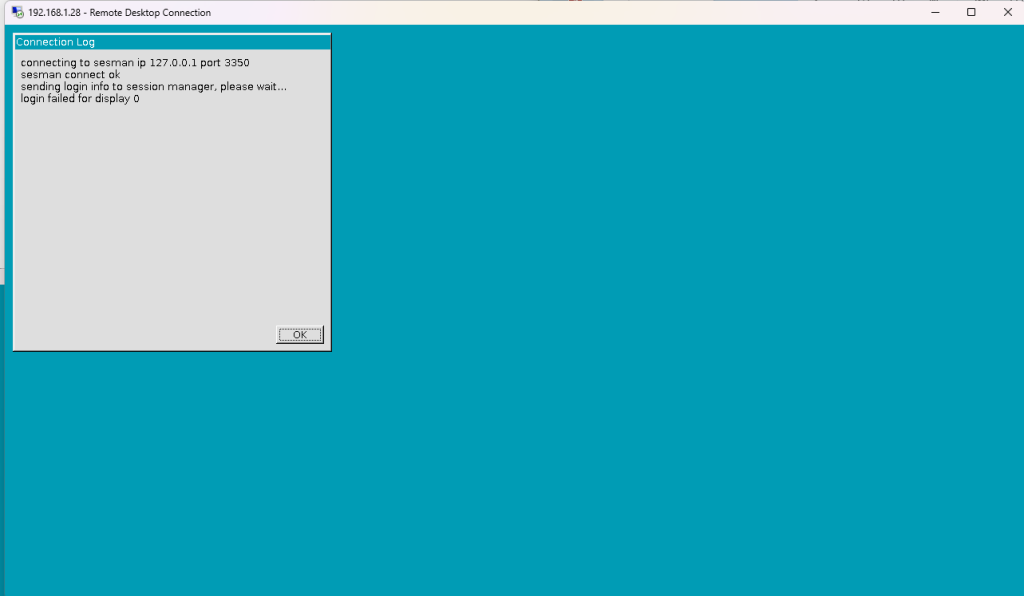
IMPORTANT: If you get this message (see below), you have mistyped your details or logged in to an active session (someone else is logged on) – Sometimes, you may get a BLACK screen. To fix you need to enable multi-user mode, again, see below:
Step 6 – Enable Multi-User Mode
- Install D-BUS
dbus-x11 is a software package that provides a D-Bus session bus for each X11 display, facilitating inter-process communication between applications running under the X11 window system.
sudo apt-get install dbus-x11- Modify the startwm.sh file
sudo nano /etc/xrdp/startwm.shAdd the following:
# Unset variables that conflict with the GNOME session
unset DBUS_SESSION_BUS_ADDRESS
unset XDG_RUNTIME_DIRFind the last two lines of the file, which should look like this
test -x /etc/X11/Xsession && exec /etc/X11/Xsession
exec /bin/sh /etc/X11/XsessionBefore:
#!/bin/sh
# xrdp X session start script (c) 2015, 2017, 2021 mirabilos
# published under The MirOS Licence
# Rely on /etc/pam.d/xrdp-sesman using pam_env to load both
# /etc/environment and /etc/default/locale to initialise the
# locale and the user environment properly.
if test -r /etc/profile; then
. /etc/profile
fi
exec /bin/sh /etc/X11/XsessionAfter:
# Comment out the original Xsession lines
# test -x /etc/X11/Xsession && exec /etc/X11/Xsession
# exec /bin/sh /etc/X11/Xsession
# Unset variables that conflict with the GNOME session
unset DBUS_SESSION_BUS_ADDRESS
unset XDG_RUNTIME_DIR
# Start GNOME
exec /usr/bin/gnome-session
Save the file and exit the editor.
Restart the xrdp service to apply the changes: sudo systemctl restart xrdp
XRDP Troubleshooting and Security Notes
- Black screen after login: install
dbus-x11, restartxrdp, and check/var/log/xrdp-sesman.logfor session startup errors. - Cannot connect: check
systemctl status xrdp, confirm TCP 3389 is listening, and verify yourufwrule. Prefersudo ufw allow from YOUR_TRUSTED_IP to any port 3389 proto tcpover opening the port to the whole internet. - Login loops or blank desktop: test with a fresh local user and confirm the selected desktop session is installed. GNOME, Xfce and other desktops can behave differently under XRDP.
- Production exposure: put XRDP behind a VPN, bastion host, or IP-restricted firewall rule. RDP-compatible services are high-value targets on public networks.
That is it; reconnect to your Ubuntu Server, and you will get a new desktop even if the server (or laptop) is already in use.
We welcome all feedback. Please comment below.
Thanks for taking the time to read this article. if you have any questions or feedback, please write in the comment section below.
Need a Linux VPS to try this on?
I host my own lab work on Atlantic.Net Cloud — straightforward Linux VPS pricing, hourly billing, and snapshots that make it easy to break things and roll back. Their dedicated and HIPAA-compliant hosting tiers are worth a look if you outgrow the cloud plans.
Disclosure: This is an affiliate/referral link. If you sign up I may earn credit at no extra cost to you. I work as a freelance writer for Atlantic.Net and use their services personally — I wouldn’t link them otherwise.
Leave a Reply