
Key Takeaways
- Backup First: Always take a VM snapshot or create a backup before making any disk-level changes.
- Add & Scan: Add a new virtual disk to your VM, then rescan your server’s SCSI bus to detect it (e.g., as
/dev/sdd). - Prep the Disk: Partition the new disk (
fdisk), set the partition type to8e(Linux LVM), and initialize it as a Physical Volume (pvcreate). - Extend the LVM: Use
vgextendto add your new Physical Volume to the Volume Group, then uselvextendto grow your Logical Volume. - Grow the Filesystem: The final step is to tell the XFS filesystem to use the new space with the
xfs_growfscommand.
This guide provides a clear and engaging walkthrough of extending an XFS logical volume in Red Hat, catering to both seasoned Linux administrators and those newer to the process.
Scenario:

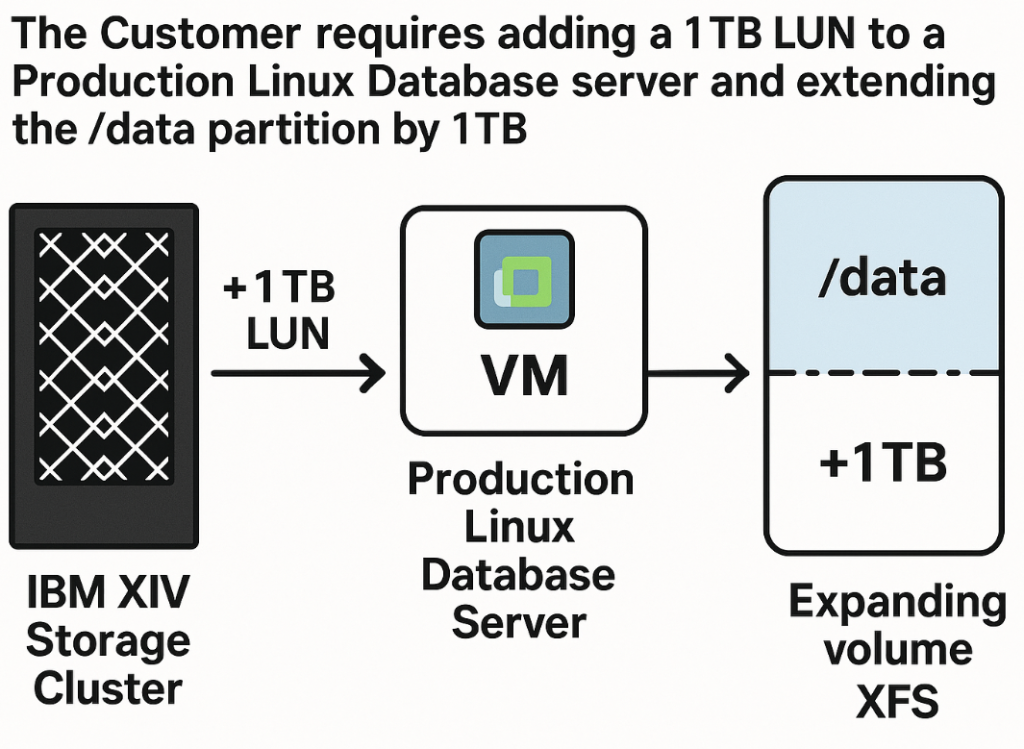
The Customer requires adding a 1TB LUN to a Production Linux Database server and extending the /data partition by 1TB. The LUN is located on an attached IBM XIV Storage Cluster. The server is a Virtual Machine running on VMware. The filesystem is XFS. Expand the volume, keeping all existing data intact.
Objective: Expand the /data partition by 1TB while ensuring data integrity.
What is the Safest Way to Prepare for LVM Changes?
The safest way is to create a complete backup or a virtual machine snapshot. Before you modify partition tables or volume groups, a snapshot acts as a crucial safety net. If any step fails, you can revert the VM to its exact pre-change state, protecting your data. This is a non-negotiable first step in a production environment and a core part of a robust disaster recovery plan.
How to extend a logical volume (LVM) on Red Hat Linux with XFS filesystem
This is a very common task performed by Linux system administrators, but to others, this may seem a daunting task. The process may seem difficult, but it’s not when you get your head around how Red Hat manages the filesystem and Logical Volumes (LVM).
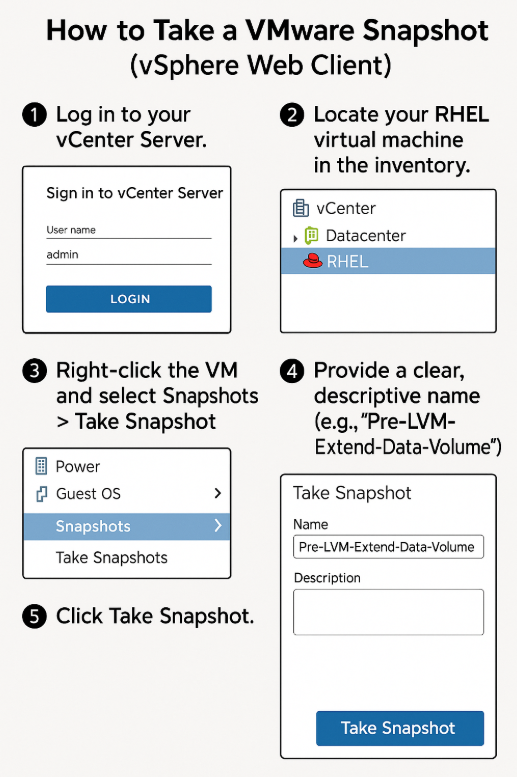
How to Take a VMware Snapshot (vSphere Web Client)
- Log in to your vCenter Server.
- Locate your RHEL virtual machine in the inventory.
- Right-click the VM and select Snapshots > Take Snapshot.
- Provide a clear, descriptive name (e.g., “Pre-LVM-Extend-Data-Volume”).
- Click Take Snapshot.
How to Take a VMware Snapshot (PowerCLI)
For automation, you can use a simple PowerCLI script:
# Connect to your vCenter
Connect-VIServer -Server your-vcenter.example.com

# Get the VM
$vm = Get-VM -Name "Your-RHEL-VM-Name"

# Create the snapshot
New-Snapshot -VM $vm -Name "Pre-LVM-Extend" -Description "Snapshot before extending /data" -Quiesce
How Do I Add the New Storage to the VM?
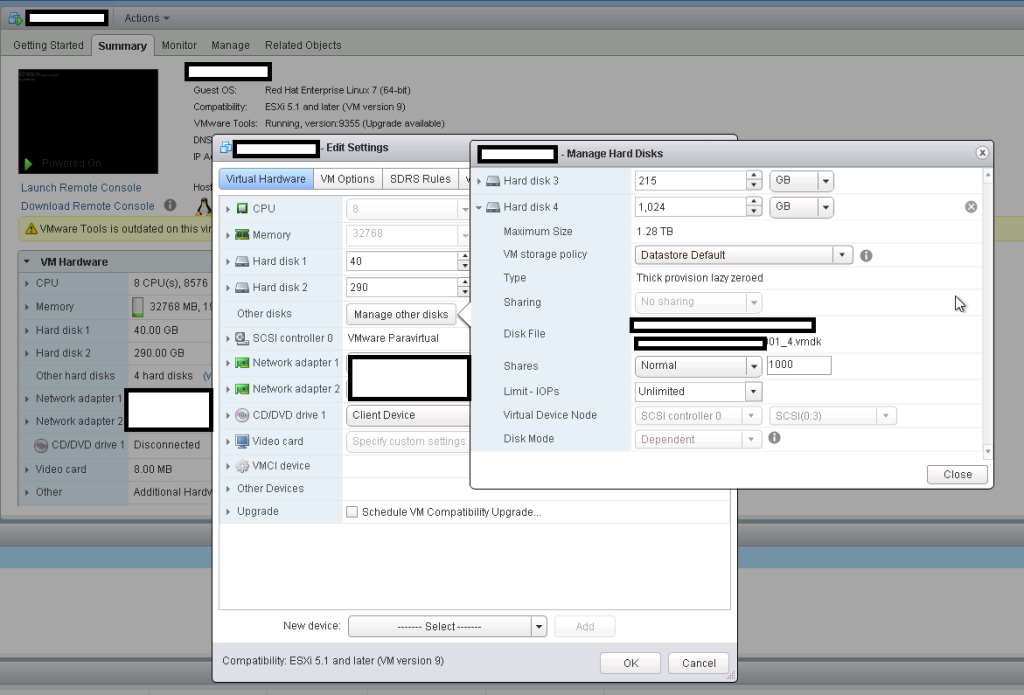
You add storage by editing the virtual machine’s settings and adding a new virtual hard disk.
- In vCenter, right-click your VM and select Edit Settings.
- At the bottom of the dialog, click the Add New Device button.
- Select Hard Disk and click Add.
- Specify the size for your new disk (e.g., 1 TB).
- Choose your datastore and provisioning type (e.g., Thin Provision).
- Click OK. The new disk will be “hot-added” to the running VM.
How Do I Make Linux Recognize the New Disk?
You must rescan the server’s SCSI host bus for the operating system to detect the new virtual disk.
After adding the disk in vCenter, SSH into your RHEL server and run the following commands as root:
# This command finds all SCSI host devices and tells them to rescan
grep -l . /sys/class/scsi_host/host*/scan | while read S; do echo "- - -" > $S; done
After a few seconds, run lsblk or fdisk -l to find the new disk. It will appear as a new device name, such as /dev/sdd, with no partitions.
How Do I Prepare the New Disk for LVM?
You prepare the disk by creating a partition that spans the entire disk, setting its type to “Linux LVM,” and then initializing it as an LVM Physical Volume (PV).
Step 1: Partition the New Disk (fdisk)
Use the fdisk utility on the new device. We’ll use /dev/sdd as our example.
# Start fdisk
fdisk /dev/sdd

# At the fdisk prompt, enter the following commands:
# n (new partition)
# p (primary)
# 1 (partition number 1)
# [Enter] (accept default first sector)
# [Enter] (accept default last sector, using the whole disk)
#
# Now, change the partition type:
# t (change partition type)
# 8e (the hex code for "Linux LVM")
#
# Finally, write the changes and exit:
# w (write table to disk and exit)
Run partprobe to force the kernel to re-read the new partition table immediately.
partprobe
You should now see /dev/sdd1 when you run lsblk.
Step 2: Create the Physical Volume (pvcreate)
LVM can’t use the raw partition directly. You must initialize it as a Physical Volume (PV), which is the foundational block for LVM.
# This command flags /dev/sdd1 as available for LVM use
pvcreate /dev/sdd1
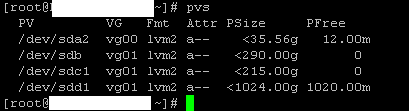
You can verify its creation by running pvs. You will see your new PV listed.
How Do I Extend the Volume Group (VG)?
You extend the Volume Group (VG) by using the vgextend command to add your newly created Physical Volume to it. A Volume Group is a pool of storage made from one or more Physical Volumes, and LVM is a core part of flexible storage management in Linux.
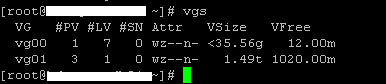
First, find the name of your existing Volume Group:
# List all Volume Groups
vgs
Once you have the name (e.g., data_vg), add your new PV to it:
# vgextend [VG_Name] [New_PV_Path]
vgextend data_vg /dev/sdd1
Running vgs again will show the Volume Group now has 1 TB of new free space.
How Do I Extend the Logical Volume (LV)?
You extend the Logical Volume (LV) using the lvextend command. This command takes the free space from the Volume Group and assigns it to the specific Logical Volume where your filesystem lives.
First, find the path of your Logical Volume (the one mounted on /data).
# List all Logical Volumes
lvs

# OR, find it with df
df -h /data
# Example output: /dev/mapper/data_vg-data_lv
Now, extend the LV. The easiest and safest way is to use the -l +100%FREE flag, which tells LVM to add all available free space from the VG to this LV.
# lvextend -l +100%FREE [LV_Path]
lvextend -l +100%FREE /dev/mapper/data_vg-data_lv
Alternatively, you could specify the exact size: lvextend -L +1T ...
How Do I Resize the XFS Filesystem?
You resize the XFS filesystem using the xfs_growfs command. The lvextend command made the container (the LV) bigger, but the filesystem inside it doesn’t know about the new space yet.
xfs_growfs will expand the XFS filesystem to fill the Logical Volume while it is online, with no downtime required.
# Run the command on the filesystem mount point
xfs_growfs /data
The command will output the new size, confirming the change.
What If I’m Using an ext4 Filesystem?
The process is identical for all steps except the final one. LVM, partitioning, and volume extension are all filesystem-agnostic.
If your filesystem was ext4 instead of XFS, you would not use xfs_growfs. Instead, you would use the resize2fs command on the Logical Volume path:
# For ext4 filesystems ONLY
resize2fs /dev/mapper/data_vg-data_lv
You can check our complete guide to managing ext4 volumes for more details.
How Can I Verify the Expansion Was Successful?
You can verify the new size with the df -h (disk free, human-readable) command.
df -h /data
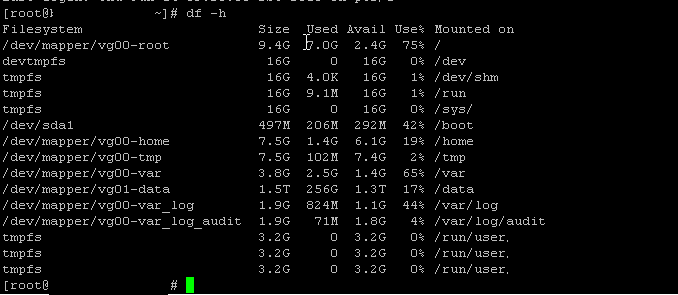
The output will now show the total size of /data has increased by 1 TB, and the “Used” and “Avail” columns will be updated accordingly.
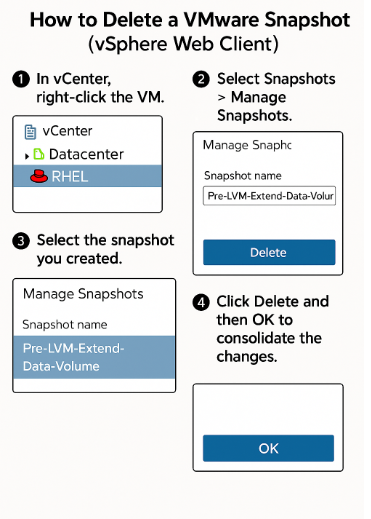
What Is the Final Cleanup Step?
The final step is to delete the VMware snapshot you created in Step 1.
Snapshots are not backups; they are temporary differencing disks. Leaving them for a long time will consume significant datastore space and negatively impact your VM’s performance.
- In vCenter, right-click the VM.
- Select Snapshots > Manage Snapshots.
- Select the snapshot you created.
- Click Delete and then OK to consolidate the changes.
Leave a Reply