
VMWare Replication: How to Increase Disk Space
What is VMWare Replication
VMWare Replication is an asynchronous replication solution that is capable of protecting Virtual Machines from a source location in a target location. The target can be another data center or a cloud hosting provider.
It is a licensed product where you are charged for replication licenses per virtual machine. VMware usually sells them in blocks of 25 virtual machines at a time. You must also be running VMware vSphere Standard or Enterprise edition, it will not work on Essentials or Essentials Plus licenses.
VMWare Replication has been known by various product names throughout its lifetime, it is commonly known as Site Recovery Manager (SRM), vSphere Replication, or vSphere Data Protection (VPD).
Throughout this article, I will refer to it as SRM.
Why is it so hard to increase disk space in SRM?
One of the most common issues introduced by VMWare Replication software is the inability to expand disk space on a server.
If you attempt to increase disk space on a source virtual machine, that change will not automatically be transferred to the disaster recovery replica. If a sysadmin does expand the disk space, it will break replication and potentially take the VM offline.
Increasing hard disk capacity is one of the most common tasks system administrators have to do. These days to extend hard disk space, the operating system does all the hard work for you, Windows Disk Manager can extend any disk (including the system disk) without even rebooting the server. It’s the same for Linux, but VMware is a different story and it’s one of the challenges introduced with vSphere replication.
This common task is still possible to do, but you must approach it slightly differently.
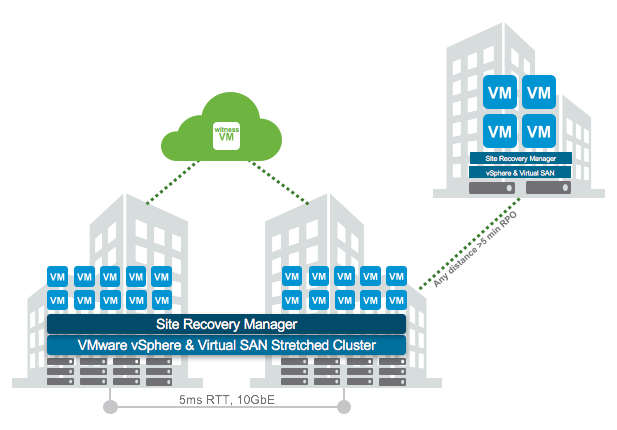
Infrastructure Overview:
In this demo I will be running a VMware vSphere 6.5 Enterprise Plus license, it has also been tested on vSphere 7.
Here is a summary of the infrastructure I am using:
- Locations:
- Two physically separate sites, geographically distant from each other.
- Network Connectivity:
- Primary Connection: 10GB production “dark fiber” network.
- Backup Connection: 4GB link.
- Server Configuration (Per Location):
- Hosts: 8 ESXi hosts.
- Storage: Dedicated IBM XIV object storage.
- Networking: 40GB Infiniband.
Procedure: How to Increase Disk Space When Using VMWare Replication
Step 1: Accessing the VMware Infrastructure
Open a vCenter client window to the vCenter servers located at Site A and Site B. You will need to work in each environment. I will refer to Site A as the Primary Site, and Site B as the Recovery Site.
- Access Primary Site:
- Open the VMware Web Client.
- Log onto the vCenter at the Primary Site.
- Access Recovery Site:
- Using the VMware Web Client, log onto the vCenter at the Recovery Site.
- Navigate to vReplication:
- On the vCenter (Primary Site), go to the home page.
- Select
Monitorand then choosevSphere vReplication.
Step 2 – Information gathering at the source location
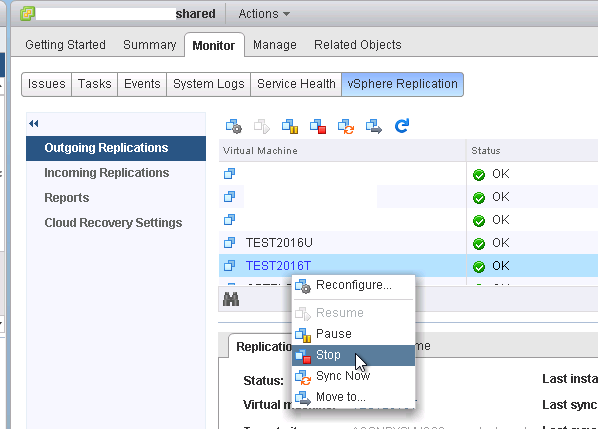
- Access Outgoing Replications:
- Navigate to
Outgoing Replications.
- Navigate to
- Identify the Server:
- Find the server for which you want to expand the disk space. For this guide, we’ll use
TEST2016Tas an example.
- Find the server for which you want to expand the disk space. For this guide, we’ll use
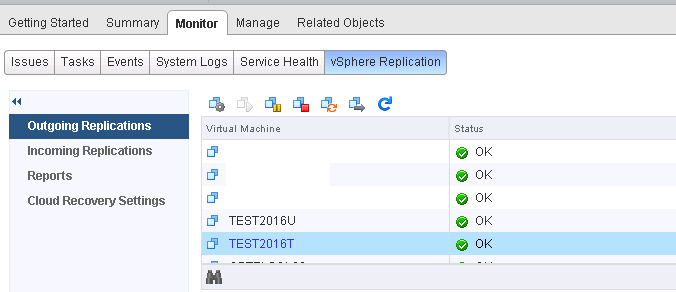
- Configure vReplicator:
- Highlight the chosen server.
- Click on the
Configure vReplicatorbutton. - When prompted, log in using your vCenter account\credentials.
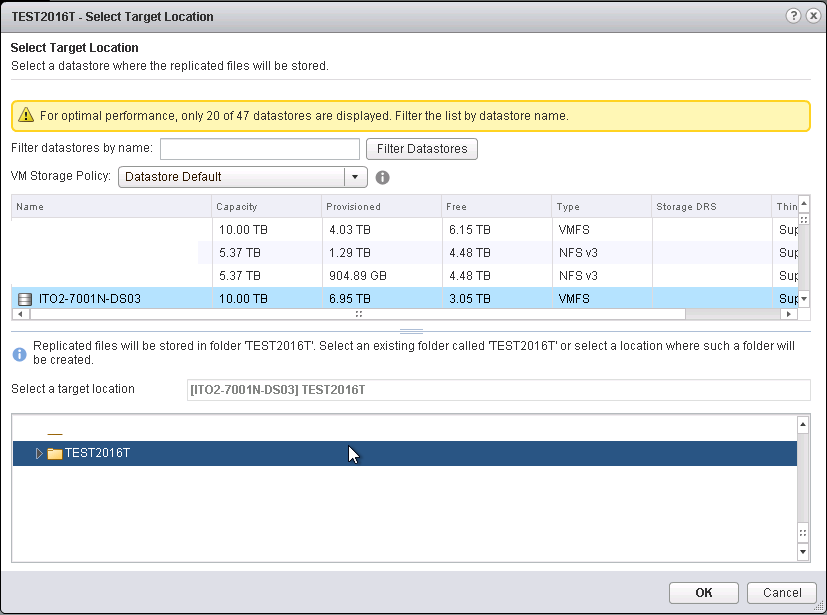
- Click on
Target Locationand expand the details by pressing the arrow. - Take note of the
Datastorename. This indicates where the replicated disk data resides. Remember, the name you see might differ from our example. - After noting the necessary details, exit by clicking
CANCELon the configuration wizard.
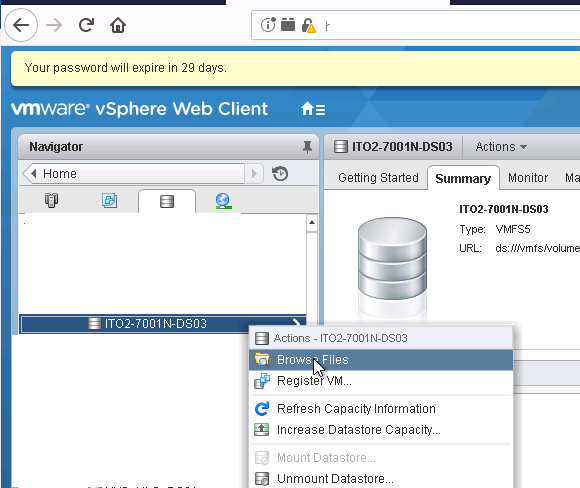
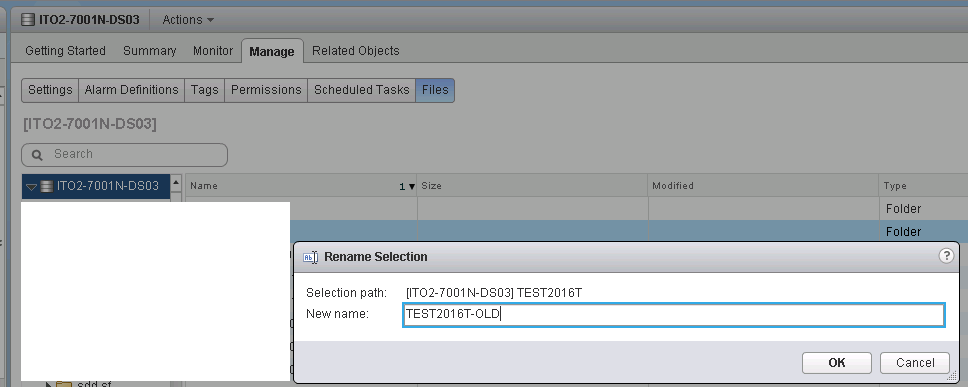
Step 3: Gathering Information from the Target Location
- Switch to Recovery Site:
- Transition to the vCenter at the Recovery Site.
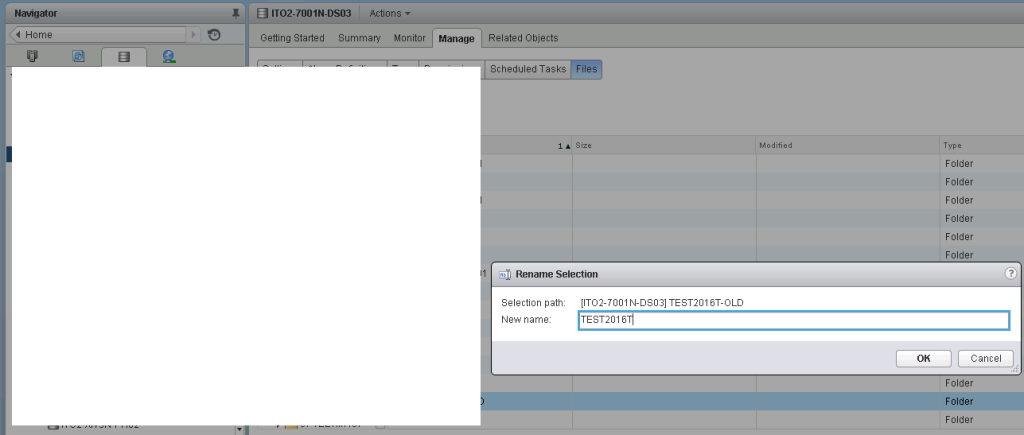
- Rename the folder where the virtual machine’s replicated data is stored. This step ensures that the replicated data remains intact when replication from the virtual machine is removed.
- Go to
Datastoreand then to the specificFolder Namewhere the replicated data is stored.
Example:
Step 4: Terminating the Current Replication
- Return to Primary Site:
- Navigate back to the vCenter at the Primary Site.
- Deactivate Replication:
- Identify the virtual machine you wish to resize.
- Select the server, right-click on it, and choose
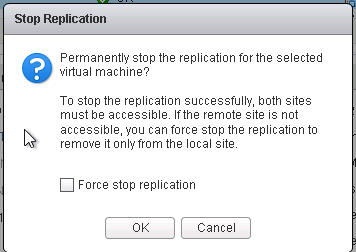
Stopto disable its replication
- Click ok on the warning message
Step 5 – Expand the server disk space in vCenter
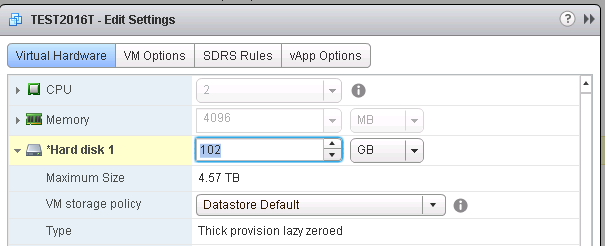
- Access vCenter at Primary Site:
- Navigate to the vCenter at the Primary Site.
- Modify Virtual Machine Disk Size:
- Locate and select your desired server.
- Right-click on the server and choose
Edit Settings. - In the settings menu, input the new desired disk size for the volume.
Step 6 – Expand the Volume on an ESXi Host
- Access vCenter at Secondary Site:
- Navigate to the vCenter at the Secondary Site.
- Enable SSH:
- Activate the SSH service within vCenter.
- SSH into a Server:
- Using a terminal application, such as Putty, establish an SSH connection to any server at the secondary location. Ensure that the chosen ESXi host has the storage LUN already mapped.
- Once connected, navigate to the datastore volume and identify the server name.
- Use the following command to switch to the datastore and specific folder where the replicated disk resides:
For example:
cd /vmfs/volumes/ITO2-7001N-DS03/TEST2016T-OLDSubstitute TEST2016T-OLD for your server

- Use vmkfstools:
- Once you’re in the correct directory where the replicated disk is stored, utilize the
vmkfstoolscommand to resize the VMDK. Ensure you’re aware of the disk number you modified in vCenter.
- Once you’re in the correct directory where the replicated disk is stored, utilize the
vmkfstools -X [new size]G [server_name]-disk[number].vmdkReplace:
[new size]with the desired disk size.[server_name]with the name of your server.[number]with the specific disk number you’ve changed in vCenter.
Note:
- It’s crucial to have a backup of your data and to be certain about the disk number and size before executing the command to prevent any data loss or misconfiguration.
For Example:
vmkfstools -X 102GB TEST2016T.vmdkSubstitute TEST2016T.vmdk for your server

Note: The preceding command increases the size of a virtual disk to 102 GB. Substitute this for YOUR VALUE
Step 7 – Re-enable Replication
- At the recovery site vCenter (Recovery Site), Rename the virtual machine folder to the original name.
- At vCenter (Primary Site) – Reconfigure the replication for the virtual machine. Ensure to select the Specify datastore folder option to select the folder in which the replicated disk is stored.
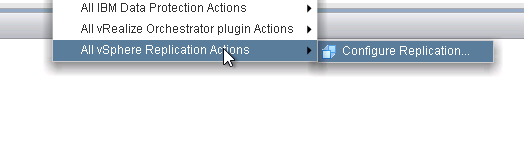
- Click on the Server name > Actions > All vSphere Replication Actions > Configure vReplication
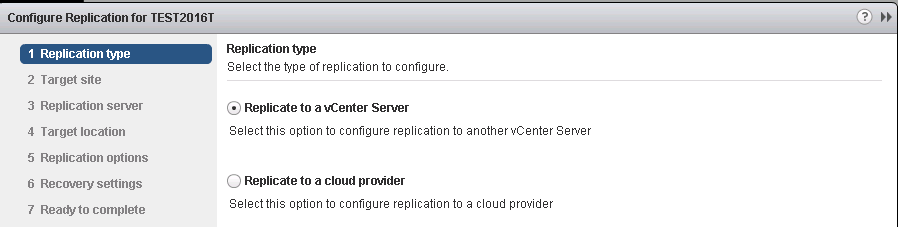
- Choose Replicate to a vCenter Server
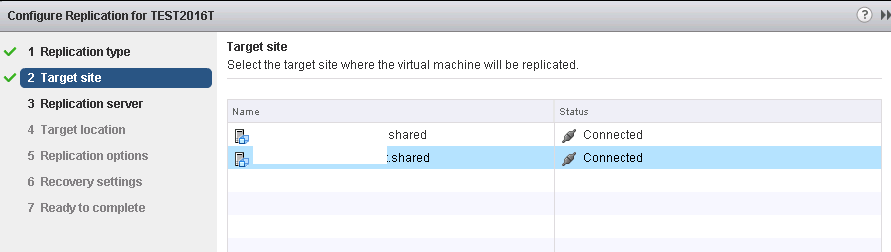
- Choose Recovery Site Appliance as Replicated site
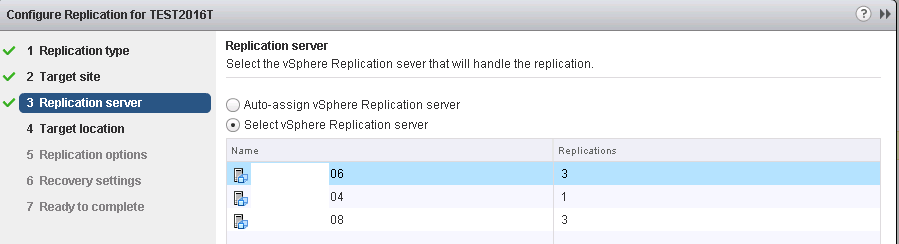
- Choose a vReplicator appliance
IMPORTANT – On Target location point the server storage to the original location of the replicated data.
In this example it was ITO2-7001N-DS03 – Yours will be different.
Ensure you choose the correct folder too.
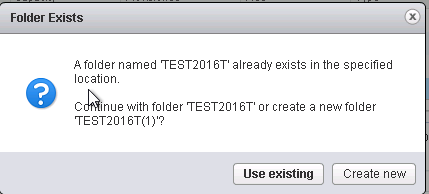
IMPORTANT – Chose USE EXISTING when you get the following warning
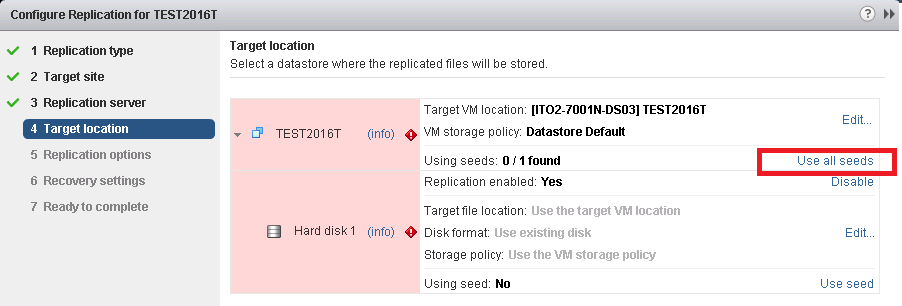
IMPORTANT – Change the USING SEED option to YES by clicking USE ALL SEEDS
This will use the existing data ensuring that the entire server does not need to be replicated from scratch, useful if you have large servers.
BEFORE
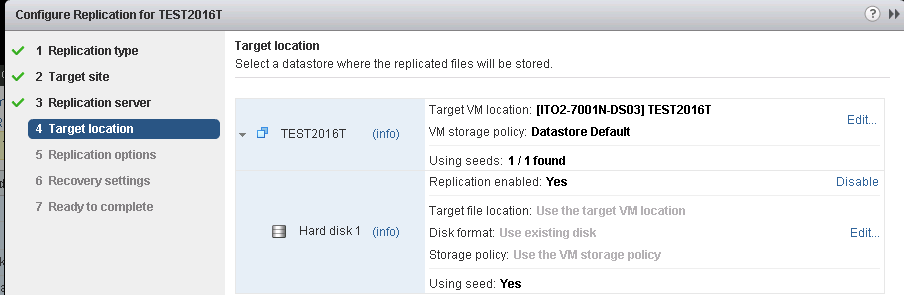
AFTER
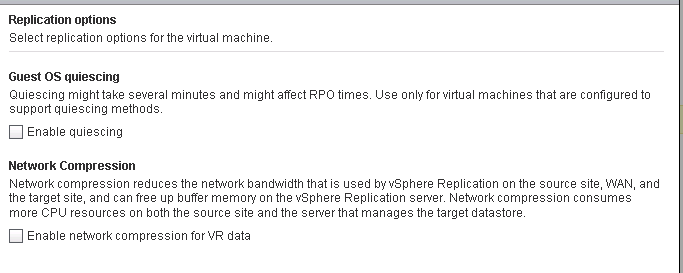
- Ensure Guest OS quiescing and Network compression are unticked
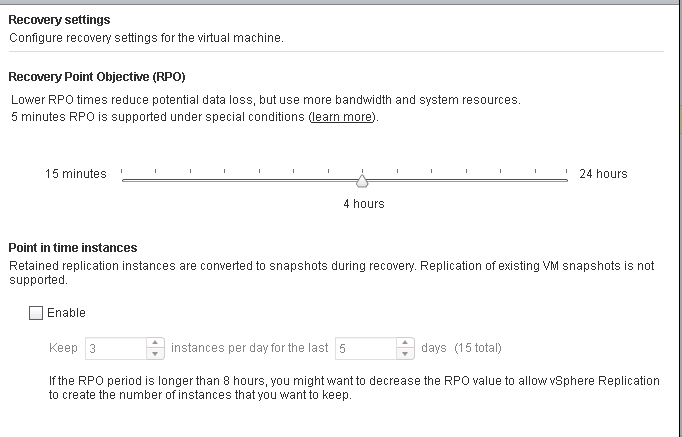
- Leave RPO at pre-define timings. In my example this is set to 4 hours
Step 8 – Monitor until completion
- Now Next, Next finish to complete the process
- Monitor the status in the Recent Task section of vCenter
- Disable SSH service on host
Step 9 – Check the Operating System to make sure the disk has expanded
- In Windows, you will need to check Windows Disk Management and expand the disk in the GUI
- In Linux, you will need to manually expand the filesystem, the process of this varies depending on what format the disk is written in
Important Notes:
- Always back up your data before making any disk changes.
- Double-check the disk number and new size before using
vmkfstoolsto avoid data loss. - The exact steps for extending partitions within the guest OS will vary depending on the operating system.
VMWARE SRM Q&A
Q: What are the potential risks associated with resizing a replicated disk in an SRM environment, and how can these risks be mitigated?
A: Resizing a replicated disk in an SRM environment introduces several risks:
- Data Loss: If the
vmkfstoolscommand is executed incorrectly (e.g., with the wrong disk number or size), it can lead to data corruption or loss. - Replication Failure: Incorrectly resizing the disk on the recovery site can cause replication to fail or become inconsistent.
- Downtime: The process of stopping replication, resizing the disk, and re-enabling replication can introduce downtime for the protected VM.
Mitigation Strategies:
- Backups: Always take a full backup of the VM before initiating the disk resize operation. This provides a fallback in case of data loss.
- Verification: Double-check the disk number and new size in the
vmkfstoolscommand to ensure accuracy. - Testing: Perform the disk resize operation in a non-production environment first to validate the procedure and identify potential issues.
- “Use Existing Data” and “Use All Seeds”: During replication reconfiguration, selecting these options is crucial to avoid a full resynchronization, minimizing downtime and potential inconsistencies.
- Monitoring: Closely monitor the replication process after reconfiguration to ensure it completes successfully and the replica is consistent.
Q: How does the “Use Existing Data” and “Use All Seeds” option in SRM help optimize the disk resizing process?
A: These options are critical for optimizing the disk resizing process by leveraging the existing replica data on the recovery site:
- Use Existing Data: This tells SRM to use the resized disk on the recovery site as the base for the replica, avoiding a full resynchronization from the primary site.
- Use All Seeds: This instructs SRM to utilize all available seed data from the existing replica, further speeding up the resynchronization process.
Benefits:
- Reduced Downtime: By avoiding a full resync, the time required to bring the replica back into a consistent state is significantly reduced.
- Network Bandwidth Conservation: Transferring only the changed blocks since the resize minimizes network bandwidth consumption.
- Faster Recovery: In a disaster recovery scenario, the recovery time objective (RTO) is improved as the replica is already partially synchronized.
Technical Explanation:
When you resize the disk on the recovery site, SRM recognizes that the replica disk has changed. By selecting “Use Existing Data” and “Use All Seeds,” you instruct SRM to perform a delta sync instead of a full sync. This means SRM only copies the changes made to the disk since the resize, which are typically minimal. This optimization significantly reduces the time and resources required to bring the replica back into a consistent state.
I can delve into other technical aspects of SRM, such as the different consistency levels, the role of the vSphere Replication appliance, or the integration with storage arrays. Just let me know what specific areas you’d like to explore further!
Recent Comments