

Note: Velostrata is now called Migrate for Compute Engine and is exclusively available for customers of the Google Cloud Platform.
What is Velostrata?
Velostrata is a software platform that is designed to migrate large-scale, enterprise-grade workloads and transfer them into the Google Cloud Platform. Velostrata works with virtual workloads from VMware, Hyper-V. , but also with physical machines.
Google purchased Velostrata in May 2018; the Israeli-based tech startup kept the Velostrata name until recently; officially, the product is now called “Migrate for Compute Engine.” The Velostrata acquisition was likely a response to AWS purchasing CloudEndure, the popular cloud migration tool that was previously used for getting workloads into Compute Engine.
What is Velostrata used for?
Velostrata can be used for many different cloud migration scenarios. It is a great tool for new migrations to the Google Cloud Platform, and it works really well with virtual workloads and cloud-to-cloud migrations.
- Data Center Migration
- Cross-Cloud Migration
- SAP Migrate and Modernize
- Velostrata VMware
- Velostrata vmware to GCP
- Velostrata AWS to GCP
- Velostrata Azure to GCP
Arguably the best part is that this is a free service for migrations into GCP. This blog will focus on data center and cross-cloud workloads. If you get stuck at any point during this procedure, google has great Velostrata documentation available online.
How does Velostrata work?
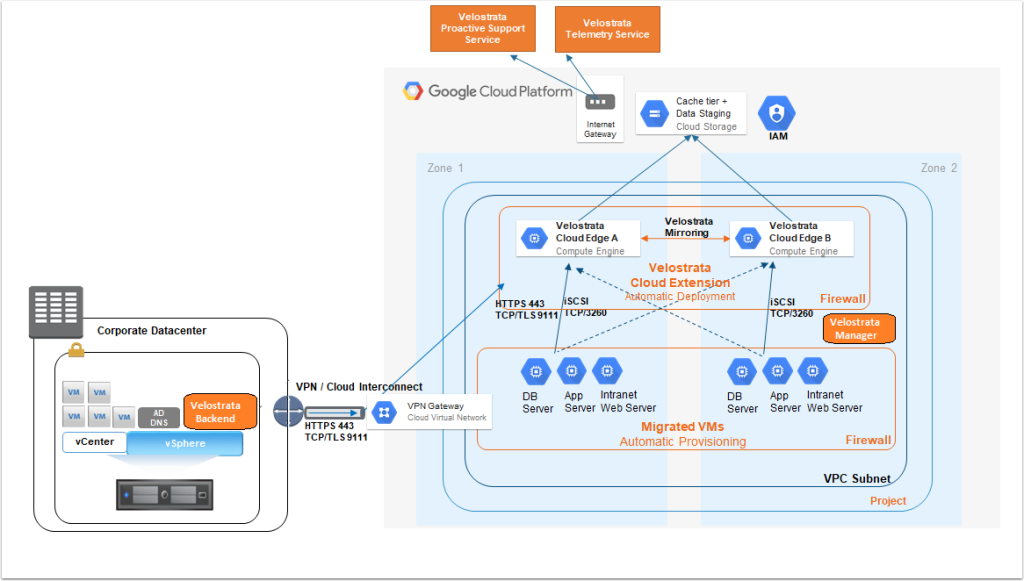
Velostrata can be used to migrate VMs running on VMware vSphere into GCP, it can also migrate your physical servers and any AWS EC2 instances.
There is no requirement for agents to be installed server-side, and instead, data can be streamed using GCP-based appliances (Manager & Edge Servers)
Technology such as de-duplication, pre-fetching, asynchronous write-back, and network optimizations further accelerate the migration, reducing migration bandwidth by up to 75% in production migrations.
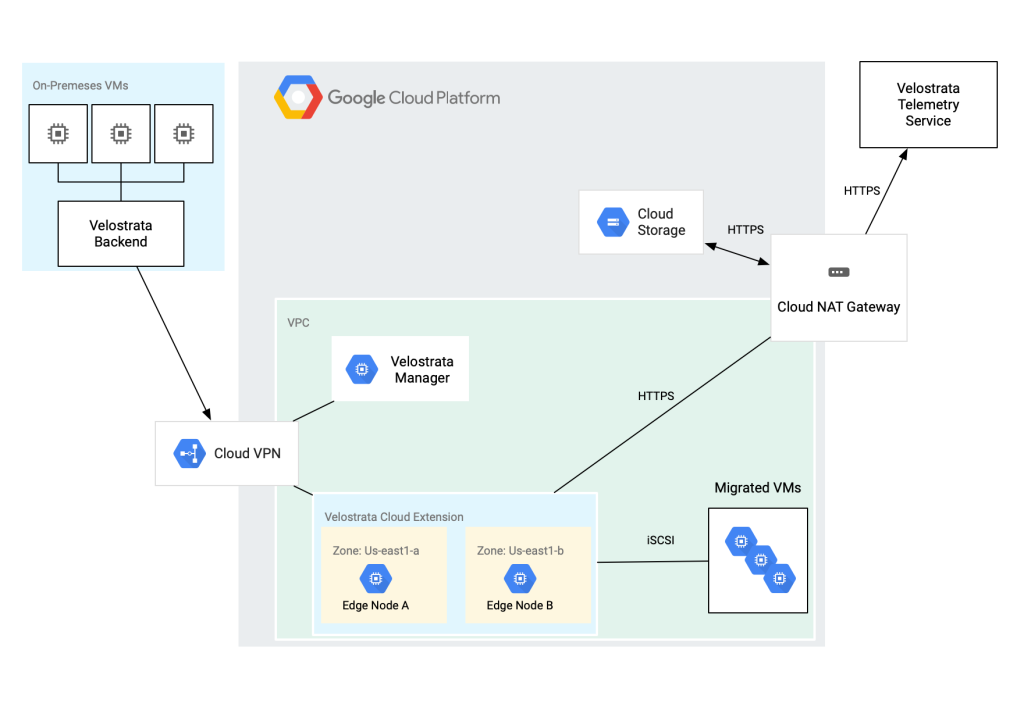
The architecture must consist of a local data center, a cloud VPN connection (or cloud interconnect) into the GCP VPC.
Please note there are extensive how-to guides on Googles Documentation hubs
Migrating On-premise VMs
After the initial configuration of GCP has been completed and permissions have been created:
- Configure GCP
- Configure Velostrata Manager
- Configure IAM
- Configure Cloud VPN
You must then configure your local vCenter server with the Velostrata backend appliance and plugin. This comes as an OVF file.
Next, you have to configure Cloud Extensions with vSphere where you can embed your Cloud credentials, define your networking, and chose your regions and zones
Once everything is configured you will see Velostrata Operations available against your virtual machines.
Running a VM in the Cloud or Starting a Migration
- From the vSphere Web Client, select the desired Virtual Machine.
- Right-click on the required VM and
- select Velostrata Operations > Run in Cloud, or
- select Velostrata Operations > Migrate
- Select your Cloud Extension.
- (Optional) Name the Cloud VM.
- Click Next. The Cloud Instance screen appears.

- Select the Project and Instance Type. Velostrata suggests instance sizes that approximate the capacity and performance of the existing VM. See Cloud Instance Rightsizing for information on how recommendations are processed. Note: the prices shown are for computing costs only and do not include disk and network costs which are variable. For more information, see Compute Engine Pricing.
- Click Next. The Storage Policy screen appears.
- Select Write Back or Write Isolation for the Storage Policy. See Understanding Storage Policies.
- Click Next. The Networking screen appears.

- Select a cloud Subnet for the VM.
- Enter the comma-separated Network Tags which will be applied to the VM. Network tags are used by networks to identify which instances are subject to certain firewall rules and network routes.
- (Optional) Select the Instance Service Account.
- From the Configure Private IP drop-down list, select one of the following:
- Auto to automatically assign an available address from the subnet, or
- Static and enter a Static IP within the VPC subnet.
- From the Edge Node drop-down list, select the node in your Cloud Extension that will handle the migration.
- For External IP, select:
- None, to not assign an external IP address
- Static, to assign an external IP previously created on the Google Cloud Platform Console, or
- Ephemeral, for an automatically assigned external IP.Note: the External IP setting persists after the VM has been detached from Velostrata. External IP addresses are visible in the Public IP Address field in the Velostrata Cloud Extension portlet on vSphere.
- Click Next.
- If you are performing a Migrate operation:
- select the Disk Type for your instance and Service Account that will host the worker instance handling the migration.
- Click Next. The Summary screen appears.
- Review the summary and then click Finish.
The process of running the VM in the cloud and then migrating the VM can be viewed on the Cloud Instance Information portlet on the VM Summary page, and by monitoring the created vSphere task.
Leave a Reply