

Grab a coffee, sit back, and learn MySQL Database Administration with TurboGeek
MySQL|MariaDB Database Administration and SQL Language Basics
In this MySQL Tutorial article, I will introduce you to MySQL Database Administration tasks needed for MySQL. The purpose is to allow system administrators to perform some basic administration tasks before escalating to a qualified DBA. MySQL is a high-performance database server from Oracle Corporation.
Red Hat recently dropped support of MySQL in favour of MariaDB; essentially, both products are very similar; the commands in this blog will work with both MySQL AND MariaDB.
What is MySQL Server?
MySQL is an open-source, relational database management system (RDBMS) based on the structured query language (SQL). MySQL is available on all major operating systems, including Windows, Linux, and Solaris. It is free for individuals and non-production environments under the GNU General Public License; however, a commercial license is required if used commercially.
MySQL stores data in tables, columns, and rows like other relational databases. Each entry is defined by a unique identifier. Its raison d’être has always been about the performance and reliability of the database. MySQL Database Administration was designed and optimized for the web development arena; it is arguably the most common database used in web server deployments. MySQL works very well with Apache and PHP and is often the go-to database for LAMP stack deployments. MySQL Database Administration powers 9 out of 10 websites on the internet today and is the database chosen by Facebook, Twitter, and Wikipedia.[i]
History of MySQL
MySQL was created by a Swedish company called MySQL AB in 1995; during the early years, the development focused on speed and productivity rather than feature sets. Features, however, were subsequently added with every major release, but MySQL AB always concentrated on speed, reliability, and, above all, making an easy-to-use database focused on web applications[ii].
During the late 1990s, due to its significant performance advantages, MySQL became the database of choice for many companies. The Database market has expanded and grown rapidly since the introduction of MySQL. It played a significant part in the history of the internet, enabling inexperienced users access to a free database, resulting in an explosion of websites for blogs, forums, and online articles.[iii]
MySQL was successful because it is easy to use, is simple to install, and uses a simple query language to understand. For Example, the SHOW DATABASES command will list the available database in MySQL. It was designed for people who are not experts in Database management, empowering inexperienced users while offering enough complexity to cater to advanced DBAs. [iv]
From 2001 onwards, MySQL AB began to add features that appealed to the enterprise markets, such as BDB and InnoDB support (a storage engine used in eCommerce), Sub Queries, Prepared statements, stored procedures, etc. With each revision of MySQL, more enterprise-grade features were added. Again, the growth of MySQL allowed users to pick up these feature sets with relative ease.
Sun Microsystems purchased MySQL AB in 2008; later in 2009, Oracle acquired the company after buying Sun Microsystems. Recent versions of MySQL are rich in product features while maintaining strong performance ability. With Oracle’s drive to the cloud, they have recently started positioning MySQL as the go-to cloud database platform alongside existing, more traditional Oracle database platforms.
MySQL Versions
Since 2007, MySQL started introducing different versions of its core product. These editions focused on the community version and the enterprise version of MySQL. This change in strategy presented users with a choice; both applications use the same source code but were offered with differing support levels available to the end user. [v]
The community edition is supported by the MySQL open-source global community via a documentation hub, online blogs, IRC channels, and forums. The Enterprise editions are supported by dedicated technical support teams, which offer hotfixes and service pack support, and more recently include enterprise-exclusive features such as Enterprise Backup, Enterprise Monitor, Enterprise Security, and Enterprise Audit modules.[vi]
MySQL Forks
Since the purchase of MySQL by Oracle, many of the original development teams have left and set up what are known as fork development companies; these are essentially open-source RDBMS software houses that are creating new RDBMS software using the original GNU source code for MySQL. Popular examples include MariaDB and Percona.
MySQL Management Tools
There are a number of tools available to manage and maintain MySQL. In typical Linux installations, DB management is done via the MySQL Database Administration client’s command line. The MySQL client can be used to create databases and set up permissions and access rights. Additionally, there are a number of popular GUI tools, including SQLyog, phpMyAdmin, MySQL Query Browsers, Navicat, MySQL Administrator, and MySQL Workbench.
Each tool does similar tasks, which include creating new tables, importing/exporting data, managing users and permissions, backups and restores, and creating triggers, views, and stored procedures of the data. phpMyAdmin is widely used on Linux, and SQLyog and Workbench are popular on Windows. These tools are very similar in functionality to the Microsoft SQL Server studio. Some of the applications are free, whilst others offer free trials but require a license for full functionality. All tools are relatively simple to learn the basics and can offer enterprise-grade features.
What is a Database?
A database is an organized collection of structured information, or data, typically stored electronically in a computer system. The data can then be easily accessed, managed, modified, updated, controlled, and organized. Most databases use structured query language (SQL) for writing and querying data.
MariaDB is basically the same as MySQL. Red Hat dropped support for MySQL in favor of MariaDB, but the products are pretty much identical.
MariaDB is an example of a DBMS (Database Management System). There are four types of DBMS:
- Hierarchical
- Network
- Relational
- Object-Orientated
Specifically, MariaDB and MySQL is a Relational Database Management System (RDBMS). Data is stored in a structured format using columns and rows. Values must always be related to each other; tables can be related to other tables. The Structured Query Language (SQL) is used to query the data.
MariaDB and MySQL support stored procedures within the database; a stored procedure is a subroutine available to applications that access a relational database management system. Such procedures are stored in the database data dictionary. Uses for stored procedures include data validation or access-control mechanisms. Keys are used to uniquely identify rows within a table (i.e. primary key)
How to Install MySQL Server?
MySQL Installation Guide
Note: The commands needed are highlighted in bold
MySQL Database Administration is supported on various platforms, from Windows to Linux. In this lesson, we will learn how to perform a MySQL installation on Ubuntu. If you are using a different flavor of Linux, please check the MySQL Download Pages.
Step 1 – Update your server
Connect to your Server via SSH and log in using the credentials highlighted at the top of the page.
Once you are logged into your Ubuntu 18.04 server, run the following command to update your base system with the latest available packages.
apt-get update -yStep 2 – Install MySQL 8 Repository
By default, MySQL 8 is unavailable in the Ubuntu 18.04 default repository, so you must add the MySQL 8 repository to your system.
First, download the repository package with the following command:
wget -c https://repo.mysql.com/mysql-apt-config_0.8.13-1_all.debOnce downloaded, install the downloaded package with the following command:
dpkg -i mysql-apt-config_0.8.13-1_all.debDuring the installation process, you will be asked to choose the MySQL version as shown in the following screen:
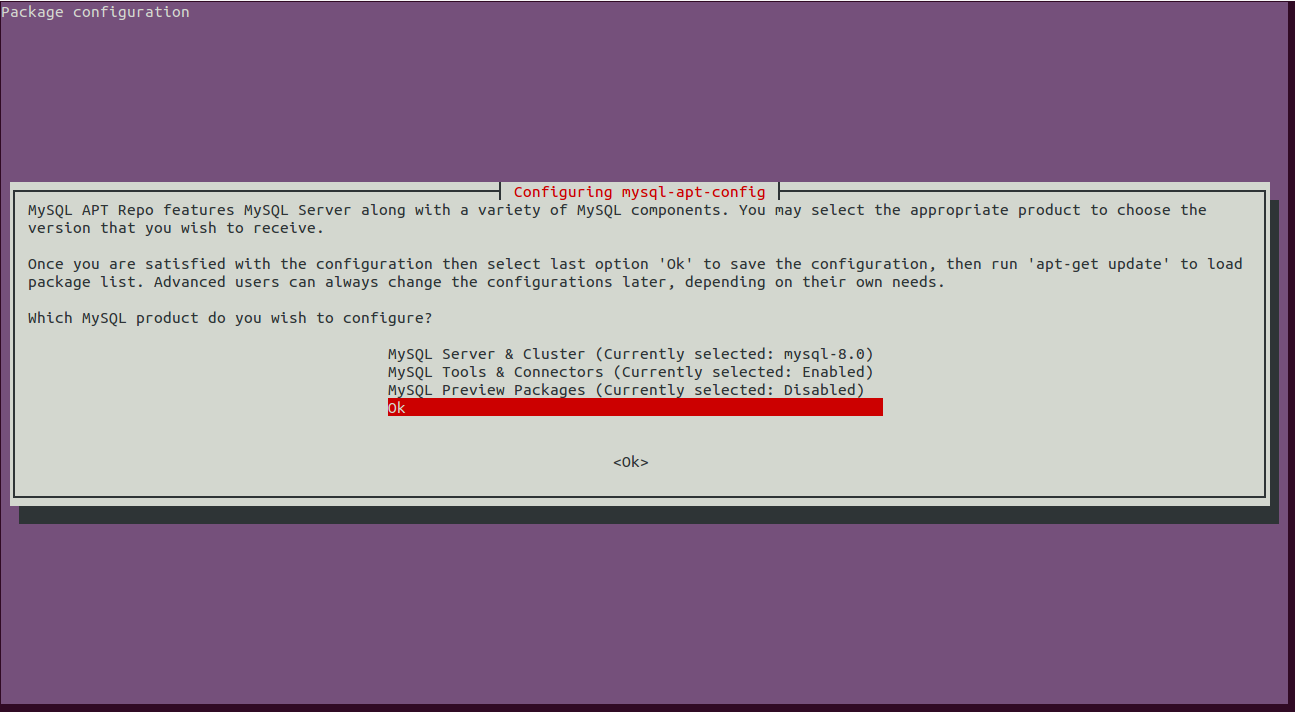
Scroll down, select Ok and hit Enter to finish the installation.
Step 3 – Install MySQL 8
Next, update the repository with the following command:
apt-get update -yOnce the repository is updated, run the following command to install MySQL 8 in your system.
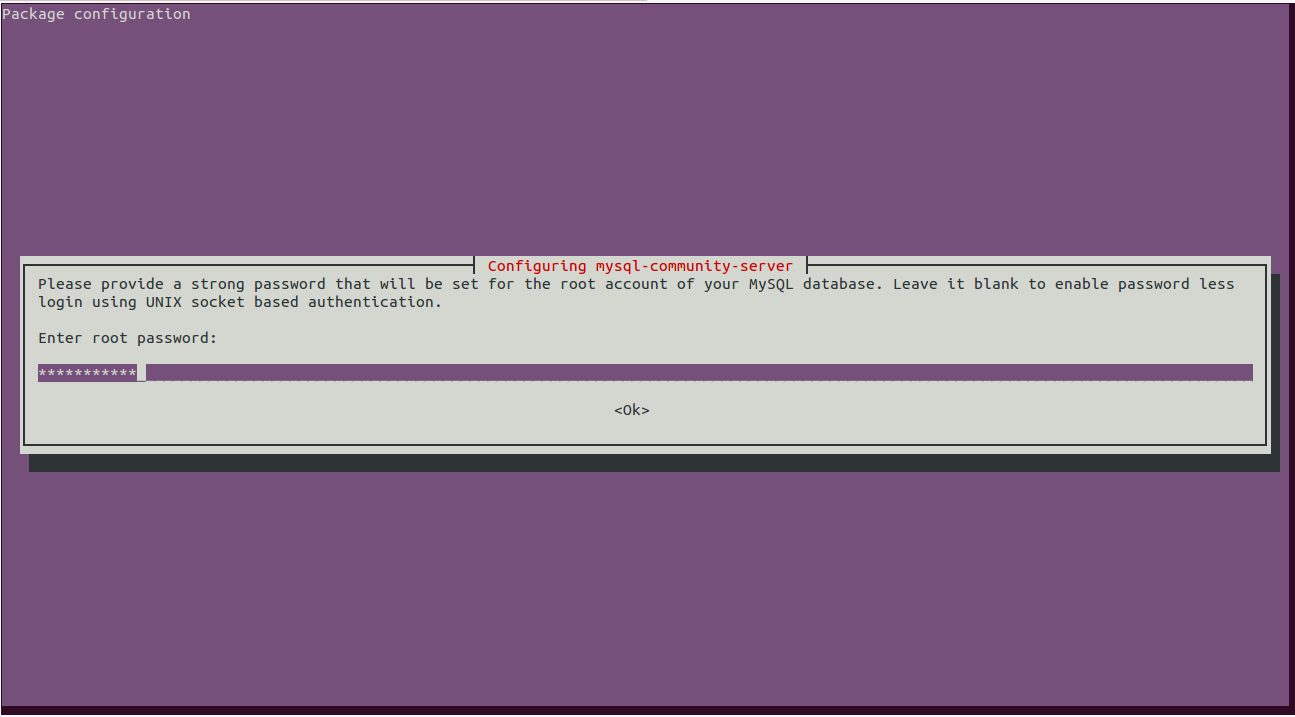
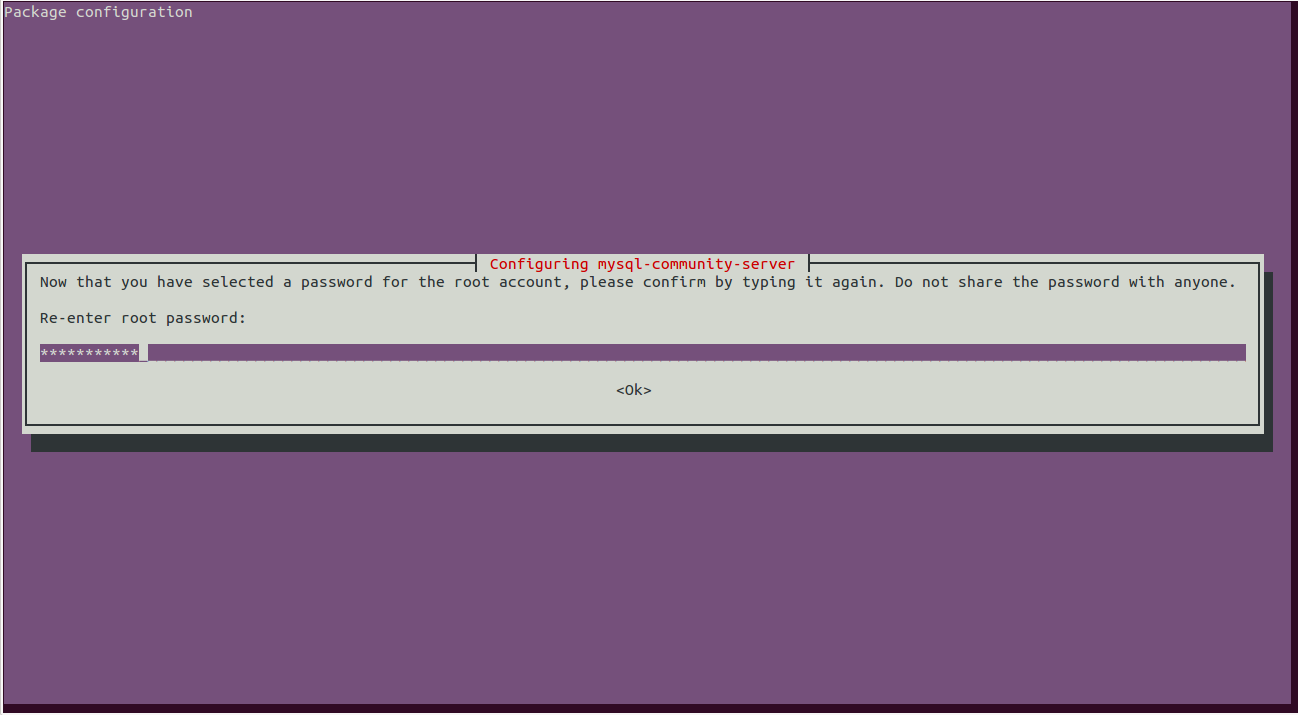
apt-get install mysql-server -yDuring the installation process, you will be asked to set the MySQL root password as shown below:
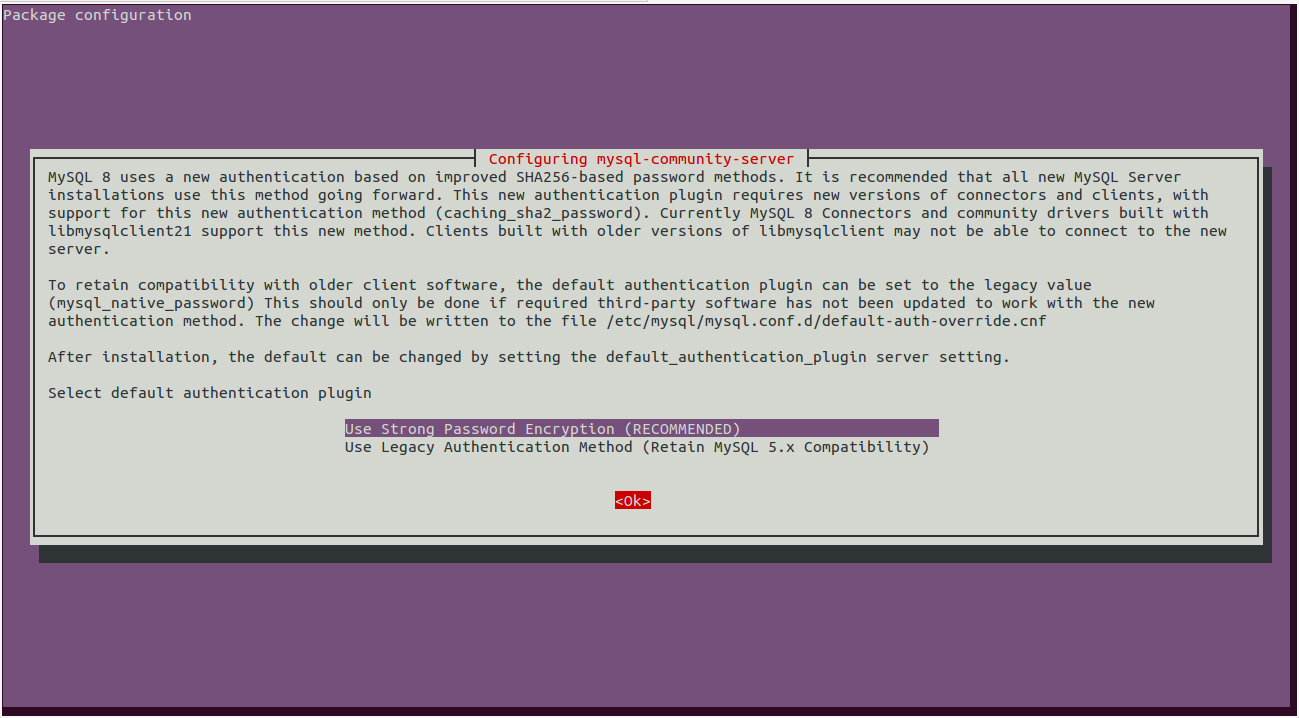
Next, you will need to select the default authentication plugin for MySQL as shown below:
Select “Use Strong Password Encryption” and hit Enter to finish the installation.
Next, you can verify the installed version of the MySQL with the following command:
mysql -VYou should get the following output:
mysql Ver 8.0.19 for Linux on x86_64 (MySQL Community Server - GPL)Step 4 – Manage MySQL Service
You can manage the MySQL service with the systemctl utility.
To start the MySQL service, run the following command:
systemctl start mysqlTo enable the MySQL service to start after a system reboot, run the following command:
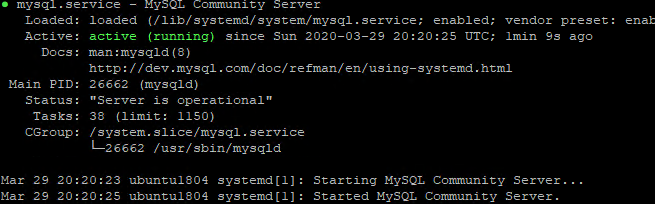
systemctl enable mysqlTo check the status of the MySQL service, run the following command:
systemctl status mysqlOutput:
Step 5 – Secure MySQL Installation
It is also recommended to secure the MySQL installation and set the MySQL root password. You can do it using the mysql_secure_installation script:
mysql_secure_installationYou will be asked to provide your current root MySQL password as shown below:
Securing the MySQL server deployment.

Enter password for user root:
Provide your root password and hit Enter. You will be asked to validate the password to improve security as shown below:

Type Y and hit Enter to check the password strength as shown below:
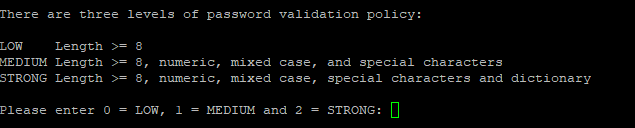
Here, you can select your desired password strength and hit Enter to continue:
Estimated strength of the password: 100
Change the password for root ? ((Press y|Y for Yes, any other key for No) : Y
Type Y and hit Enter to change the password to one with the selected password strength:
New password:
Re-enter new password:
Type your new password and hit Enter to continue. You should see the following output:
Estimated strength of the password: 100
Do you wish to continue with the password provided?(Press y|Y for Yes, any other key for No) : Y
Type Y and hit Enter to continue with your provided password as shown below:
By default, a MySQL installation has an anonymous user,
allowing anyone to log into MySQL without having to have
a user account created for them. This is intended only for
testing, and to make the installation go a bit smoother.
You should remove them before moving into a production
environment.

Remove anonymous users? (Press y|Y for Yes, any other key for No) : Y
Success.
Next, type Y and hit Enter to remove the anonymous user. You should see the following output:
Normally, root should only be allowed to connect from
'localhost'. This ensures that someone cannot guess at
the root password from the network.

Disallow root login remotely? (Press y|Y for Yes, any other key for No) : Y
Creating Databases
After you have logged in, create a database with the following commands, below is a breakdown of the syntax
CREATE DATABASE Syntax:
CREATE {DATABASE | SCHEMA} [IF NOT EXISTS] db_name [create_specification] ... create_specification: [DEFAULT] CHARACTER SET [=] charset_name | [DEFAULT] COLLATE [=] collation_name | DEFAULT ENCRYPTION [=] {'Y' | 'N’}
Create a new database:
CREATE DATABASE db_name;List available databases:
SHOW DATABASES;Select database for use:
USE db_name;Show current selected database:
SELECT DATABASE(); Select database when logging in to MySQL:
mysql -u user -p db_name; DROP DATABASE Syntax:
To drop, or delete a database you do the following. Here is a breakdown of the syntax.
DROP {DATABASE | SCHEMA} [IF EXISTS] db_name
Delete an existing database:
DROP DATABASE db_name; List available databases:
SHOW DATABASES; Using mysqladmin and mysqlshow
From the Command Line, you can query MySQL without ever having to log into the DB
mysqladmin Syntax is:
shell> mysqladmin [options] command [command-arg] [command [command-arg]] ...
mysqlshow Syntax
shell> mysqlshow [options] [db_name [tbl_name [col_name]]]
Using Mysqladmin to Create a database:
mysqladmin -u root -p create db_nameDrop a Database:
mysqladmin -u root -p drop db_name List available databases:
mysqlshow -u root -pCreating Tables
Here is the CREATE TABLE Syntax
CREATE [TEMPORARY] TABLE [IF NOT EXISTS] tbl_name
(create_definition,…) [table_options]
[partition_options]
Create a new table:
CREATE TABLE tbl_name (col_name col_def);Example:
CREATE TABLE customers (cust_id INT PRIMARY KEY AUTO_INCREMENT, username VARCHAR(50), first_name VARCHAR(50), last_name VARCHAR(50), phone_number VARCHAR (25));

Query OK, 0 rows affected (0.02 sec)
List tables:
List columns in a table:
Log into the database and type
DESCRIBE tbl_name [db_name.tbl_name];Example:
DESCRIBE customers;

+--------------+-------------+------+-----+---------+----------------+

| Field        | Type        | Null | Key | Default | Extra          |

+--------------+-------------+------+-----+---------+----------------+

| cust_id      | int(11)     | NO   | PRI | NULL    | auto_increment |

| username     | varchar(50) | YES  |     | NULL    |                |

| first_name   | varchar(50) | YES  |     | NULL    |                |

| last_name    | varchar(50) | YES  |     | NULL    |                |

| phone_number | varchar(25) | YES  |     | NULL    |                |

+--------------+-------------+------+-----+---------+----------------+

5 rows in set (0.00 sec)SHOW COLUMNS FROM tbl_name [FROM db_name];SHOW COLUMNS FROM customers;
+--------------+-------------+------+-----+---------+----------------+
| Field | Type | Null | Key | Default | Extra |
+--------------+-------------+------+-----+---------+----------------+
| cust_id | int(11) | NO | PRI | NULL | auto_increment |
| username | varchar(50) | YES | | NULL | |
| first_name | varchar(50) | YES | | NULL | |
| last_name | varchar(50) | YES | | NULL | |
| phone_number | varchar(25) | YES | | NULL | |
+--------------+-------------+------+-----+---------+----------------+
5 rows in set (0.00 sec)List tables and columns using the mysqlshow command:
mysqlshow -u NAME -p db_namemysqlshow -u root -p prod
Enter password:
Database: prod
+-----------+
| Tables |
+-----------+
| customers |
+-----------+mysqlshow -u NAME -p db_name tbl_namemysqlshow -u root -p prod customers
Enter password:
Database: prod Table: customers
+--------------+-------------+--------------------+------+-----+---------+----------------+----------------
| Field| Type | Collation | Null | Key | Default | Extra | Privileges | Comment |
+--------------+-------------+--------------------+------+-----+---------+----------------+----------------
| cust_id | int(11) | | NO | PRI | | auto_increment | select,insert,update,references | |
| username | varchar(50) | utf8mb4_0900_ai_ci | YES | | | | select,insert,update,references | |
| first_name | varchar(50) | utf8mb4_0900_ai_ci | YES | | | | select,insert,update,references | |
| last_name | varchar(50) | utf8mb4_0900_ai_ci | YES | | | | select,insert,update,references | |
| phone_number | varchar(25) | utf8mb4_0900_ai_ci | YES | | | | select,insert,update,references | |
+--------------+-------------+--------------------+------+-----+---------+----------------+----------------List additional information about a table:
SHOW TABLE STATUS [FROM db_name];mysqlshow -u root -p prod customers
Enter password:
Database: prod Table: customers
+--------------+-------------+--------------------+------+-----+---------+----------------+----------------
| Field | Type | Collation | Null | Key | Default | Extra | Privileges | Comment |
+--------------+-------------+--------------------+------+-----+---------+----------------+----------------
| cust_id | int(11) | | NO | PRI | | auto_increment | select,insert,update,references | |
| username | varchar(50) | utf8mb4_0900_ai_ci | YES | | | | select,insert,update,references | |
| first_name | varchar(50) | utf8mb4_0900_ai_ci | YES | | | | select,insert,update,references | |
| last_name | varchar(50) | utf8mb4_0900_ai_ci | YES | | | | select,insert,update,references | |
| phone_number | varchar(25) | utf8mb4_0900_ai_ci | YES | | | | select,insert,update,references | |
+--------------+-------------+--------------------+------+-----+---------+----------------+---------------------------------+---------+Show statement that created a table:
SHOW CREATE TABLE tbl_name;
 customers | CREATE TABLE `customers` (

  `cust_id` int(11) NOT NULL AUTO_INCREMENT,

  `username` varchar(50) DEFAULT NULL,

  `first_name` varchar(50) DEFAULT NULL,

  `last_name` varchar(50) DEFAULT NULL,

  `phone_number` varchar(25) DEFAULT NULL,

  PRIMARY KEY (`cust_id`)

) ENGINE=InnoDB DEFAULT CHARSET=utf8mb4 COLLATE=utf8mb4_0900_ai_ci
Copying and Cloning Tables
Using CREATE TABLE…LIKE:
CREATE TABLE new_tbl LIKE orig_tbl;

CREATE TABLE customers_test LIKE customers;

Query OK, 0 rows affected (0.02 sec)

 SHOW TABLES;

+----------------+

| Tables_in_prod |

+----------------+

| customers      |

| customers_test |

+----------------+

2 rows in set (0.00 sec)
Using CREATE TABLE…SELECT:
CREATE TABLE new_tbl [AS] SELECT * FROM orig_tbl;mysql> CREATE TABLE customers_bkup SELECT * FROM customers;
Query OK, 0 rows affected (0.01 sec)
Records: 0 Duplicates: 0 Warnings: 0
mysql> SHOW TABLES;
+----------------+
| Tables_in_prod |
+----------------+
| customers |
| customers_bkup |
| customers_test |
+----------------+
3 rows in set (0.00 sec)
Leave a Reply