

Write Less: Do More
I was recently asked to investigate how easy it is to deploy MongoDB Atlas With CDK. When I eventually got it working, it was a great experience. However, I experienced lots of issues deploying into EU-WEST-1. The problems were caused by the Cloudformation building resources inside MongoDB AWS accounts, something I have zero control over.
The support I received from MongoDB was terrific; they were accommodating. AWS, on the other hand – the support was dreadful.
Quick Answer
- Install the CDK MongoDB Atlas provider:
npm install awscdk-resources-mongodbatlas - Configure your Atlas API keys as environment variables or AWS Secrets Manager secrets
- Define your Atlas cluster in a CDK stack using the
CfnClusterconstruct - Deploy with
cdk deploy— the stack creates the Atlas project, cluster, and database user - Retrieve the connection string from the stack outputs and use it in your application
What Is MongoDB Atlas?
MongoDB Atlas is a fully managed cloud database service provided by MongoDB, Inc. It is designed to simplify MongoDB databases’ deployment, management, and scaling in the cloud. MongoDB is a NoSQL database that offers a flexible and scalable schema, making it suitable for various applications.
Knowledge is Power
I highly recommend taking some time to read up on the process behind deploying MongoDB Atlas using AWS-CDK. When I completed this project, I learned a few things about Cloudformation I’d never experienced, such as third-party Cloudformation public extensions.
- MongoDB L1, L2, and L3 Constructs for AWS CDK Resources in Github.
- MongoDB AWS-CDK Resources.
Pre-Requisites
Here are the following requirements to get this working. I will explain how to do most of this; however, I expect that you have created an AWS Account and MongoDB Atlas account. I will explain how to get a PAK code and create the cloud formation resources needed, such as the IAM Execution Role, The AWS Secrets Manager resources, and also how to deploy the MongoDB public extensions.
- MongoDB Atlas Account
- AWS Account & AWS CLI Installed and Configured
- Create MongoDB Atlas Programmatic API Key (PAK)
- Create an IAM Execution Role
- Activate MongoDB Atlas Cloud Formation Resources in each required Region and attach the IAM Execution Role
- MongoDB::Atlas::Project
- MongoDB::Atlas::Cluster
- MongoDB::Atlas::DatabaseUser
- MongoDB::Atlas::ProjectIpAccessList
- MongoDB::Atlas::PrivateEndpointService (optional in case you want to deploy a VPC endpoint into Atlas)
- MongoDB::Atlas::PrivateEndpointAWS (optional in case you want to deploy a VPC endpoint into Atlas)
- MongoDB::Atlas::ServerlessInstance (optional for Serverless)
- Store your MongoDB Atlas PAK in AWS Secret Manager.
- Require Info:
- Mongo PAK Public Key
- Mongo PAK Private Key
- Mongo DB URL
- Require Info:
- Locally Install MongoDB CDK Resources:
npm install awscdk-resources-mongodbatlasStep 1 – Create a MongoDB Atlas PAK
You will need the Organization Owner’s Permission to get yourself a PAK code.
- Log into MongoDB
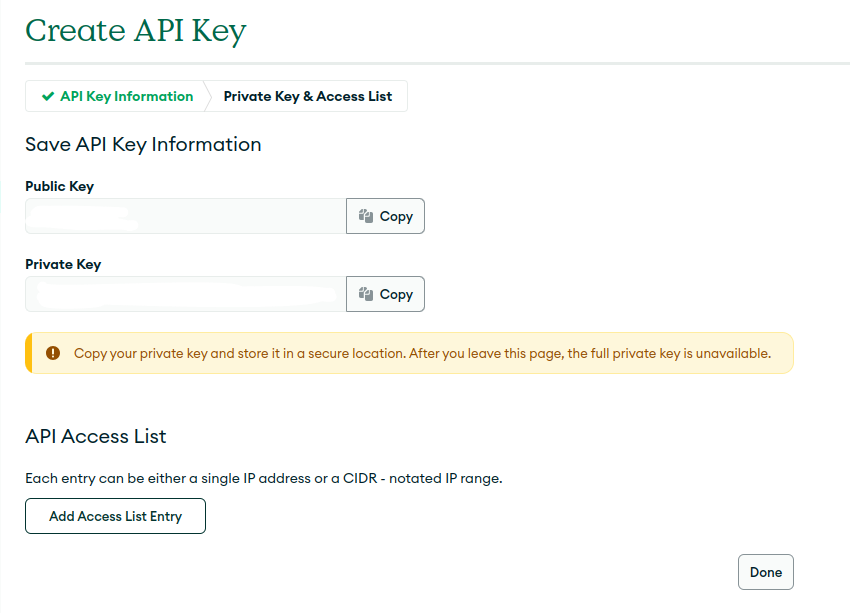
- Navigate to the Organization > Access Manager page for your Organization and press Create API Key
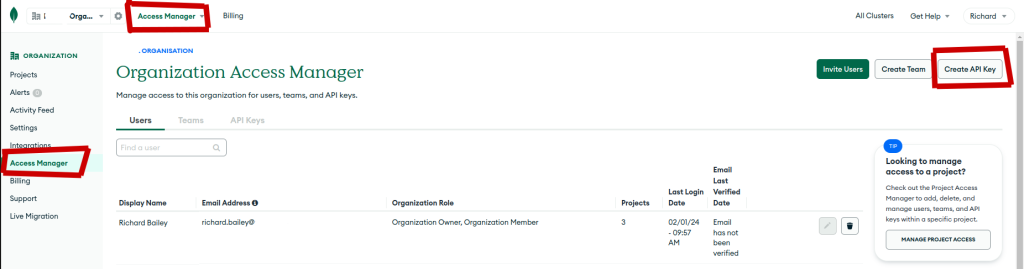
- Fill in the details to create you API Key
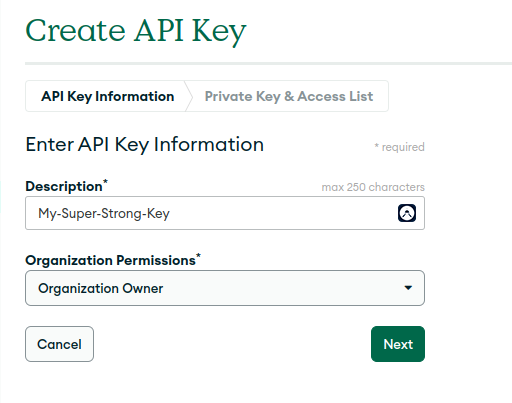
- Make a note of your API Key. You will need this later. Please note all of my information has been redacted for security reasons.
Well done, you have just created your API KEY.
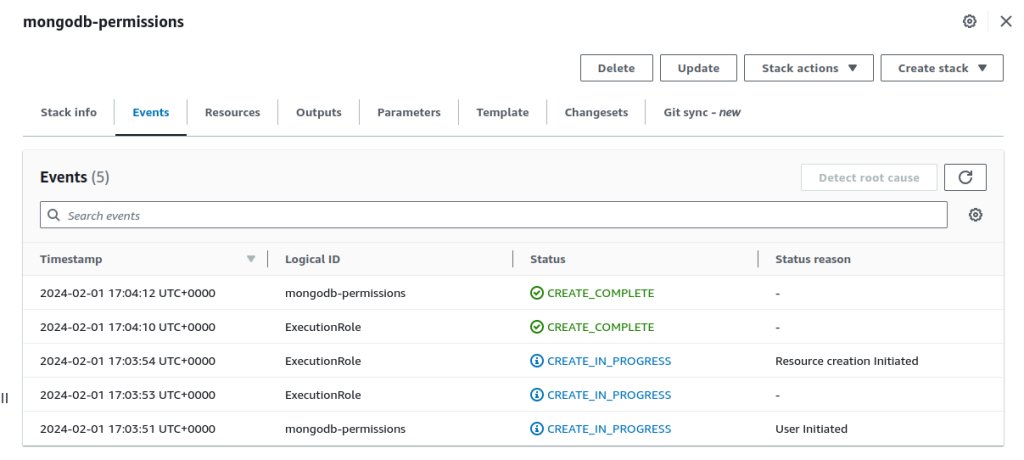
Step 2 – Use Cloud Formation to Create an IAM Execution Role
This role will be used by Cloud Formation to interact with my Account, AWS, and MongoDB.
Save this YAML file from the MongoDB Resources Github Page.
- Log into your AWS Account
- Go to CloudFormation and click Create Stack

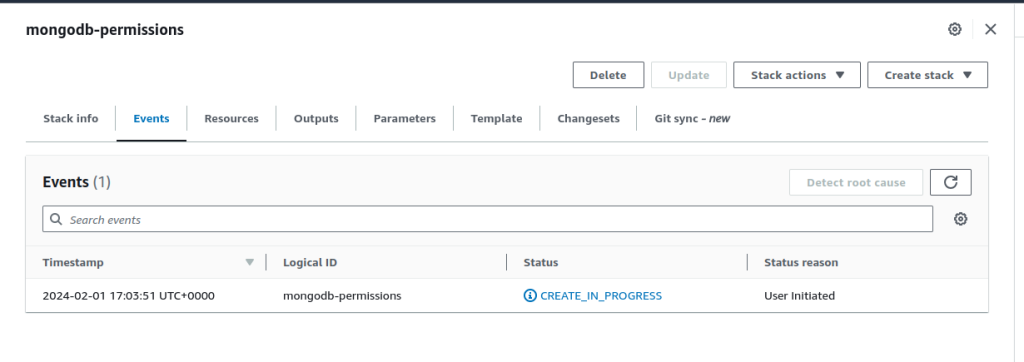
- Upload the YAML file above and deploy the stack.
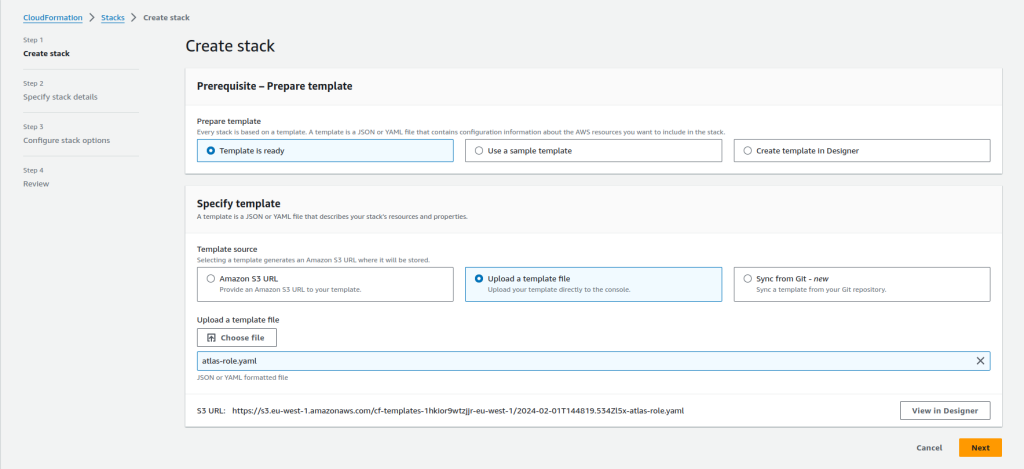
- Give the Stack a name and click next.
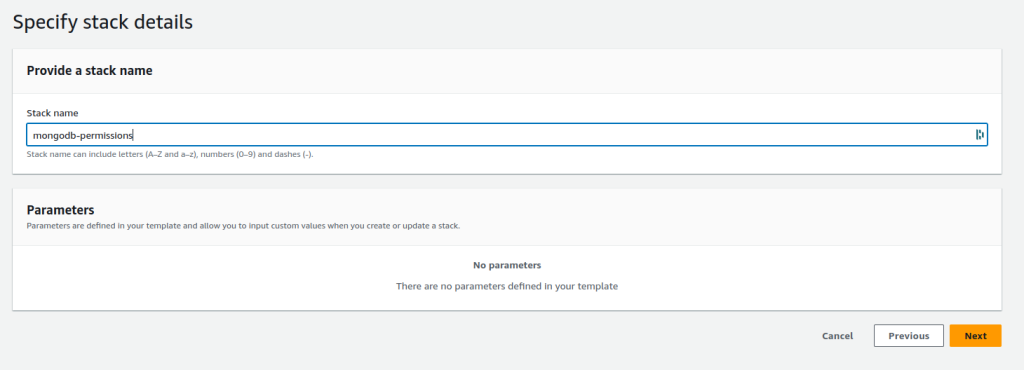
- On the next pages, you can click next next finish, no further changes are necessary
Step 3 – Activate MongoDB third-party Cloudformation public extensions.
This step can either be done manually in the AWS console, or you can deploy a preconfigured Cloud Formation template, similar to the above step.
Here we need to active the following Cloud Formation Public Extensions:
- MongoDB::Atlas::Project
- MongoDB::Atlas::Cluster
- MongoDB::Atlas::DatabaseUser
- MongoDB::Atlas::ProjectIpAccessList
- MongoDB::Atlas::PrivateEndpointService (optional in case you want to deploy a VPC endpoint into Atlas)
- MongoDB::Atlas::PrivateEndpointAWS (optional in case you want to deploy a VPC endpoint into Atlas)
- MongoDB::Atlas::ServerlessInstance (optional for Serverless)
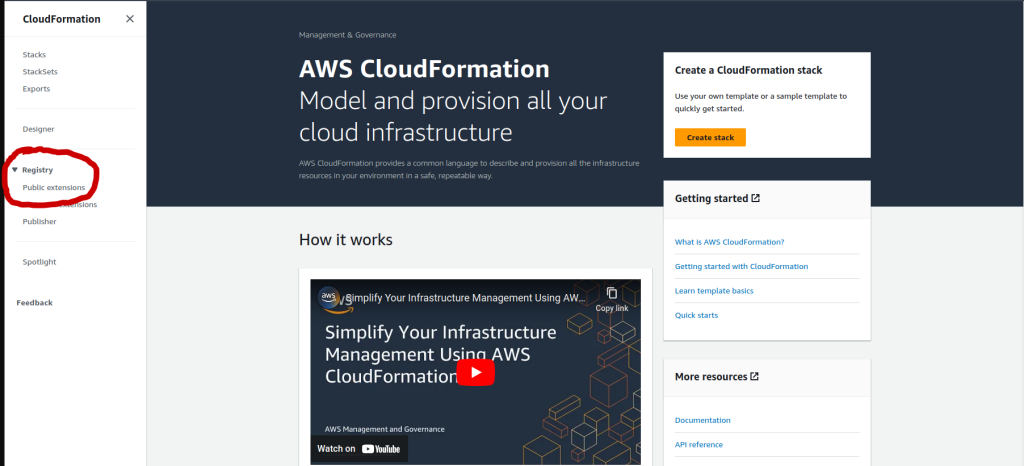
Activate Manually
- Open Cloud Formation and navigate to Registry > Public Extensions
- On the next page, make sure the filter is set as follows:
- Extension Type = Resource Types
- Publisher = Third Party
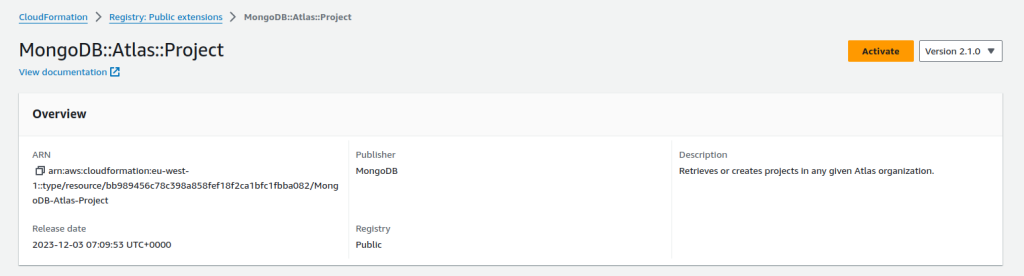
- Then Search for MongoDB::Atlas::Project
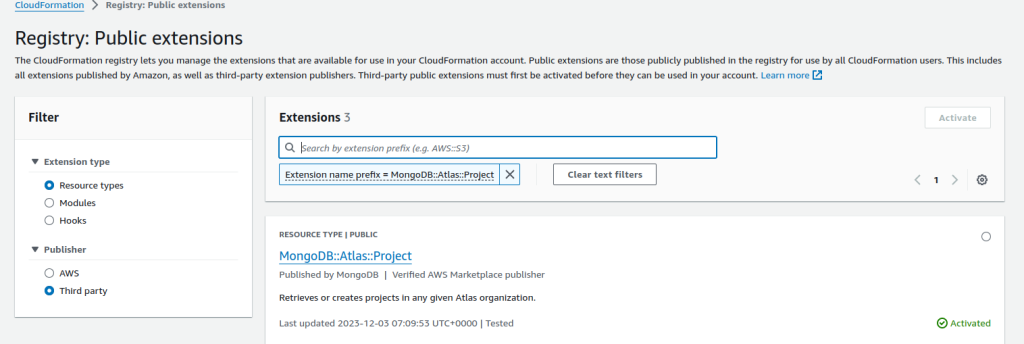
- Click on the heading MongoDB::Atlas::Project and then click the Active button
- IMPORTANT: On the next page, you must assign the ARN you created in Step 2 of this procedure.
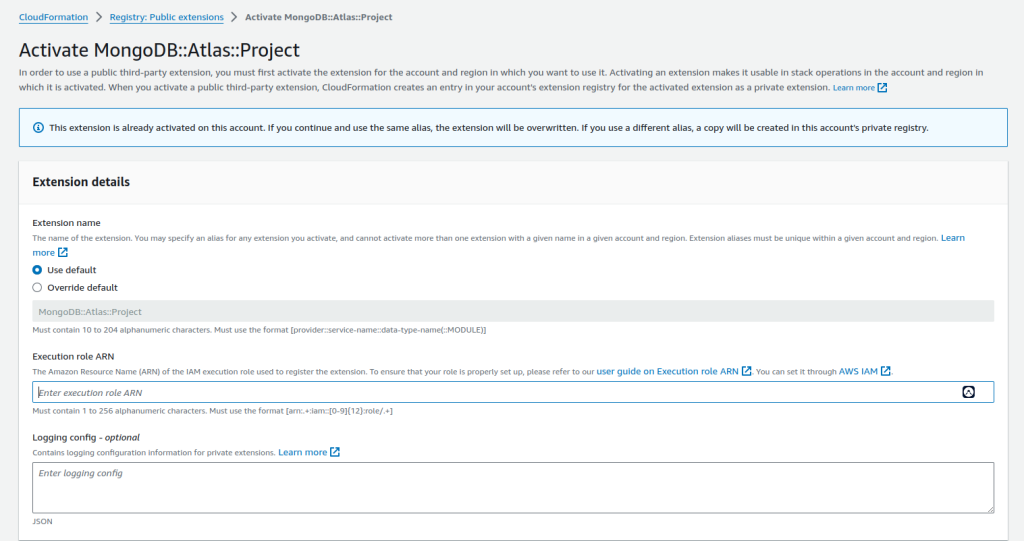
- Repeat the process for:
- MongoDB::Atlas::Project
- MongoDB::Atlas::Cluster
- MongoDB::Atlas::DatabaseUser
- MongoDB::Atlas::ProjectIpAccessList
- MongoDB::Atlas::PrivateEndpointService (optional incase you want to deploy a VPC endpoint into Atlas)
- MongoDB::Atlas::PrivateEndpointAWS (optional incase you want to deploy a VPC endpoint into Atlas)
- MongoDB::Atlas::ServerlessInstance (optional for Serverless)
Step 4 – Store your MongoDB PAK in Secrets Manager
The Next Step is to create an AWS Secret for your MongoDB PAK. Again there is a template for this on the MongoDB Cloud Roursesd Github page.
- Download the Cloud Formation Template from Githib.
- Open Cloud Formation and Deploy the new stack
- CloudFormation > Stack > Create Stacks
- Upload the template above
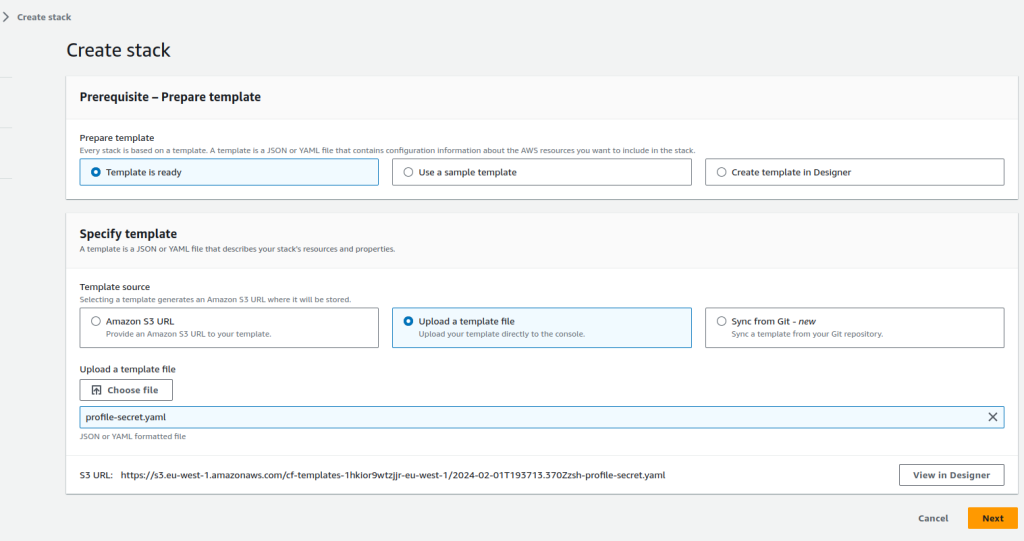
- Click Next, you will then be prompted to add the parameters you created in Step 1
- Add the following:
- BaseUrl – typically https://cloud.mongodb.com
- Private Key (from the API PAK)
- Public Key (from API PAK)
- You can also give the profile a name, I recommend leaving this as default
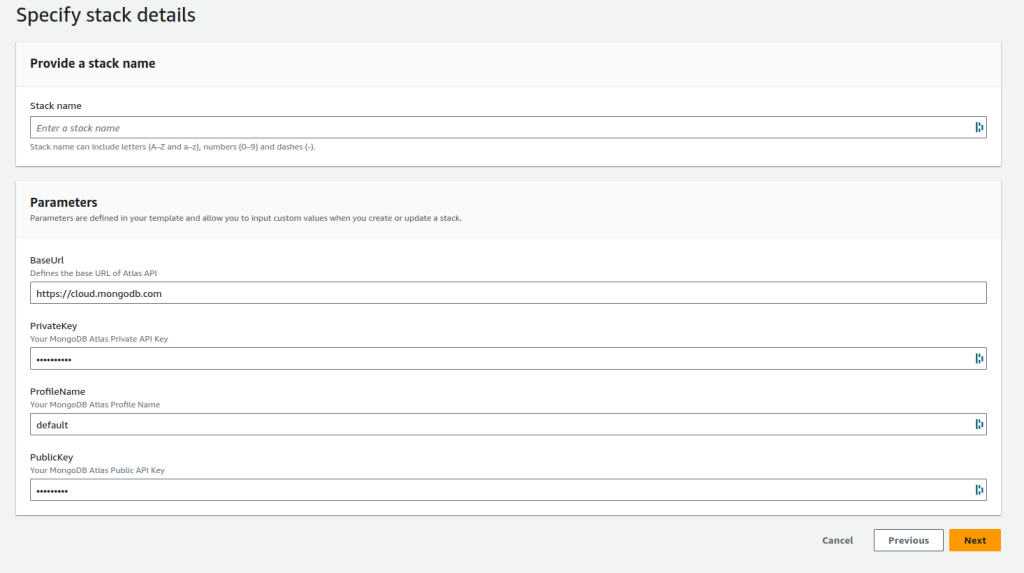
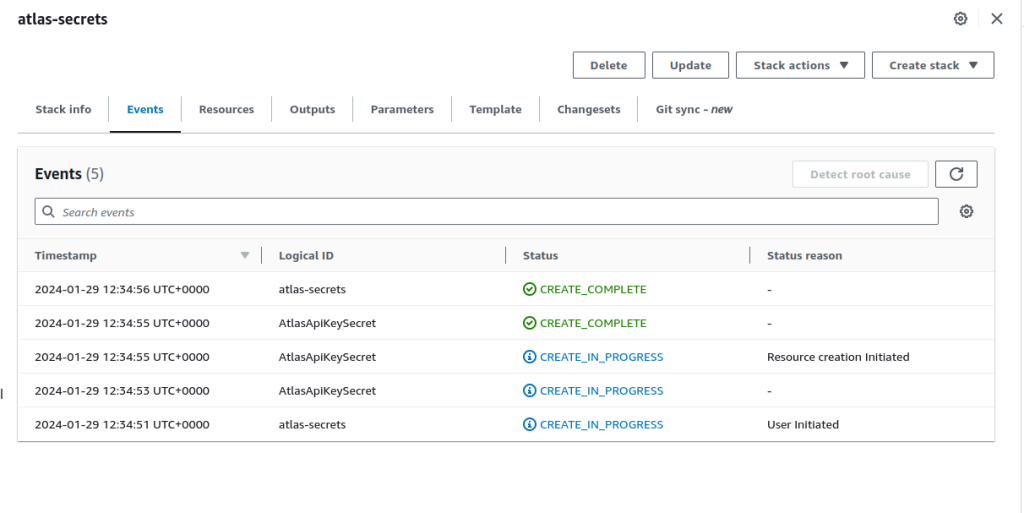
Run the Cloud Formation Template and you will get a Secret Createds.
Step 5 – Configure your IDE
Now we start to code. Open your favorite IDE, I will be using Webstorm by JetBrains.
- Install the latest version of AWS-CDK
npm install -g aws-cdk- Now Bootstrap the AWS environment
cdk bootstrap aws://123456789/eu-west-1 [Your Account & Region]- No init your typescript app
cdk init app --language typescriptUse NPM to install the MongoDB CDK Contruct library
npm install awscdk-resources-mongodbatlasStep 6 – Create Your CDK Construct
- Write MongoDB code or use pre-defined L1, L2, L3 Construct Examples.
Create an App Entry point in /bin
#!/usr/bin/env node
import 'source-map-support/register';
import * as cdk from 'aws-cdk-lib';
import { AtlascdkStack } from '../lib/atlascdk-stack';

const app = new cdk.App();
new AtlascdkStack(app, 'AtlascdkStack', {
});
Step 7 – Configure the Required Props
The following props need to be declared in your code
readonly orgId: string;
readonly profile: string;
readonly clusterName: string;
readonly region: string;
readonly ip: string;- orgID = Atlas Org at project level [Required] – you will find this on your MongoDB Atlas Organization page.
- IP = Public IP access list (default value: blank [Required])
- profile = AWS Secret Name (default value: cfn/atlas/profile/default)
[Only Required if Customised Name] - clusterName [Optional]
- Note: Project & DB name is formed from clusterName
Step 8 – Run a Diff
To see what Infrastructure is going to change type:
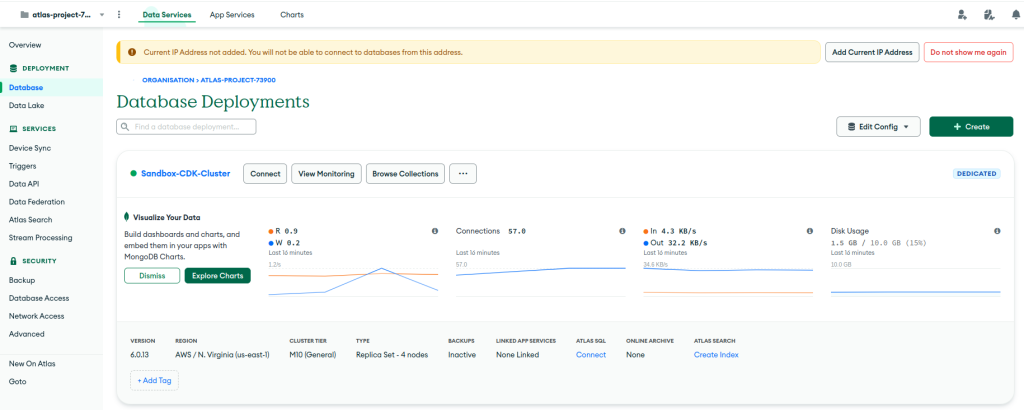
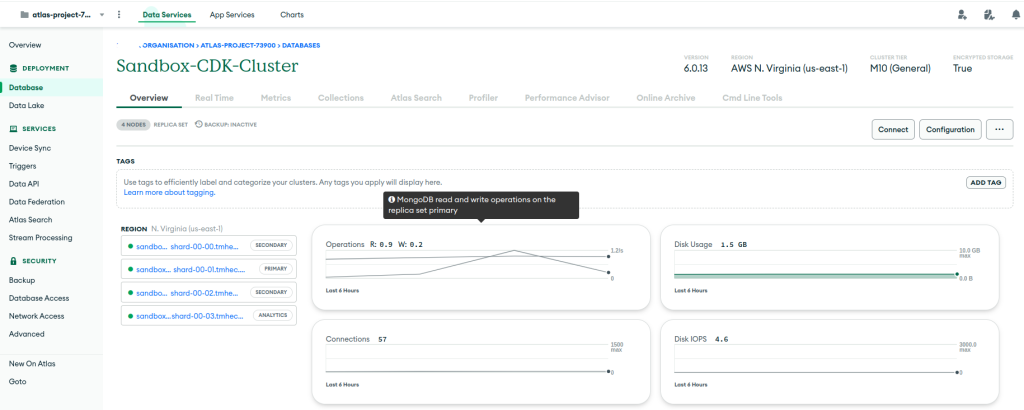
cdk diff --context orgId="YOUR ORG ID" --context ip="1.1.1.1" --clusterName="Sandbox-CDK-Cluster"You should see output like this:
Stack AtlascdkStack Hold on while we create a read-only change set to get a diff with accurate replacement information (use --no-change-set to use a less accurate but faster template-only diff) Parameters [+] Parameter BootstrapVersion BootstrapVersion: {"Type":"AWS::SSM::Parameter::Value<String>","Default":"/cdk-bootstrap/hnb659fds/version","Description":"Version of the CDK Bootstrap resources in this environment, automatically retrieved from SSM Parameter Store. [cdk:skip]"} Conditions [+] Condition CDKMetadata/Condition CDKMetadataAvailable: {"Fn::Or":[{"Fn::Or":[{"Fn::Equals":[{"Ref":"AWS::Region"},"af-south-1"]},{"Fn::Equals":[{"Ref":"AWS::Region"},"ap-east-1"]},{"Fn::Equals":[{"Ref":"AWS::Region"},"ap-northeast-1"]},{"Fn::Equals":[{"Ref":"AWS::Region"},"ap-northeast-2"]},{"Fn::Equals":[{"Ref":"AWS::Region"},"ap-south-1"]},{"Fn::Equals":[{"Ref":"AWS::Region"},"ap-southeast-1"]},{"Fn::Equals":[{"Ref":"AWS::Region"},"ap-southeast-2"]},{"Fn::Equals":[{"Ref":"AWS::Region"},"ca-central-1"]},{"Fn::Equals":[{"Ref":"AWS::Region"},"cn-north-1"]},{"Fn::Equals":[{"Ref":"AWS::Region"},"cn-northwest-1"]}]},{"Fn::Or":[{"Fn::Equals":[{"Ref":"AWS::Region"},"eu-central-1"]},{"Fn::Equals":[{"Ref":"AWS::Region"},"eu-north-1"]},{"Fn::Equals":[{"Ref":"AWS::Region"},"eu-south-1"]},{"Fn::Equals":[{"Ref":"AWS::Region"},"eu-west-1"]},{"Fn::Equals":[{"Ref":"AWS::Region"},"eu-west-2"]},{"Fn::Equals":[{"Ref":"AWS::Region"},"eu-west-3"]},{"Fn::Equals":[{"Ref":"AWS::Region"},"il-central-1"]},{"Fn::Equals":[{"Ref":"AWS::Region"},"me-central-1"]},{"Fn::Equals":[{"Ref":"AWS::Region"},"me-south-1"]},{"Fn::Equals":[{"Ref":"AWS::Region"},"sa-east-1"]}]},{"Fn::Or":[{"Fn::Equals":[{"Ref":"AWS::Region"},"us-east-1"]},{"Fn::Equals":[{"Ref":"AWS::Region"},"us-east-2"]},{"Fn::Equals":[{"Ref":"AWS::Region"},"us-west-1"]},{"Fn::Equals":[{"Ref":"AWS::Region"},"us-west-2"]}]}]} Resources [+] MongoDB::Atlas::Project AtlasBasic/project-AtlasBasic AtlasBasicprojectAtlasBasicC3781E8B [+] MongoDB::Atlas::Cluster AtlasBasic/cluster-AtlasBasic AtlasBasicclusterAtlasBasic54E74CF8 [+] MongoDB::Atlas::DatabaseUser AtlasBasic/db-user-AtlasBasic AtlasBasicdbuserAtlasBasic0025317A [+] MongoDB::Atlas::ProjectIpAccessList AtlasBasic/ip-access-list-AtlasBasic AtlasBasicipaccesslistAtlasBasicD870229A Other Changes [+] Unknown Rules: {"CheckBootstrapVersion":{"Assertions":[{"Assert":{"Fn::Not":[{"Fn::Contains":[["1","2","3","4","5"],{"Ref":"BootstrapVersion"}]}]},"AssertDescription":"CDK bootstrap stack version 6 required. Please run 'cdk bootstrap' with a recent version of the CDK CLI."}]}Step 9 – CDK Deploy
The final step is to run CDK Deploy
cdk deploy --context orgId="644cd212e788bd1cdde7dc1f" --context ip="1.1.1.1" --context clusterName="Sandbox-CDK-Cluster"✨ Synthesis time: 6.09s
AtlascdkStack: start: Building 4eaf80395bc39588d0b54fbff03333680f28e94023800e520198fa0c4a1d3e41:current_account-current_region
AtlascdkStack: success: Built 4eaf80395bc39588d0b54fbff03333680f28e94023800e520198fa0c4a1d3e41:current_account-current_region
AtlascdkStack: start: Publishing 4eaf80395bc39588d0b54fbff03333680f28e94023800e520198fa0c4a1d3e41:current_account-current_region
AtlascdkStack: success: Published 4eaf80395bc39588d0b54fbff03333680f28e94023800e520198fa0c4a1d3e41:current_account-current_region
AtlascdkStack: deploying… [1/1]
AtlascdkStack: creating CloudFormation changeset…
✅ AtlascdkStack
✨ Deployment time: 657.24s
Stack ARN:
arn:aws:cloudformation:eu-west-1:214828364459:stack/AtlascdkStack/f2be7980-c02b-11ee-8fdf-0ae8e6b1e7dd
✨ Total time: 663.33s
Full Stack Code Example
I am now able to share with you the end-to-end stack example of my MongoDB stack.
Before we start. This is what the directory structure of my code looks like:
PLEASE NOTE: MY PARAMETERS HAVE BEEN REDACTED FOR SECURITY. YOU WILL NEED TO UPDATE WITH YOUR VALUES IF YOU ARE FOLLOWING ALONG AT HOME.
├── src
│   ├── bin
│   │   └── app.ts
│   ├── config
│   │   ├── mongo-database-config.ts
│   │   └── accounts.ts   (REDACTED)
│   ├── constructs
│   │   ├── mongo
│   │   │   └── mongo-application-database.ts
│   └── stacks
│       ├── mongodb-stack.ts
App.ts
This script sets up an AWS CDK application, defines tags, and creates an instance of the MongodbStack, which contains AWS resources related to MongoDB, and then synthesizes the CDK app for deployment.
#!/usr/bin/env node
import 'source-map-support/register';
import { App } from 'aws-cdk-lib';
import { MongodbStack } from '../stacks/mongodb-stack';

const app = new App();

const stackTags = {
  Team: 'Platform',
  Repository: 'Mongo Database',
  RepositoryUrl: 'https://bitbucket.org/xxxxxx/xxxxxxx',
  DeployedUsing: 'CDK'
};

new MongodbStack(app, 'MongodbStack', {
  stackName: 'MongodbStack',
  description: 'Contains MongoDB resources for applications.',
  env: { account: environment.AWS_ACCOUNT_ID, region: environment.AWS_REGION },
  terminationProtection: false,
  tags: stackTags
});

app.synth();
mongo-database-config.ts
This code organizes MongoDB Atlas stack configurations in a TypeScript object, allowing for easy management and retrieval of settings based on account names. The configurations include details like build type, region, cluster name, and various other MongoDB-related parameters.
import { Accounts } from '.accounts';
import { AtlasStackProps } from '../constructs/mongo/mongo-application-database';

export const MongoDatabaseConfig: Record<string, AtlasStackProps> = {
  [Accounts.MY_ACCOUNT_NAME]: {
    buildType: 'SERVERLESS',
    instanceName: 'EU-DEV-SERVERLESS',
    continuousBackupEnabled: true,
    atlasRegion: 'EU_WEST_1',
    clusterName: 'eu-dev-cluster',
    profile: 'default',
    organizationId: 'MY_MONGO_ORG_ID',
    ip: 'MY_IP_RANGE',
    vpcId: 'MY VPC_ID',
    subnetIds: 'MY_SUBNET',
    projectName: 'MY_PROJECT_NAME'
  }
};
Mongo-Application-Database.ts
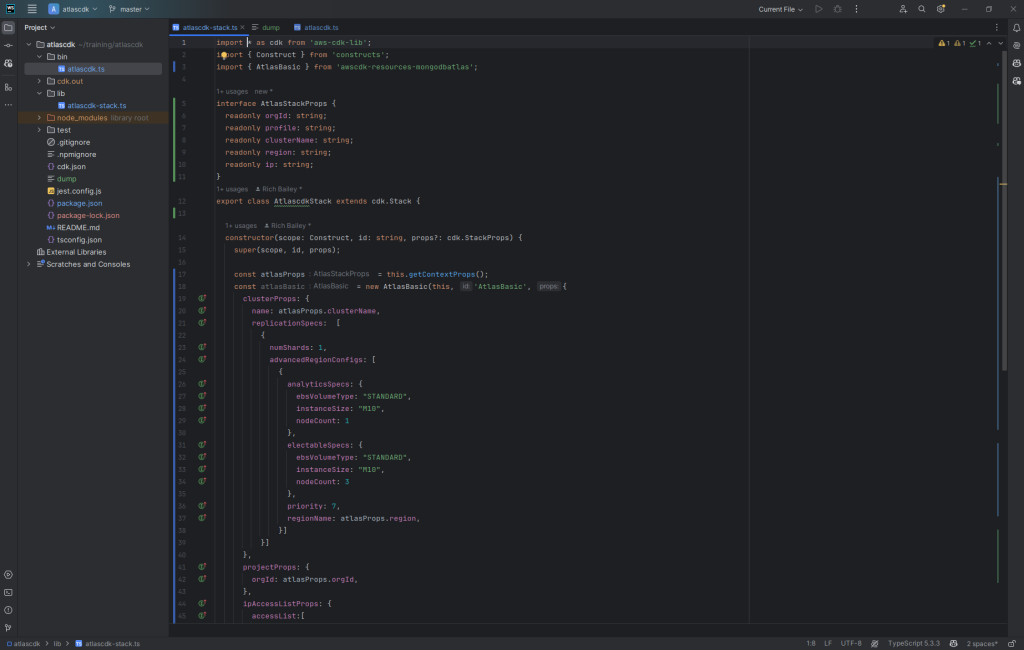
This TypeScript code defines a class MongoApplicationDatabase that extends the AWS Cloud Development Kit (CDK) Construct class. The class is designed to create and manage MongoDB Atlas resources based on provided configuration properties (AtlasStackProps).
The code is essentially a CDK construct that abstracts the creation of MongoDB Atlas resources based on the provided configuration. Depending on the build type specified in the configuration, it creates either a serverless or a dedicated MongoDB cluster.
import { Construct } from 'constructs';
import { AtlasBasicPrivateEndpoint, AtlasServerlessBasic, ServerlessInstanceProviderSettingsProviderName } from 'awscdk-resources-mongodbatlas';
import { Vpc } from 'aws-cdk-lib/aws-ec2';
import { StringParameter } from 'aws-cdk-lib/aws-ssm';

export interface AtlasStackProps {
  readonly organizationId: string;
  readonly profile: string;
  readonly clusterName: string;
  readonly atlasRegion: string;
  readonly ip: string;
  readonly vpcId: string;
  readonly subnetIds: string;
  readonly projectName: string;
  readonly buildType?: string;
  readonly instanceName?: string;
  readonly continuousBackupEnabled?: boolean;
  readonly terminationProtectionEnabled?: boolean;
  readonly ebsVolumeType?: string;
  readonly instanceSize?: string;
}

export class MongoApplicationDatabase extends Construct {
  constructor(scope: Construct, id: string, props: AtlasStackProps) {
    super(scope, id);

    const vpc = Vpc.fromLookup(this, 'Vpc', {
      vpcName: StringParameter.valueFromLookup(this, '/MY/PARAMETER/LOCATION'),
      subnetGroupNameTag: 'subnet-type',
      isDefault: false
    });

    if (props.buildType === 'SERVERLESS') {
      new AtlasServerlessBasic(this, 'AtlasServerless', {
        serverlessProps: {
          name: props.instanceName,
          profile: props.profile,
          continuousBackupEnabled: props.continuousBackupEnabled,
          providerSettings: {
            providerName: ServerlessInstanceProviderSettingsProviderName.SERVERLESS,
            regionName: props.atlasRegion
          },
          terminationProtectionEnabled: props.terminationProtectionEnabled
        },
        projectProps: {
          name: props.projectName,
          orgId: props.organizationId
        },

        ipAccessListProps: {
          accessList: [{ ipAddress: props.ip, comment: 'Legacy VPC Access' }]
        },
        profile: props.profile
      });
    } else {
      new AtlasBasicPrivateEndpoint(this, 'Atlas Dedicated', {
        region: props.atlasRegion,
        atlasBasicProps: {
          clusterProps: {
            name: props.clusterName,
            replicationSpecs: [
              {
                numShards: 1,
                advancedRegionConfigs: [
                  {
                    analyticsSpecs: {
                      ebsVolumeType: props.ebsVolumeType,
                      instanceSize: props.instanceSize,
                      nodeCount: 1
                    },
                    electableSpecs: {
                      ebsVolumeType: props.ebsVolumeType,
                      instanceSize: props.instanceSize,
                      nodeCount: 3
                    },
                    priority: 7,
                    regionName: props.atlasRegion
                  }
                ]
              }
            ]
          },
          projectProps: {
            orgId: props.organizationId,
            name: props.projectName
          },
          ipAccessListProps: {
            accessList: [{ ipAddress: props.ip, comment: 'Legacy VPC Access' }]
          },
          profile: props.profile
        },
        privateEndpointProps: {
          awsVpcId: vpc.vpcId,
          awsSubnetId: props.subnetIds
        }
      });
    }
  }
}
Mongo-Stack.ts
This stack class is designed to conditionally create a MongoDB application database based on the AWS account ID. If the configuration for the account is defined in MongoDatabaseConfig, it creates an instance of MongoApplicationDatabase with the specified configuration.
import { Stack, StackProps } from 'aws-cdk-lib';
import { Construct } from 'constructs';
import { MongoDatabaseConfig } from '../config/mongo-database-config';
import { MongoApplicationDatabase } from '../constructs/mongo/mongo-application-database';

export class MongodbStack extends Stack {
  constructor(scope: Construct, id: string, props: StackProps) {
    super(scope, id, props);
    const accountId = Stack.of(this).account;

    if (MongoDatabaseConfig[accountId]) {
      new MongoApplicationDatabase(this, 'ApplicationDatabase', { ...MongoDatabaseConfig[accountId] });
    }
  }
}
Leave a Reply