
Update: This procedure was refreshed with current source notes on May 10, 2026. Data recovery is never guaranteed; stop writes first, image the disk, and work from the copy wherever possible.
EXT4 Data Recovery: Recover Data from an EXT4 Linux File System. Your Ultimate Guide to Linux File Restoration
TL;DR
- Stop using the affected disk immediately; every write can overwrite recoverable data.
- Use GNU ddrescue or an equivalent imaging workflow before experimenting with repair tools.
- Use TestDisk for partition/file-system discovery; expect mixed results for deleted-file recovery on ext4.
Source check – May 10, 2026: The Linux kernel documentation remains the canonical ext4 reference, GNU maintains the ddrescue manual, and the TestDisk documentation distinguishes partition recovery from deleted-file recovery. If the disk has mechanical symptoms, stop and use a professional lab instead of continuing with software recovery.
| Topic | When | Command or source |
|---|---|---|
| ext4 internals | Understanding blocks, inodes, and journaling | Linux kernel ext4 docs |
| Disk imaging | Before recovery attempts | GNU ddrescue manual |
| Recovery tooling | Partition or file recovery triage | TestDisk documentation |
Start here: If you still have access to the running system, do not clean up logs, reinstall packages, or run broad repair commands first. For general storage context, read Linux file system basics; for unrelated space issues, use the safer Linux disk cleanup guide.
What is an EXT4 file system?
Linux’s Operating System offers over 100 distinct file systems for disk storage. Among these, the Extended file system version 4, or more commonly referred to as EXT4, stands out as a top choice. In fact, it has become the default file system standard in all major Linux distributions. Given its importance, mastering Ext4 Data Recovery proves invaluable.
Is EXT4 Data Recovery Possible?
Recovering data from an EXT4 partition can pose challenges. This complexity arises from the way the Operating System segments data within an EXT4 file system. To enhance performance, EXT4 organizes data meticulously into a series of block groups.
Specifically, a block consists of sectors ranging from 1KiB (1024 kb) to 64KiB (65536 kb). Moreover, the block group layout is divided into multiple blocks. To facilitate the file system’s structure, several blocks play a crucial role. These comprise the EXT4 superblock, Group descriptors, Inode tables, Inode bitmaps, and the core data blocks.
How does the EXT4 file system safeguard data?
Designed with flexibility and durability in mind, EXT4 serves as a backward-compatible file system. It builds upon its predecessors (EXT2, EXT3) while embracing features that cater to modern OS needs. These attributes ensure that EXT4 scales efficiently and remains dependable, even for extensive file systems.
Key components include:
Inode Tables and EXT4 Data Recovery
At the heart of the file system lies the Inode table, which acts as a cornerstone. This table holds metadata about a file or data block within an EXT4 system. When an application needs to access specific metadata, it can do so by referencing the known Inode ID. Notably, each Inode represents a file within the file table. By employing this file system approach, servers experience enhanced performance and diminished fragmentation.
Inodes contain pertinent information such as:
- File’s creation (birth) timestamp (btime)
- Last modification timestamp (mtime)
- Last status change timestamp (ctime)
- Size of the file
- Device id
- User id (UID)
- Group Id (GID)
- Plus, a pointer to the actual data
However, it’s worth noting that Inodes don’t retain the file name. Instead, the file table holds this piece of information. While each file name links to a unique Inode number, a single file Inode number can correspond to multiple names. Thankfully, querying Inode data remains straightforward on any EXT.
df –i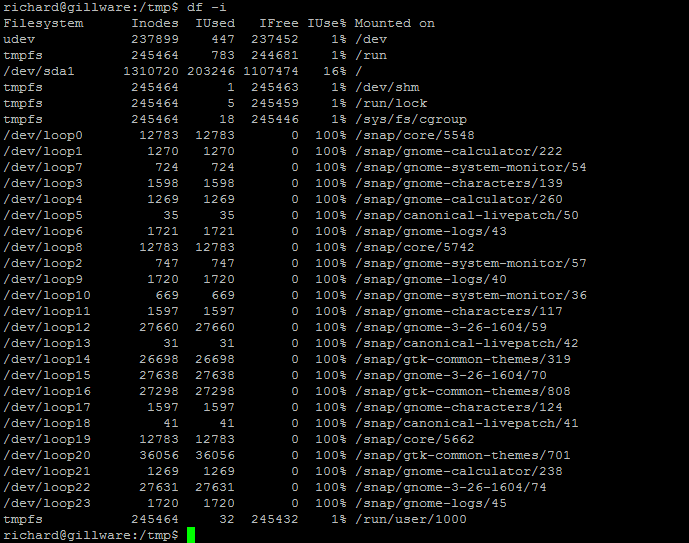
To get detailed Inode information on a file, run the stat command.
stat testfile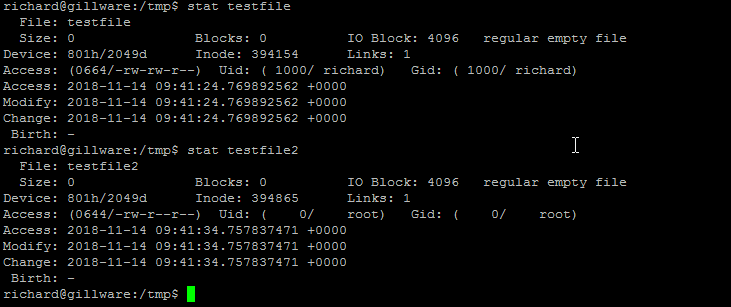
Journaling and EXT4 Data Recovery
Journaling is a feature of ext4 designed to prevent data corruption. Essentially a journaling log tracks writes to disk and ensure any partially written jobs are completed next. The file system uses the journal if there is an unexpected reboot and data has not finished writing to disk.
You can check the status of your journaling by executing the following
$ cat /proc/fs/jbd2/your partition/info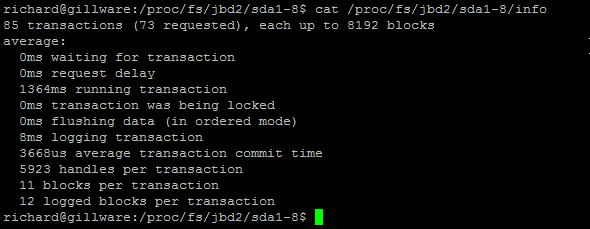
EXT4 Data Recovery Step-by-Step Procedure
Grasping the concepts discussed earlier is crucial for diving into EXT4 Data Recovery. Despite the robustness of hardware, data loss can occur due to hardware mishaps, software glitches, or simply human error. More often than not, accidental deletions or malicious intents lead to missing data. If you find your server lacking a current backup, you might face challenges in restoring vital information.
Contrary to the advice from many Linux distributors, recovering EXT4 data files straight out of the box isn’t typically feasible. Yet, this doesn’t mean you’re out of options. Several innovative tools strive to reclaim lost data, either by searching through the file system journal or by attempting to undelete vanished Inodes. Success rates, however, can vary.
For those hesitant about diving into data recovery on their own or for instances where initial efforts don’t bear fruit, seeking out a third-party data recovery specialist becomes a viable option.
A Word of Caution: Backup Before You Dive In
Before undertaking any recovery steps, always ensure you’ve backed up your disk. Avoid working directly on the file system from which you’re trying to retrieve data. Doing so risks overwriting Inodes, potentially ruining any hopes of data recovery. Tools like ddrescue can help you clone EXT4 file systems to safer locations.
Step 1 – Install DDRescue and Testdisk
This command installs a program called “gddrescue” on a Linux system using the terminal and superuser privileges.
sudo apt install gddrescue testdiskYou should see output like this:
sudo apt install gddrescue testdisk
Reading package lists... Done
Building dependency tree... Done
Reading state information... Done
The following packages were automatically installed and are no longer required:
  linux-headers-6.5.0-14-generic linux-hwe-6.5-headers-6.5.0-14 linux-image-6.5.0-14-generic
  linux-modules-6.5.0-14-generic linux-modules-extra-6.5.0-14-generic
Use 'sudo apt autoremove' to remove them.
Suggested packages:
  ddrescueview
The following NEW packages will be installed
  gddrescue testdisk
0 to upgrade, 2 to newly install, 0 to remove and 2 not to upgrade.
Need to get 527 kB of archives.
After this operation, 1,928 kB of additional disk space will be used.
Get:1 http://gb.archive.ubuntu.com/ubuntu jammy/universe amd64 gddrescue amd64 1.23-2build1 [118 kB]
Get:2 http://gb.archive.ubuntu.com/ubuntu jammy/universe amd64 testdisk amd64 7.1-5build1 [410 kB]
Fetched 527 kB in 0s (2,713 kB/s)
Selecting previously unselected package gddrescue.
(Reading database ... 284326 files and directories currently installed.)
Preparing to unpack .../gddrescue_1.23-2build1_amd64.deb ...
Unpacking gddrescue (1.23-2build1) ...
Selecting previously unselected package testdisk.
Preparing to unpack .../testdisk_7.1-5build1_amd64.deb ...
Unpacking testdisk (7.1-5build1) ...
Setting up gddrescue (1.23-2build1) ...
Setting up testdisk (7.1-5build1) ...
Processing triggers for man-db (2.10.2-1) ...
Processing triggers for install-info (6.8-4build1) ...
Step 2 – Take an Image of the File System
This command calls the ddrescue command, typically used for copying data from one source (in this case, /dev/sdb, which represents a block device, possibly a disk) to a destination file (/tmp/server.img).
You can use the lsblk command to discover your disk layout. On my local system, my disks are in /dev/zd0
lsblkYou will get output like this:
zd0              230:0    0   500M  0 disk
└─keystore-rpool 252:0    0   484M  0 crypt /run/keystore/rpool
nvme0n1          259:0    0 476.9G  0 disk
├─nvme0n1p1      259:1    0   512M  0 part  /boot/grub
│                                           /boot/efi
├─nvme0n1p2      259:2    0     2G  0 part
│ └─cryptoswap   252:1    0     2G  0 crypt [SWAP]
├─nvme0n1p3      259:3    0     2G  0 part
└─nvme0n1p4      259:4    0 472.4G  0 part
You can also use the fdisk command to get further information about your disk:
sudo fdisk -l /dev/zdYou Should see Output similar to:
Disk /dev/zd0: 500 MiB, 524288000 bytes, 1024000 sectors
Units: sectors of 1 * 512 = 512 bytes
Sector size (logical/physical): 512 bytes / 8192 bytes
I/O size (minimum/optimal): 8192 bytes / 8192 bytes
Now you are ready to Image your Disk.
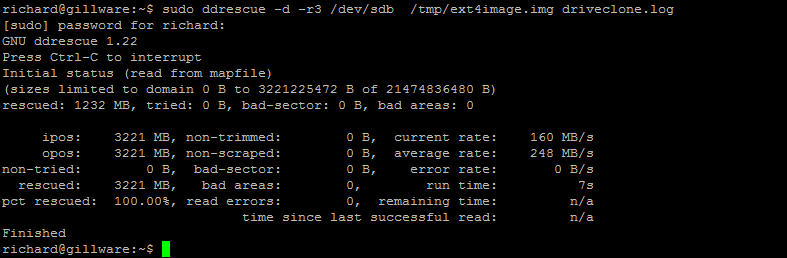
sudo ddrescue /dev/zd0 /tmp/server.img /tmp/server.logYou should see output like this:
GNU ddrescue 1.23
Press Ctrl-C to interrupt
     ipos:  524222 kB, non-trimmed:        0 B,  current rate:    524 MB/s
     opos:  524222 kB, non-scraped:        0 B,  average rate:    524 MB/s
non-tried:        0 B,  bad-sector:        0 B,    error rate:       0 B/s
  rescued:  524288 kB,   bad areas:        0,        run time:          0s
pct rescued:  100.00%, read errors:        0,  remaining time:         n/a
                              time since last successful read:         n/a
Finished
Here is a breakdown of what the command above does:
sudo: It is a command that allows a permitted user to execute a command as the superuser or another user, as specified by the security policy.ddrescue: This is the main command. It is used for copying data from one file or block device to another, with advanced features for error recovery.-d: This option instructsddrescueto operate in direct disc access mode, which is useful for bypassing the operating system’s cache.-r3: This option sets the retry limit to 3 times. Ifddrescueencounters errors during the copying process, it will attempt to recover the data up to 3 times./dev/sdb: This is the source block device. It represents a storage device, possibly a disk./tmp/server.img: This is the destination file where the data/dev/sdbwill be copied.server.log: This is the log file thatddrescuewill keep a record of its operations and any encountered errors.
Below is a real-world example of this being completed on a customer server:
Step 3 – Use Testdisk to recover files.
Once you have a backup of our EXT4 file system, we can safely use a tool called testdisk to attempt to recover data.
To demonstrate this, I have created 3 data files called:
- data1.img
- data2.img
- data3.img

Next, for this demonstration, I have deleted the files 3 files using
sudo rm /tmp/data*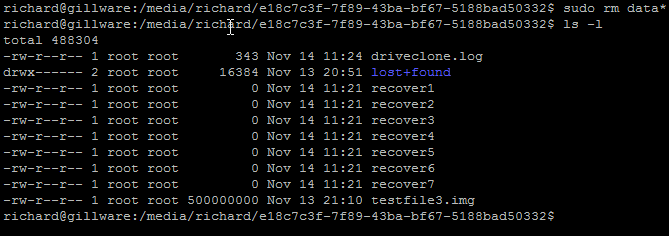
Next, execute the testdisk application. Simply type testdisk
testdisk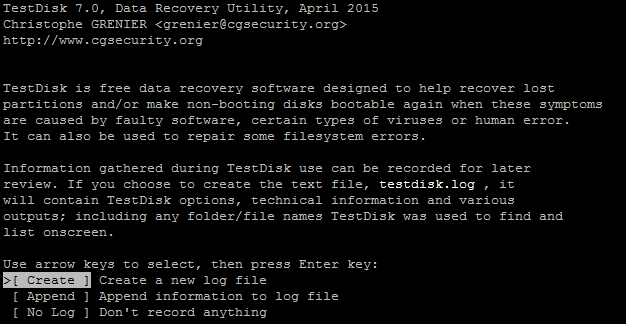
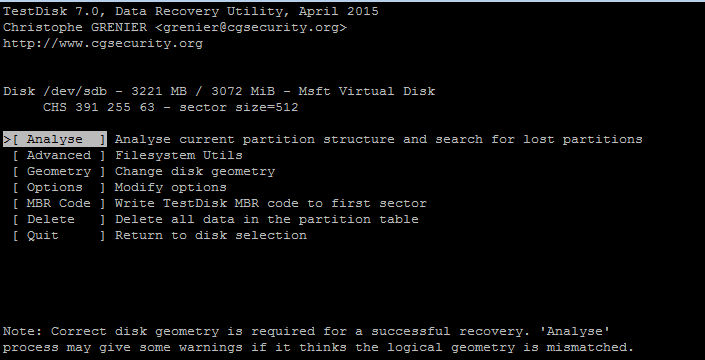
Select Create and choose Intel partition (the program should auto-detect your disk)
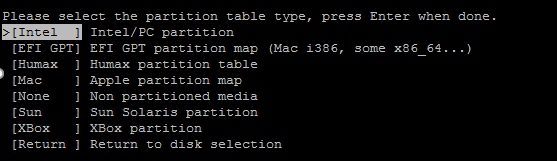
Next, Select Analyze
Choose your partition to recover data and hit enter, then press P to list all the files found.

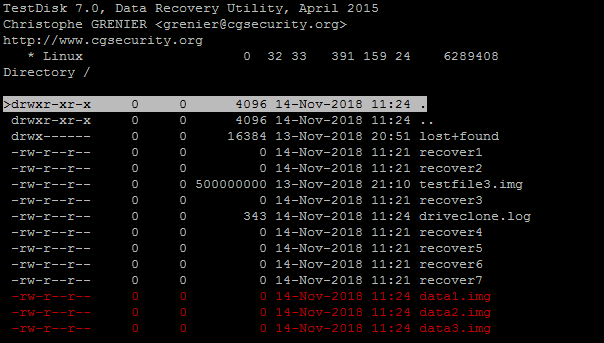
Press: to select files marked in red they will turn green once selected

Press C to copy selected files and choose a location to save the files
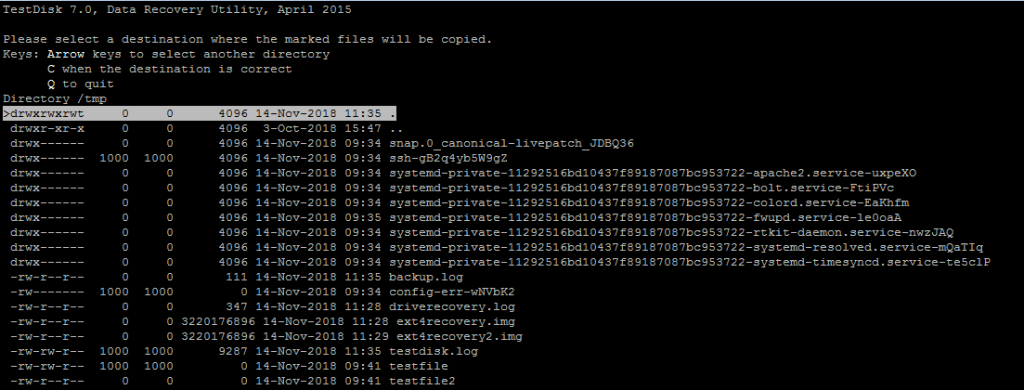
After you have chosen the file system. Press C again to copy

Step 4 – Use a Hex Editor to Examine the Data
If you encounter any issues recovering data or can only partially restore a file, you can take your investigation one step further and interrogate the data with a hex editor. The hex editor will determine if the data blocks are available and if it is worthwhile attempting to recover. A tool such as wxhexeditor is great at interrogating data. You can even mount your backup image taken previously on ddrescue to determine if the data is available.
To install WxHexEditor on Ubuntu:
sudo apt-get update
sudo apt-get install wxhexeditor
To install WxHexEditor on a Debian variant via the archive repo using:
wget -q -O - http://archive.getdeb.net/getdeb-archive.key | sudo apt-key add -
sudo sh -c 'echo "deb http://archive.getdeb.net/ubuntu $(lsb_release -cs)-getdeb apps" >> /etc/apt/sources.list.d/getdeb.list'
sudo apt-get update
sudo apt-get install wxhexeditor
To install WxHexEditor on an RHEL, CentOS, Rocky, or Fedora variant via the archive repo, use:
sudo yum install libtool gcc-c++ wxGTK-devel
git clone https://github.com/EUA/wxHexEditor.git
cd wxHexEditor
make OPTFLAGS="-fopenmp"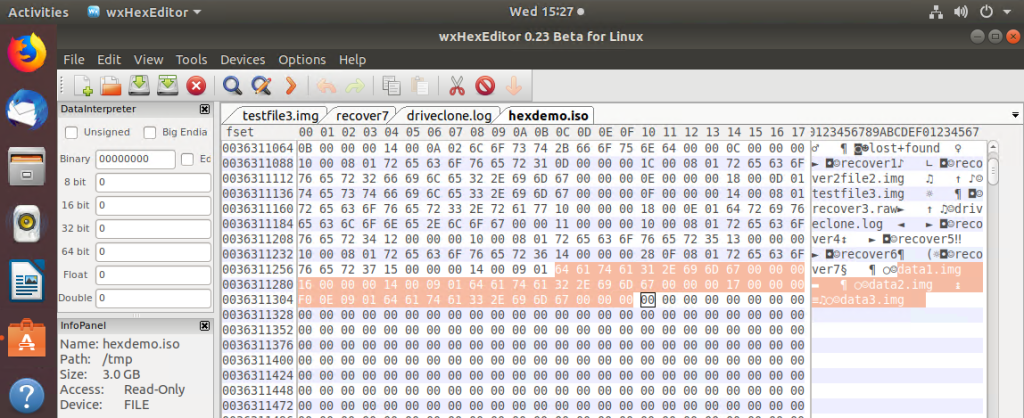
Summary
We’ve only begun to explore data recovery on the EXT4 file system. We’ve presented two methods to protect and recover your data. Each recovery scenario varies, and you must consider the volume of data you want to restore, whether the data is encrypted, or if there’s a hardware issue, like a failed raid controller.
There are plenty of Linux applications that can attempt to recover the data. Also, consider looking into:
- Ext4magic
- Extundelete
- The Sleuth Kit
- Photorec (ideal for recovering photos from USB)
Thanks for taking the time to read this article. if you have any questions or feedback, please write in the comment section below.
Leave a Reply