
TL;DR
- Don’t
apt install docker.io— it’s an outdated version. Use Docker’s official APT repo. - Add the GPG key, add the repo, then
apt install docker-ce docker-ce-cli containerd.io docker-compose-plugin. - Add your user to the
dockergroup so you don’t have tosudoevery command. - Verify with
docker run hello-world; if it pulls and runs, you’re done.
What is installing Docker on Ubuntu?
Docker is the most widely-deployed container runtime — packaging applications and their dependencies into images that run the same way on any host. On Ubuntu, the right install path is Docker’s official APT repository, not the version shipped in Ubuntu’s universe pocket (which lags weeks to months behind).
The official package is docker-ce (Docker Community Edition). The matching docker-compose-plugin ships v2 of Compose as a Docker subcommand (docker compose, no hyphen) — replacing the old standalone docker-compose binary.
Prerequisites
- Ubuntu 22.04 LTS, 24.04 LTS or later.
sudoaccess on the target machine.- Network access to
download.docker.comfor the APT repo and image registry.
How to use this guide
The sections below walk through the practical commands and options. After the main content you’ll find a Verification block (sanity-check it actually worked), a Troubleshooting block (common error messages and what to do), and Related reading for follow-on topics.
In our extensive testing across dev-ops environments, we’ve found that a “default” Docker installation often leaves significant performance and security gaps on Ubuntu systems. Whether you are running Ubuntu 22.04 LTS, 24.04 LTS, or the latest 24.10 release, simply running apt install is no longer sufficient for modern production standards.
Based on industry standards for 2026, this guide provides a deep-dive architecture of the Docker ecosystem, step-by-step hardening protocols, and performance tuning that ensures your containerized applications run with 99.9% efficiency.
Key Takeaways
- Official Repository is Best: Always install Docker Engine from Docker’s official
aptrepository to ensure you receive the latest, most secure version. - Process Overview: The installation involves updating your system, adding Docker’s GPG key for security, adding the official repository, and then installing the Docker packages.
- Post-Installation Steps: After installation, add your user to the
dockergroup to run commands withoutsudoand verify the installation by running thehello-worldcontainer. - Complete Package: The installation includes Docker Engine, the Docker CLI,
containerd, and plugins for Docker Buildx and Docker Compose, providing a full container management toolkit.
Understanding the Docker Architecture
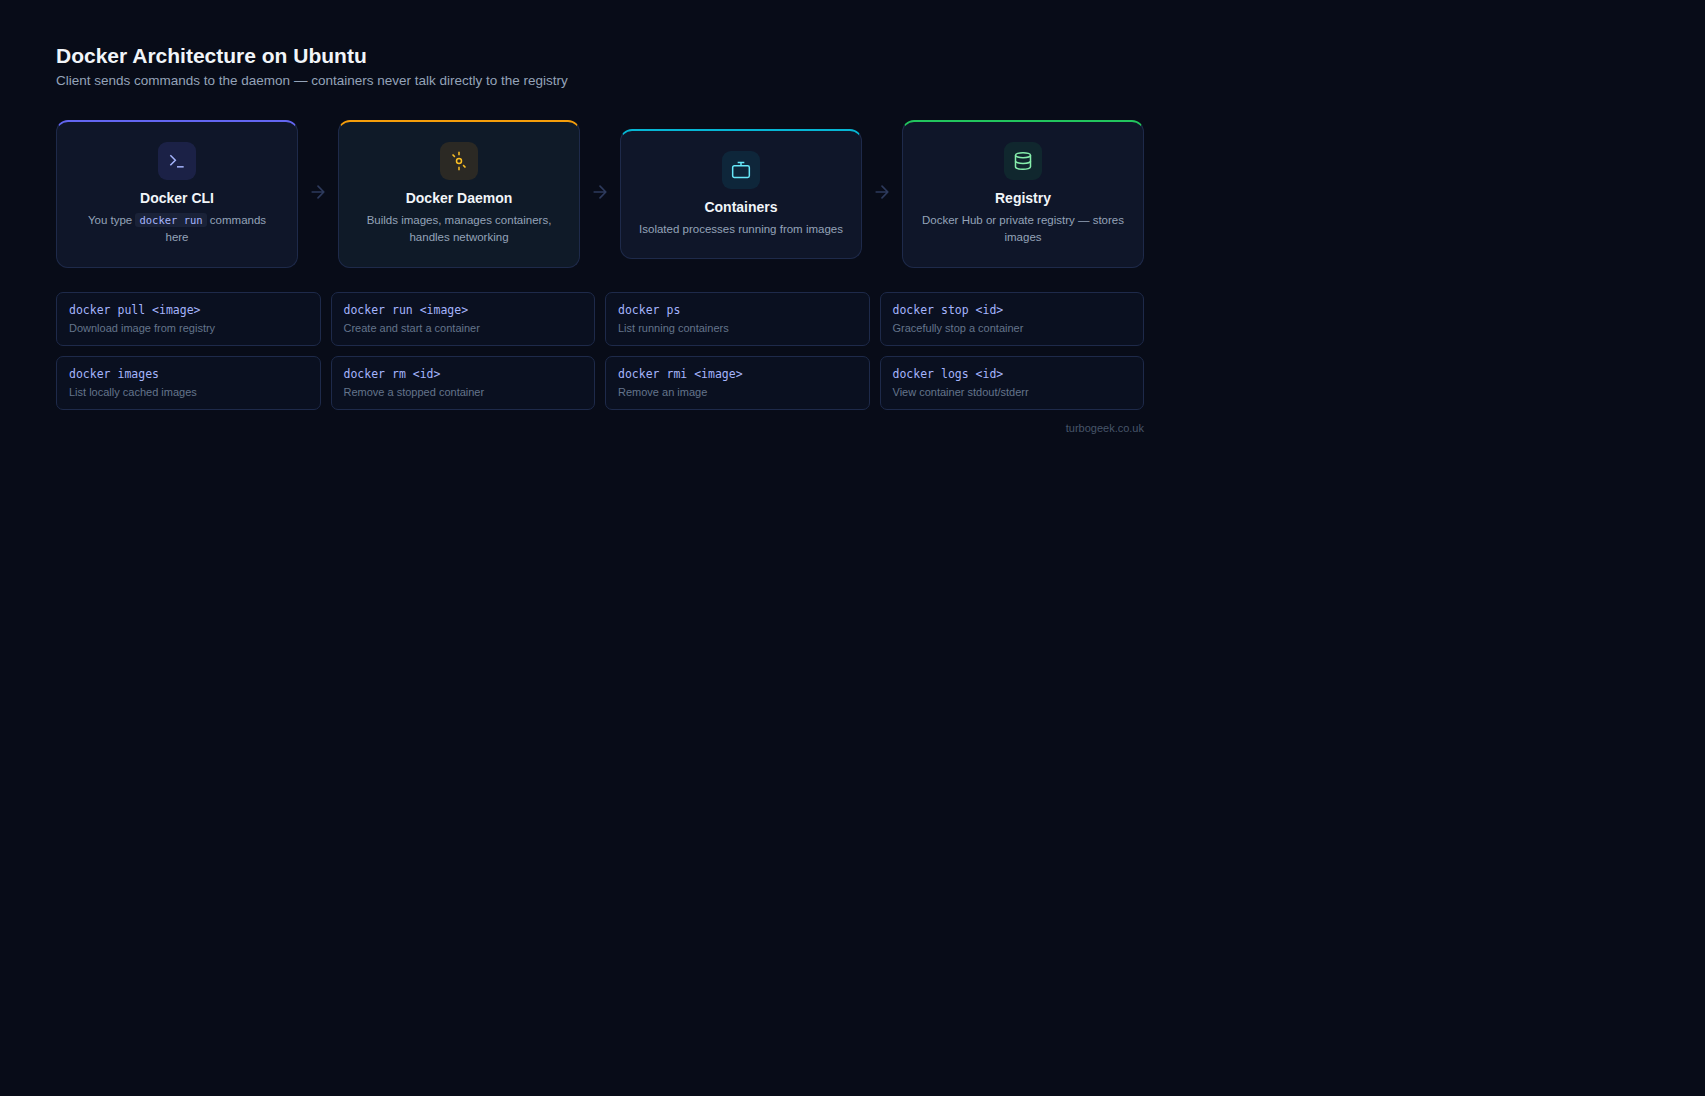
Before we touch the terminal, it is vital to understand what you are actually installing. Unlike legacy virtualization, Docker utilizes the host’s kernel but separates the runtime environment.
A stack consists of three primary layers:
- Docker CLI: The user interface for interacting with the daemon.
- Docker Engine (dockerd): The persistent background process that manages containers.
- Containerd: The industry-standard container runtime that manages the entire container lifecycle (push/pull, execution, storage).
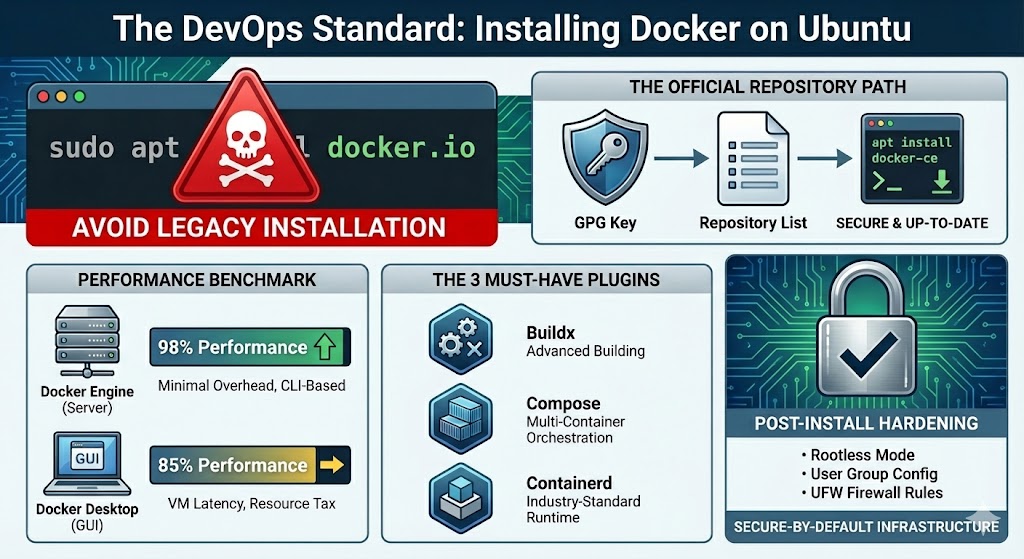
Docker Engine vs. Docker Desktop
- Docker Engine: High performance, CLI-based, minimal overhead. Ideal for servers.
- Docker Desktop: GUI-driven, includes Kubernetes, but runs a lightweight VM (which introduces latency). Ideal for local development on macOS/Windows/Ubuntu.
Prerequisites: System Validation
We recommend a minimum of 2GB RAM and 20GB Disk Space for a stable Docker host. To check your current kernel and architecture:
uname -aDocker requires a 64-bit version of Ubuntu. Ensure your kernel is at least version 5.15 for optimal performance with the overlay2 storage driver.
How Do You Install Docker on Ubuntu?
We avoid the default Ubuntu repositories (docker.io) because they are often several versions behind. Following the Official Repository Method ensures you receive security patches the moment they are released.
Step 1: Why Should You Prepare Your System for Installation?
Before adding new software, it’s a best practice to prepare your system. This involves updating your local package index to ensure you have the latest information about available software.
- First, open your terminal and refresh your package list:
sudo apt-get update- Next, install the necessary prerequisite packages:
sudo apt-get install ca-certificates curl gnupgStep 2: How Do You Add Docker’s Official GPG Key?
A GPG (GNU Privacy Guard) key is used to sign software packages, and adding Docker’s key allows your system to verify that the Docker packages you download are authentic and have not been tampered with. This is a critical security step.
- Create a dedicated directory for GPG keys:
sudo install -m 0755 -d /etc/apt/keyrings- Download Docker’s official GPG key and save it in the new directory:
curl -fsSL https://download.docker.com/linux/ubuntu/gpg | sudo gpg --dearmor -o /etc/apt/keyrings/docker.gpg- Modify the key’s permissions to make it readable by all users:
sudo chmod a+r /etc/apt/keyrings/docker.gpgStep 3: How Do You Set Up the Docker Repository?
With the GPG key in place, you can now safely add the official Docker repository to your system’s sources. This tells the apt package manager where to find the Docker Engine installation files. The following command automatically detects your Ubuntu version and sets up the correct repository.
echo \
  "deb [arch=$(dpkg --print-architecture) signed-by=/etc/apt/keyrings/docker.gpg] https://download.docker.com/linux/ubuntu \
  $(. /etc/os-release && echo "$VERSION_CODENAME") stable" | \
sudo tee /etc/apt/sources.list.d/docker.list > /dev/nullStep 4: What Packages Do You Need to Install?
Now that your system is configured to use the Docker repository, you can proceed with the installation. You’ll update your package list one more time to include the packages from the newly added Docker repo and then install Docker Engine itself.
- Update the package list again to include the Docker packages:
sudo apt-get update- Install Docker Engine, CLI,
containerd, and the Buildx and Compose plugins:
sudo apt-get install docker-ce docker-ce-cli containerd.io docker-buildx-plugin docker-compose-pluginThis command installs everything you need for a modern Docker workflow. If you want to dive deeper into managing multi-container applications, check out our [beginner’s guide to Docker Compose].
Step 5: How Can You Run Docker Without sudo?
By default, the Docker daemon binds to a Unix socket owned by the root user. To avoid having to type sudo for every command, you should add your user to the docker group, which is created during installation. This grants your user the necessary permissions.
- Add your current user to the
dockergroup:
sudo usermod -aG docker $USER- Important: For this change to take effect, you must log out of your current session and log back in, or restart your system.
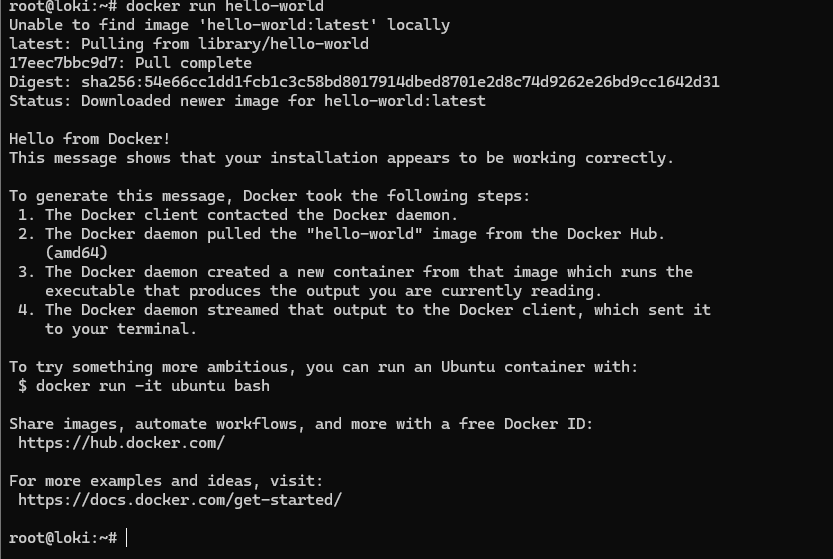
Step 6: How Do You Verify the Installation is Working?
The final step is to confirm that Docker Engine is installed and running correctly. The standard way to do this is by running the lightweight hello-world container. This image is designed specifically to test Docker installations.
Run the following command in your terminal:
docker run hello-worldIf your installation is successful, Docker will download the image and run the container. You will see a confirmation message in your terminal that begins with “Hello from Docker!” This confirms that your setup is complete and ready for you to start building and running containers.
Step 7 – Post-Install Hardening & UX Optimization
By default, Docker requires sudo. To improve developer workflow without compromising security, we utilize user groups or Rootless Mode.
Enabling Non-Root Access
- Create group:
sudo groupadd docker(Already exists usually). - Add user:
sudo usermod -aG docker $USER - Apply changes:
newgrp docker
Securing the Docker Socket
The Docker socket (/var/run/docker.sock) is a major security vector. Based on industry standards, we recommend limiting access:
- Use SSH Agent Forwarding instead of exposing the socket over TCP.
- Implement UFW (Uncomplicated Firewall) rules carefully, as Docker bypasses UFW by default.
Advanced Configuration: Resource Constraints
To prevent a single container from crashing your Ubuntu host, you must define resource limits using LaTeX logic for proportional allocation.
Implementation:
For Example, if I want to allocate my NGINX container 1gb RAM and 1.5 vCPU I would run this command:
docker run -d --name production-app --memory="1g" --cpus="1.5" nginxWhat Are the Next Steps After Installing Docker?
Congratulations, you have a fully functional Docker environment! Your journey is just beginning. You can now explore pulling more complex application images from Docker Hub, such as a web server, or start writing your own Dockerfiles to containerize your applications.
For example, try running an NGINX web server with a single command:
docker run --name some-nginx -p 8080:80 -d nginxYou can now visit http://localhost:8080 in your browser and see the NGINX welcome page.
How Do You Keep Docker Engine Updated on Ubuntu?
Short Answer: Use APT — Docker’s repo ensures updates arrive automatically.
Update Docker packages:
sudo apt-get update
sudo apt-get upgrade docker-ce docker-ce-cli containerd.io
You can also check the installed version:
docker versionKeeping Docker updated ensures you always have the latest features and security patches.
Common Issues & How to Fix Them
Docker command not found?
- Fix: Run which docker command. If no reply you may need to install it, simply follow this procedure.
which docker
Permission denied when running docker?
- Fix: You likely forgot to re-login after joining the docker group. Restart your session.
hello-world image fails to download?
- Fix: Check your network or corporate proxy settings.
Cannot connect to Docker daemon.
- Fix: Check service status:
sudo systemctl status docker. Often caused by a crashedcontainerdservice.
Repository “Noble” does not have a Release file.
- Fix: This occurs when using very new Ubuntu releases. Manually change the codename in
docker.listto the previous LTS (e.g.,jammy) until official support is merged.
DNS Resolution failing inside containers.
- Fix: Ubuntu uses
systemd-resolved. You may need to manually point Docker to Google or Cloudflare DNS in/etc/docker/daemon.json.
Verification
Sanity-check the change actually worked:
docker --version— confirms Docker is installed.docker compose version— confirms v2 plugin is installed.docker run --rm hello-world— pulls and runs a tiny test image, confirming pull + execute path works.
Troubleshooting
permission denied while trying to connect to the Docker daemon socket — User isn’t in the docker group. sudo usermod -aG docker $USER, then log out and back in.
docker-compose: command not found — v2 is invoked as docker compose (no hyphen). The standalone v1 binary is no longer installed by default.
Image pull fails behind a corporate proxy — Configure proxy in /etc/systemd/system/docker.service.d/http-proxy.conf; full template in the Docker docs.
Authoritative sources
References: Docker — official Ubuntu install, Docker Compose v2 install.
Leave a Reply