
TL;DR
- Start with
df -handdu; do not delete files until you know what owns the space. - Safe wins usually come from package caches, old logs, old kernels, Docker images, and user downloads.
- Use
journalctl --vacuum-sizeor--vacuum-timefor systemd journals; do not manually truncate active journal files. - If the root filesystem is already at 100%, free a small amount first, then investigate calmly.
Find your fix
- Disk is full and you don’t know why — measure with
dubefore deleting anything - Package cache is eating space —
apt clean - Old kernels are piling up —
apt autoremove --purge - The journal or /var/log is huge —
journalctlvacuum - Docker images and containers —
docker system prune - Hunt down the biggest files —
find+ careful delete
| Topic | When | Command |
|---|---|---|
| Find full filesystems | Start here | df -h |
| Find large directories | Before deleting anything | sudo du -h --max-depth=1 / | sort -rh |
| Shrink systemd journal | Logs are large | sudo journalctl --vacuum-size=500M |
| Remove old kernels | /boot fills up | sudo apt autoremove --purge |
| Clean Docker | Containers/images are large | docker system prune |
Need to Free Up Disk Space on a Linux Server or Desktop? You’ve come to the right place. Perhaps you have seen our other article about how to check disk space on Linux. If you are in a hurry, use the jump list above to go straight to your fix.
Low disk space shows up in predictable ways: warning notifications, failed software updates or installs, slow performance, applications that error or crash because they cannot write, files that will not save, and in extreme cases trouble logging in or a system that stops responding altogether. If any of those sound familiar, work through the steps below — measure first, then delete.
How to Free Up Disk Space on Linux
Step 1 – Work out What Is using the Disk Space
This is often the trickiest part of the entire process. It can be hard to know what is eating up your disk space. Is it a process that has gone rogue, or is it a log file that is spamming verbose? Who knows! But let’s find out how to Free Up Disk Space on Linux.
The easiest way to read your hard disk is to use the du command. If you just use the du command, it will list endless directories, which is not very helpful. You could narrow it down by using a specific folder to check, but that only works if you know what folder is filling up your hard drive.
For Example, let’s check my /tmp folder but only list the top 10 biggest folders.
sudo du -h --max-depth=1 /tmp | sort -rh | head -n 10Below is my output. You can see the root of /tmp is 270 MB in size, and listed are the biggest 10 folders, sorted by size, largest to smallest.
270M	/tmp
269M	/tmp/ollama2115724660
744K	/tmp/v8-compile-cache-1000
342K	/tmp/snap-private-tmp
222K	/tmp/pkg-TqDcR8
30K	/tmp/.com.google.Chrome.tGZUvs
18K	/tmp/systemd-private-1f1b7e094b504f18891cf3247dddd4e4-upower.service-uPEGSc
18K	/tmp/systemd-private-1f1b7e094b504f18891cf3247dddd4e4-systemd-timesyncd.service-s4RoAW
18K	/tmp/systemd-private-1f1b7e094b504f18891cf3247dddd4e4-systemd-resolved.service-sAq0tJ
18K	/tmp/systemd-private-1f1b7e094b504f18891cf3247dddd4e4-systemd-oomd.service-GYMie5
18K /tmp/systemd-private-1f1b7e094b504f18891cf3247dddd4e4-systemd-logind.service-J4DnMAYou can repeat this against the entire filesystem if you want.
sudo du -h --max-depth=1 / 2>/dev/null | sort -rh | head -n 10Note: This may take a while to complete depending on the speed and size of your disk.
This is my output
/                                       79G
/home                                   38G
/snap                                   17G
/usr                                    13G
/var                                    8.7G
/installables                           2.6G
/boot                                   353M
/opt                                    321M
/etc                                    16M
/run                                    3.1M
/tmp 1.4M You can immediately see that my home folder is the biggest folder on my system, a perfect start to Freeing up Disk Space on Linux.
Here are some of my favorite disk space commands:
#List Top Disk-consuming Files (stay on this filesystem):
sudo find / -xdev -type f -exec du -h {} + | sort -rh | head -n 10

#List Top Disk-consuming Directories:
du -h --max-depth=1 /path/to/directory | sort -rh | head -n 11

#Find Large Files in Home Directory:
find ~/ -type f -exec du -h {} + | sort -rh | head -n 10

#Identify Large Files Older Than X Days:
sudo find / -xdev -type f -mtime +X -exec du -h {} + | sort -rh | head -n 10

#Find Large Log Files:
find /var/log -type f -size +100M -exec ls -lh {} + | awk '{print $9, $5}'
The -xdev flag keeps find on the root filesystem, so it does not descend into pseudo-filesystems like /proc and /sys or hang on network mounts.
Do not delete log files with
rm. A running service keeps its deleted log file open, so the space is not freed until the service restarts — and you lose the log. Shrink logs with the tool that owns them instead: see Step 4 for the systemd journal, and logrotate for classic logs.
If you have already deleted open files and the space has not come back, list deleted-but-still-open files — anything shown here keeps consuming disk until its process is restarted:
sudo lsof +L1 | head -n 15Step 2 – Clean Package Cache (Debian / Ubuntu)
If you install packages frequently, or if you have just upgraded/updated your systems. There is a good chance your apt-cache can be cleared down to Free Up Disk Space on Linux.
Want to see how much of your cache is being used? You can run this command:
du -sh /var/cache/aptYou will see output similar to this:
530M /var/cache/aptTo clear the cache just type:
sudo apt cleanThis command safely removes all cached .deb files.
After running the command, you can re-check the size to confirm the space has been freed.
Step 3 – Clear down old Linux Kernel to Free Up Disk Space on Linux
When you update your Operating System, the Kernel is not always cleaned by default. This is because in the event of a system crash, you can always change the kernel used at System Boot. However, over time the number of Kernels will grow, and clearing them down is a great way to Free Up Disk Space on Linux.
Try to remove kernels automatically.
The safest method is to use apt‘s built-in autoremove functionality. This will automatically identify and remove old kernels and headers that are no longer required, while carefully preserving the current and one backup kernel.
sudo apt autoremove --purgeThis single command handles the entire cleanup process safely.
However, if you are still facing critical issues you can attempt to manually clean up Kernels.
Please note this process carries risk – only proceed if you accept the risk
Keep in mind that the actual packages might include architecture-specific information (e.g., “linux-image-5.4.0-72-generic” for a specific version). If you want to see only the version numbers, you may need to parse the output further.
dpkg-query -W -f='${binary:Package}\t${Version}\t${Installed-Size}\n' | grep linux-image | awk '{printf "%s\t%s\t%.2f MB\n", $1, $2, $3/1024}'This command retrieves information about installed Debian packages, filters for those related to Linux kernel images, and then prints a formatted list containing the package name, version, and installed size in megabytes.
You will see output similar to this:
dpkg-query -W -f='${binary:Package}\t${Version}\t${Installed-Size}\n' | grep linux-image | awk '{printf "%s\t%s\t%.2f MB\n", $1, $2, $3/1024}'
linux-image-5.19.0-32-generic	5.19.0-32.33~22.04.1	11.65 MB
linux-image-5.19.0-46-generic	5.19.0-46.47~22.04.1	11.69 MB
linux-image-6.2.0-26-generic	6.2.0-26.26~22.04.1	13.17 MB
linux-image-6.2.0-31-generic	6.2.0-31.31~22.04.1	13.19 MB
linux-image-6.2.0-32-generic	6.2.0-32.32~22.04.1	13.19 MB
linux-image-6.2.0-33-generic	6.2.0-33.33~22.04.1	13.18 MB
linux-image-6.2.0-34-generic	6.2.0-34.34~22.04.1	13.19 MB
linux-image-6.2.0-35-generic	6.2.0-35.35~22.04.1	13.19 MB
linux-image-6.2.0-36-generic	6.2.0-36.37~22.04.1	13.19 MB
linux-image-6.2.0-37-generic	6.2.0-37.38~22.04.1	13.19 MB
linux-image-6.2.0-39-generic	6.2.0-39.40~22.04.1	13.19 MB
linux-image-6.5.0-14-generic	6.5.0-14.14~22.04.1	13.60 MB
linux-image-6.5.0-15-generic	6.5.0-15.15~22.04.1	13.61 MB
linux-image-generic-hwe-22.04	6.5.0.15.15~22.04.8	0.02 MB
If you are happy to remove the Kernel, you can do so by using this command. You may want to keep at least one or two older kernels as a backup in case there are issues with the latest one. Always check that your system is stable after removing old kernels before proceeding further.

sudo apt-get remove <kernel-package-name>Before removing any kernel manually, check which one you are running — never remove the running kernel:
uname -rAfter removal, rebuild the boot menu and confirm the remaining kernels are listed before you reboot:
sudo update-grubStep 4 – Truncate Log Files to Free Up Disk Space on Linux
The /var/log directory on a Linux system is where various log files are stored. These log files contain information about system events, processes, and applications.
Examples of common log files within /var/log:
syslog: General system log file capturing a variety of events.auth.logorsecure: Logs related to authentication and security.messages: General system messages.kern.log: Kernel-related messages.apache2/access.logandapache2/error.log: Apache web server access and error logs.mysql/error.log: MySQL database server error log.- Access Permissions: Usually, access to the
/var/logdirectory and its log files is restricted to system administrators (rootor users with elevated privileges) to maintain the integrity and security of the logs.
Step 4.1 – Find the Biggest Five Files
Let’s take a look at the five biggest files in my /var/log folder. Run this command:
du -h --max-depth=1 /var/log 2>/dev/null | sort -rh | awk '{if ($1 != "0") printf "%-40s%-10s\n", $2, $1}' | head -n 5This is the output I get:
/var/log/journal                        1.2G
/var/log/aws-vpn-client                 885K
/var/log/installer                      610K
/var/log/apt                            262K
/var/log/cups 89K Step 4.2 – Truncate Journal – Important Information
Stop! Before you go truncating files, make sure you understand the risk, and only do the truncate if you are certain.
/var/log/journal(1.2G):- Purpose: This directory contains logs managed by
systemd-journald. It stores system logs in a binary format. - Usage: Used for centralized and structured logging, allowing easy retrieval and analysis of system events.
- Purpose: This directory contains logs managed by
/var/log/aws-vpn-client(885K):- Purpose: Logs related to the AWS VPN client, which is a tool for connecting to AWS Virtual Private Clouds (VPCs).
- Usage: Records events and activities related to VPN connections.
/var/log/installer(610K):- Purpose: Logs related to the system installation process.
- Usage: Helpful for diagnosing issues during the installation of the operating system.
/var/log/apt(262K):- Purpose: Logs related to package management using APT (Advanced Package Tool).
- Usage: Captures information about package installations, upgrades, and removals.
/var/log/cups(89K):- Purpose: Logs for the Common Unix Printing System (CUPS), which manages printing services.
- Usage: Contains information about print jobs, errors, and printer status.
Safely Shrink the Systemd Journal: Instead of using rm or truncate, use the journalctl utility, which is designed for this purpose. You can shrink the journal logs based on size or time.
- To limit the journal to a specific size (e.g., 500MB):
sudo journalctl --vacuum-size=500M- To remove log entries older than a certain time (e.g., two weeks):
sudo journalctl --vacuum-time=2weeksjournalctl will safely process the files and inform you of how much space was freed.
Want the journal to stay small permanently?
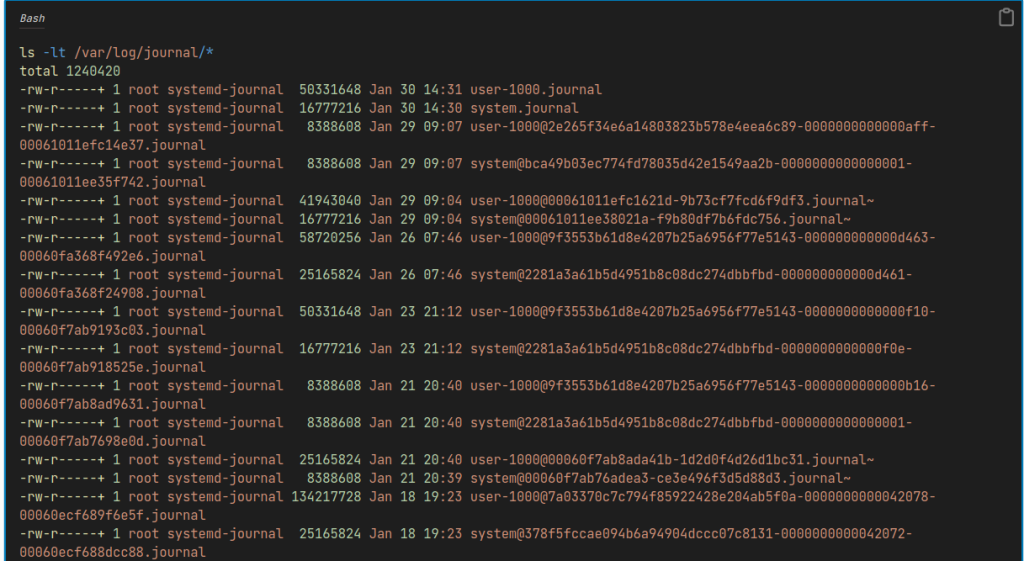
Vacuuming is a one-off cleanup — the journal grows straight back. To cap it for good, set a retention limit in journald’s configuration. First, see what is in the journal folder:
ls -ltr /var/log/journal/*The output will look something like this:
To make the limit permanent, open journald’s configuration:
sudo nano /etc/systemd/journald.confUnder the [Journal] section, set SystemMaxUse=500M (pick the cap that suits your disk), then restart journald and verify:
sudo systemctl restart systemd-journald
journalctl --disk-usagejournalctl --disk-usage should now report a figure at or below your cap, and the journal will maintain itself from here on.
Step 4.3 – Do Not Truncate Journal Files Manually
Avoid directly truncating active files under /var/log/journal on a real server. The supported cleanup path is journalctl --rotate followed by journalctl --vacuum-size=500M or journalctl --vacuum-time=2weeks. That lets systemd rotate archived journal files and reclaim space without overwriting active journal data by hand.
If a guide, forum post, or old runbook tells you to run truncate -s 0 /var/log/journal/*, treat that as emergency-only lab advice. Use the vacuum commands above first, then configure journald retention if logs keep filling the disk.
Step 5: Find and Remove Large Files Manually
If you still need more space, you can search for large files across the filesystem. Use this command to find the top 10 largest files.
sudo find / -xdev -type f -exec du -h {} + | sort -rh | head -n 10As in Step 1, -xdev keeps the search on the root filesystem.
Warning: Before deleting any files from this list, be certain you know what the file is for. Deleting critical system or application files can break your system.
If you identify a large file in a user directory (e.g., /home/user/Downloads) that you are certain is safe to delete, you can remove it with the rm command. For added safety, consider using the interactive -i flag, which will prompt you for confirmation.
# Use with caution!
rm -i /path/to/your/large/file.zipStep 6 – Clean Up Docker Images and Containers
If the machine runs Docker, images, stopped containers and build cache are one of the most common reasons a server fills up — tens of gigabytes is normal. As always, measure first:
docker system dfThe safe cleanup is docker system prune. It removes stopped containers, dangling images, unused networks and dangling build cache, and asks for confirmation before deleting anything:
docker system pruneCareful with
-a.docker system prune -aalso deletes every image not used by a running container, so the next deployment has to re-download everything. Do not run it on a production host unless you are sure that is what you want.
Run docker system df again afterwards to confirm how much space came back.
That’s all for now. These are six of the safest ways to Free Up Disk Space on Linux; just be careful.
Thanks for reading this article. If you have any questions or feedback, please write in the comment section below.
Authoritative sources
References: GNU Coreutils – du, systemd journalctl, and Docker system prune.


Leave a Reply