
Safe mode is a vital tool for resolving serious issues with Windows. It loads Windows with a minimal set of drivers and services.
For advanced users and IT professionals, accessing the Command Prompt within Safe Mode provides a powerful toolkit for diagnosing and fixing complex issues directly, bypassing the graphical interface and potentially problematic drivers.
This guide will walk you through launching the safe mode command prompt and utilizing key Windows repair commands such as sfc, DISM, and chkdsk.
Why Use Command Prompt in Safe Mode?
- Minimal Interference: Safe Mode loads only essential components, reducing conflicts from third-party software or non-essential drivers that might be causing the underlying problem.
- Direct Access: The Command Prompt provides direct access to system utilities and files, allowing for powerful repair operations.
- Troubleshooting Boot Issues: When Windows won’t boot normally, Safe Mode with Command Prompt might be one of the few accessible interfaces.
How to Launch Command Prompt in Safe Mode
There are several ways to boot into Safe Mode with Command Prompt, depending on whether you can currently access Windows:
Method 1: From Within Windows (If Windows is Booting)
- Press
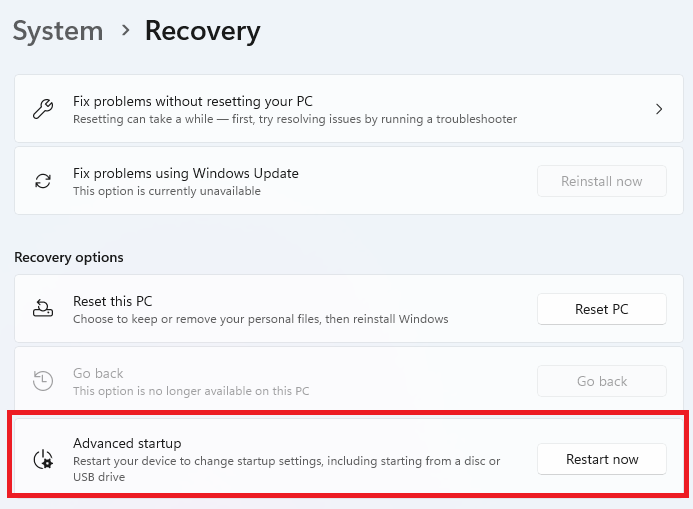
Windows Key + Ito open Settings. - Navigate to
Update & Security(orSystem>Recoveryin Windows 11). - Click on
Recovery. - Under
Advanced startup, clickRestart now.
- Your computer will restart and show the Windows Recovery Environment (WinRE).
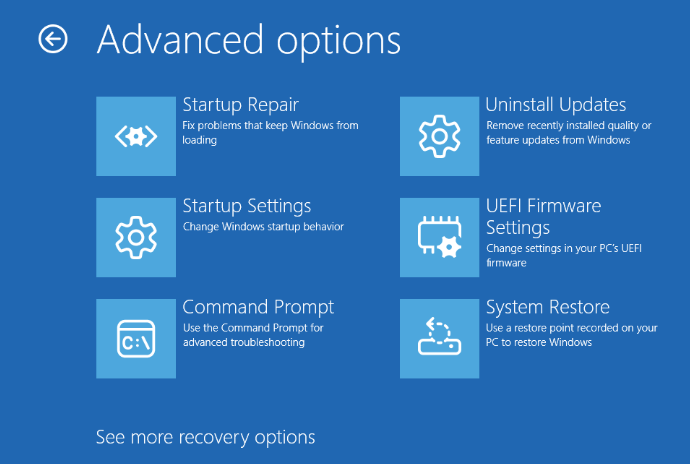
- Choose
Troubleshoot>Advanced options>Startup Settings>Restart.
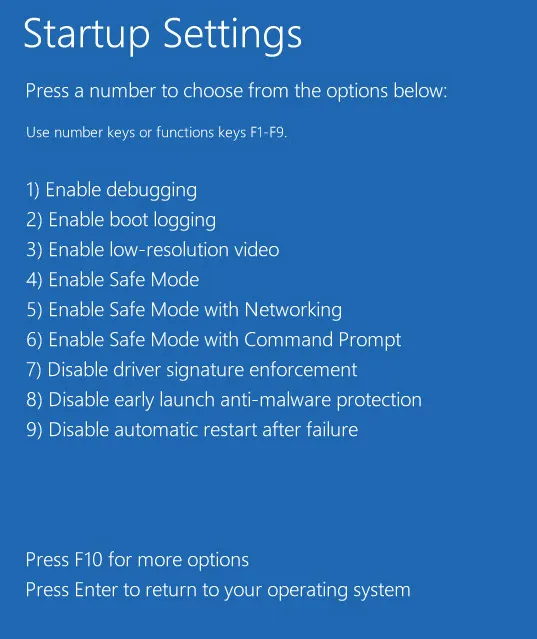
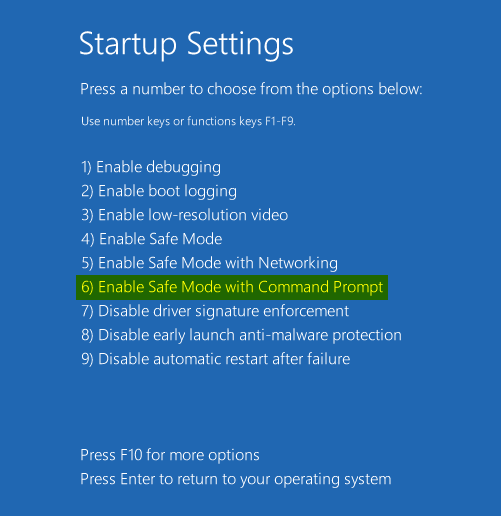
- After restarting again, you’ll see a list of startup options. Press
6orF6on your keyboard to select Enable Safe Mode with Command Prompt
Method 2: From the Windows Sign-in Screen
- On the Windows sign-in screen, click the Power button icon.
- Hold down the
Shiftkey on your keyboard and clickRestart. - Continue holding
Shiftuntil the Windows Recovery Environment appears. - Follow steps 6-7 from Method 1 above.

Method 3: Using Windows Installation/Recovery Media (If Windows Won’t Boot at All)
- Boot your computer from a Windows installation USB drive or DVD, or a system recovery drive.
- Choose your language preferences and click
Next. - Click
Repair your computer(usually in the bottom-left corner).

- Select
Troubleshoot>Advanced options>Command Prompt.- Note: This launches the Command Prompt from the Recovery Environment, which is slightly different but offers access to many of the same tools (
sfc,DISM,chkdsk).
- Note: This launches the Command Prompt from the Recovery Environment, which is slightly different but offers access to many of the same tools (
Once you select “Enable Safe Mode with Command Prompt,” Windows will boot into a minimal desktop environment with a Command Prompt window open.
Essential Windows Repair Commands in Safe Mode
Here are some fundamental commands for troubleshooting in Safe Mode using the Command Prompt:
SFC (System File Checker): Check and Repair System Files
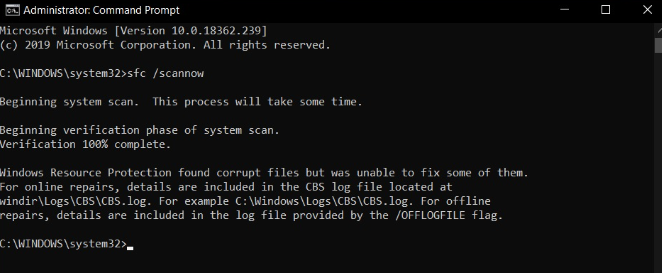
- Purpose: Scans protected Windows system files and replaces corrupted or missing versions with correct ones. This is often the first step for system instability issues.
- Command:
sfc /scannow - Usage: Simply type
sfc /scannowand press Enter. The scan can take some time. - In Safe Mode: Running sfc scannow safe mode is highly effective because fewer files are in use, potentially allowing SFC to repair files it couldn’t fix in a normal Windows session. You might see messages indicating success, finding errors it couldn’t fix, or finding no integrity violations.
DISM (Deployment Image Servicing and Management): Repair Windows Image
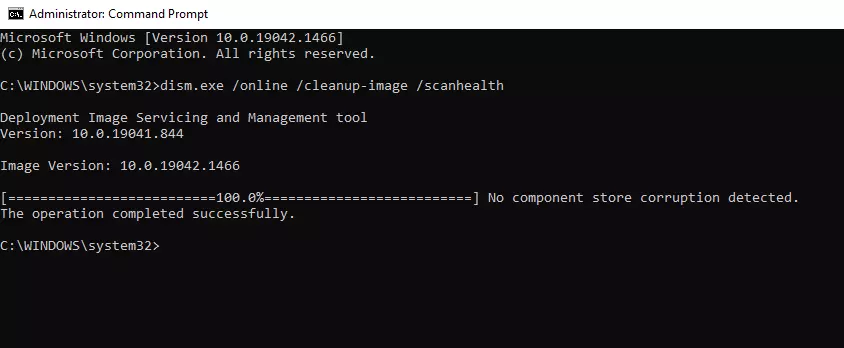
Purpose: Used for more advanced servicing of the Windows image itself. It can repair the component store corruption that might prevent sfc /scannow from working correctly.
Commands:
DISM /Online /Cleanup-Image /CheckHealthPerforms a quick check for corruption.
DISM /Online /Cleanup-Image /ScanHealthPerforms a more extensive scan for corruption.
DISM /Online /Cleanup-Image /RestoreHealthScans for and automatically attempts to repair corruption. This may require an internet connection (if available via Safe Mode with Networking) or source files.
Usage: Run these commands one after another if you suspect deeper system image issues or if sfc /scannow fails. /RestoreHealth can take significant time.
CHKDSK (Check Disk): Scan and Fix Drive Errors
Purpose: Checks the file system and file system metadata of a volume for logical and physical errors. It can fix file system errors and locate bad sectors.
Command:
chkdsk C: /f /r /xC:Specify the drive letter you want to check (usually C: for the system drive)./f: Fixes errors found on the disk./r: Locates bad sectors and recovers readable information (implies /f)./x: Forces the volume to dismount first, if necessary (useful in Safe Mode).
Usage: Type the command and press Enter. If the drive is in use (like the system drive C:), chkdsk might ask if you want to schedule the scan for the next restart. Type Y and press Enter, then restart your computer. The scan will run before Windows loads fully.
Advanced Commands (Use with Caution)
While in the safe mode command prompt, you can also potentially:
- Manage User Accounts: Use
net usercommands (e.g.,net user <username> /active:yesto enable a disabled administrator account, ornet user <username> <newpassword>to reset a local password). - Modify the Registry: Use
regeditto open the Registry Editor. Warning: Incorrect registry changes can cause severe system instability. Only do this if following specific, trusted instructions for a known problem. - Manage Services: Use
net startandnet stopcommands to manually control services. - Run Boot Repair Commands: Commands like
bootrec /fixmbr,bootrec /fixboot(may require booting from recovery media),bootrec /rebuildbcdcan fix bootloader issues.
Exiting Safe Mode Command Prompt
Once you’ve finished running commands:
- Type
shutdown /r /t 0in the Command Prompt and press Enter to restart the computer immediately. - Alternatively, type
exit, press Enter, and then manually restart the PC.
shutdown /r /t 0 Windows should attempt to boot normally on the next startup.
Conclusion
The safe mode command prompt is an invaluable tool for tackling serious Windows problems. By understanding how to access it and utilize essential Windows repair commands, like:
-
sfc /scannow DISM,- c
hkdsk
You can often diagnose and fix issues that prevent normal operation. Always proceed with caution, especially with advanced commands, and ensure you have backups of important data before attempting major repairs.
Hopefully this help, if you need any assistance please write in the comments below.
See our other Windows guides here.