
Claude Code is a powerful AI coding assistant, but most users only use about 10% of what it can do. Out of the box, Claude responds to your requests and helps with code — that is already useful. But skills change the game entirely.
Skills are loadable behaviour modules that change how Claude approaches tasks, not just what it does. When you invoke a skill, Claude adopts a specific workflow, a set of disciplines, a repeatable process. The result is not an AI that just writes code — it is one that architects features before building them, debugs systematically instead of guessing, reviews with rigour before merging, and verifies before claiming something is done.
Most Claude Code users never discover skills. They use Claude as a faster autocomplete. That works, but it leaves most of the value on the table. This post covers the seven skills that will have the biggest impact on your day-to-day development workflow — the ones that eliminate entire categories of mistakes and save the most real time. Each section shows you exactly how to invoke the skill, what it does in practice, and the concrete difference it makes.
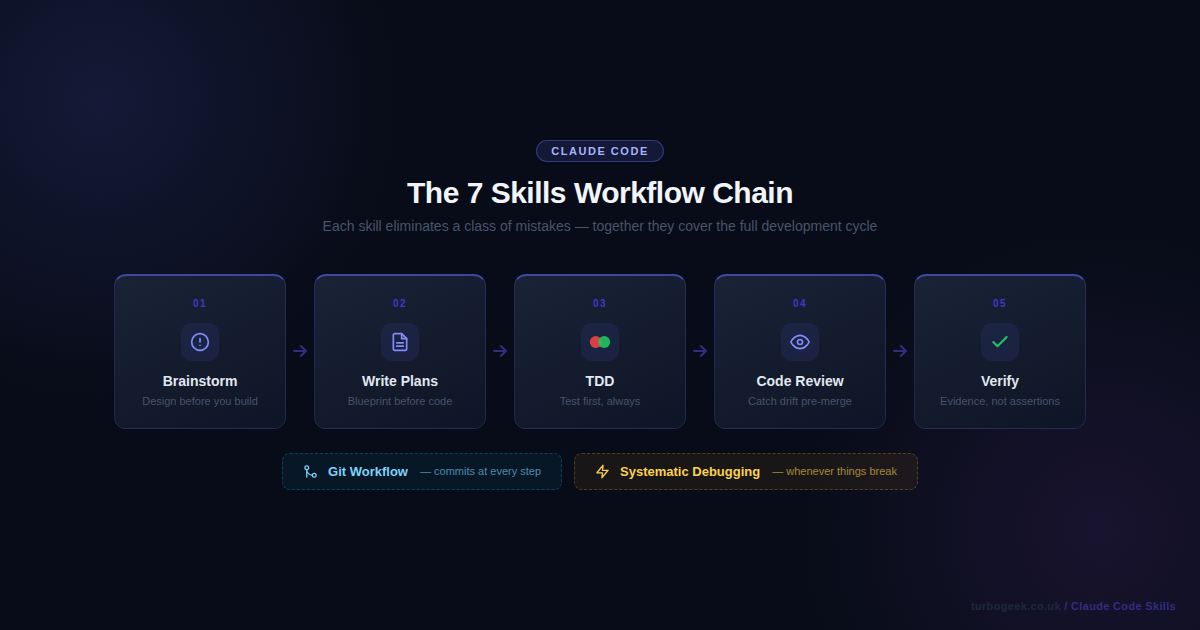
TL;DR — The 7 Claude Code Skills at a Glance
- Brainstorming — design before you build; surfaces assumptions, proposes approaches, produces a written spec
- Test-Driven Development — enforces red-green-refactor; no implementation code before a failing test exists
- Systematic Debugging — hypothesis → evidence → root cause; replaces guessing with a rigorous protocol
- Writing Plans — multi-step implementation blueprint committed to the repo before any code is touched
- Git Workflow — meaningful commits, consistent branch names, reviewer-ready PRs without the overhead
- Requesting Code Review — structured pre-merge review that checks implementation against the original plan
- Verification Before Completion — evidence-first done claims; Claude must run commands and show you the output
New to Claude Code skills? Start with Skill 1: Brainstorming — it is the entry point that makes all the others more effective. Once it becomes habit, add Writing Plans and TDD. The skills compound: brainstorm → plan → TDD → verify is a complete loop that covers an entire feature from idea to shipping.
Quick Reference
| Skill | When to invoke | Command |
|---|---|---|
| Brainstorming | Before any feature or change > 20 minutes | /brainstorm |
| Test-Driven Development | Before writing any implementation code | /tdd |
| Systematic Debugging | When a bug is not immediately obvious | /debug |
| Writing Plans | Before any multi-step feature | /plan |
| Git Workflow | After completing implementation | /git-workflow |
| Code Review | Before merging to main | /review |
| Verification | Before claiming anything is done | /verify |

Skill 1: Brainstorming — Design Before You Build
What it does
Before writing a single line of code, the brainstorming skill forces a design conversation. It asks clarifying questions one at a time, surfaces your assumptions, proposes 2–3 different approaches with trade-offs, and produces a written spec file committed to your repository. The goal is simple: stop you from building the wrong thing correctly.
This matters more than it sounds. The most expensive kind of wasted work is code that was written perfectly and solves the wrong problem. Brainstorming eliminates that class of failure by creating a brief design gate before implementation starts.
When to invoke
- Before starting any new feature, component, or change larger than a trivial bug fix
- When a requirement feels vague or ambiguous
- When you have a rough idea but have not thought through the constraints
How to invoke
Type /brainstorm or say use brainstorming to design [feature].
Real example
You: use brainstorming to add rate limiting to the API

Claude: I'm using superpowers:brainstorming...

✓ Exploring project context — found Express.js API, no existing rate limiting

Where should rate limiting be enforced?

A) At a reverse proxy / CDN layer (nginx, Cloudflare)
B) In application middleware (Express middleware function)
C) At the database query level

You: B

What rate limit window strategy works best for your use case?

A) Fixed window — simpler, slight accuracy tradeoff at window boundaries
B) Sliding window — accurate, requires more storage per user
C) Token bucket — burst-friendly, industry standard for REST APIsBefore vs After
Before: You start coding a Redis-based solution, three hours in you realise it conflicts with your existing session middleware.
After: The brainstorming skill surfaces that conflict in the second question.
Pro tip
Even for small tasks, brainstorming catches the assumption you did not know you were making. Invoke it before any change that will take more than 20 minutes.
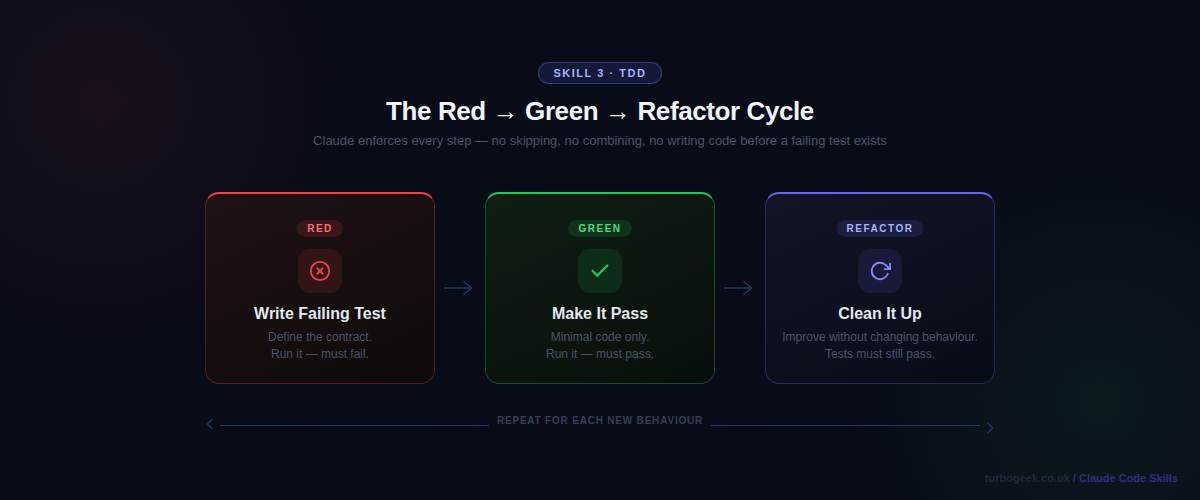
Skill 2: Test-Driven Development — Red, Green, Refactor Without Shortcuts
What it does
The TDD skill enforces the red-green-refactor cycle without negotiation. Claude writes a failing test first, runs it to confirm it fails, writes the minimal code to make it pass, runs it again to confirm it passes, then refactors. It will not skip steps or combine them. This is the discipline that most developers claim to practice and most do not.
The skill matters because TDD done properly produces code with better design (tests force clear interfaces), fewer regressions (every feature has a test from day one), and faster debugging (failures are isolated immediately). The skill enforces this even when the temptation is to write the code and add tests later.
When to invoke
- When implementing any new feature or function
- When fixing a bug — write a test that reproduces the bug first
- When refactoring — ensure existing tests pass before and after
How to invoke
Say use TDD to implement [feature] or use the /tdd shorthand.
Real example
# Claude writes the failing test FIRST — before any implementation
def test_rate_limiter_blocks_after_limit():
    limiter = RateLimiter(max_requests=5, window_seconds=60)
    for _ in range(5):
        assert limiter.check("user_123") == True
    # 6th request must be blocked
    assert limiter.check("user_123") == False

# Claude runs the test immediately:
# $ pytest tests/test_rate_limiter.py::test_rate_limiter_blocks_after_limit -v
# FAILED — NameError: name 'RateLimiter' is not defined
#
# Only after confirming the test fails does Claude write the implementation.Before vs After
Before: Tests are written after the code, shaped around what the implementation already does rather than what it should do.
After: Tests define the contract. Implementation is written to satisfy the test, not the other way around.
Pro tip
The skill enforces “minimal implementation” — it will not over-engineer to make a test pass. This keeps your codebase lean and your tests meaningful.
Related: If you practise TDD with shell scripts or CLI tools, ShellCheck for Safer Bash Scripts pairs well — it catches errors before your test cycle even begins.
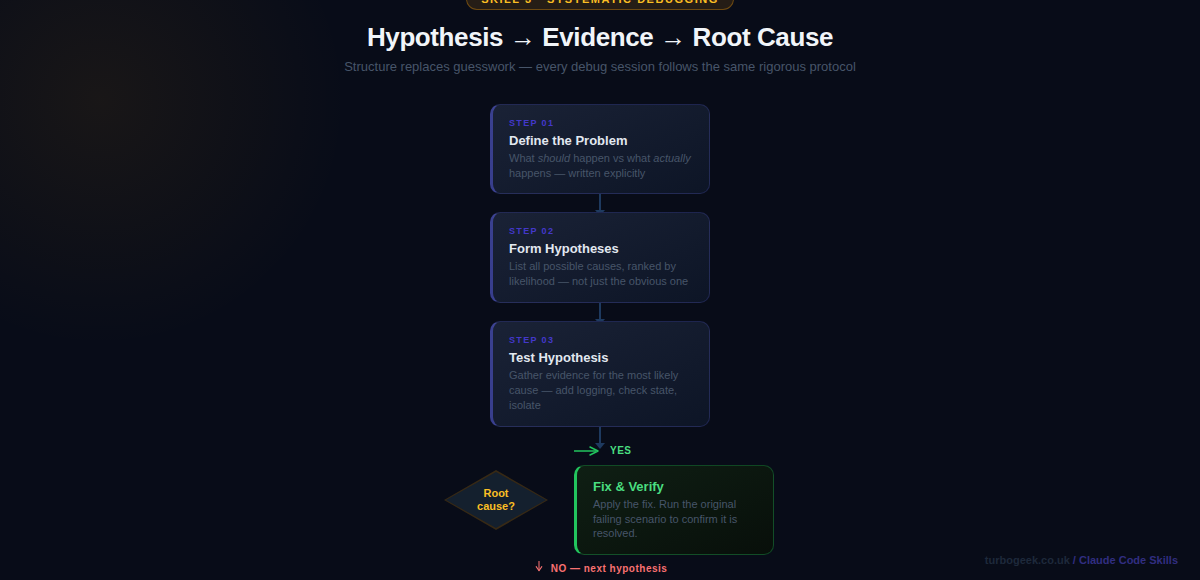
Skill 3: Systematic Debugging — Root Cause Over Symptoms
What it does
The systematic debugging skill replaces “guess and check” with a structured investigation protocol. It establishes what the system should do, what it actually does, and the gap between them. From there it forms hypotheses ranked by likelihood, gathers evidence, and identifies the root cause — rather than jumping to a fix for the most obvious symptom.
Systematic debugging matters because most debugging time is wasted on fixes that address symptoms rather than causes. A login that breaks on certain passwords is not a “password validation bug” — it might be a character encoding issue two layers deeper. The skill slows you down just enough to find the real problem.
When to invoke
- When a test is failing unexpectedly
- When behaviour differs between environments
- When a fix you applied keeps recurring
How to invoke
Say use systematic debugging to fix [problem description].
Real example
Systematic debugging protocol engaged.

What should happen: POST /login returns 200 for all valid users
What actually happens: Returns 401 for passwords containing # $ % characters

Hypotheses (ranked by likelihood):
1. Character encoding mismatch between hash storage and comparison (HIGH)
2. Input sanitisation strips special chars before bcrypt comparison (MEDIUM)
3. JWT signing fails with special chars in the payload (LOW)

Testing hypothesis 1:
→ Adding debug log before bcrypt.compare()
→ Found: hash was generated with utf-8, comparison using latin-1
→ Root cause confirmed: encoding mismatch in auth middleware
Fix: standardise on utf-8 throughout the auth pipeline.Before vs After
Before: “It is probably the regex — let me try adjusting the validation pattern.” Two hours later the bug is still there.
After: Root cause identified in four steps: bcrypt hashing with latin-1, comparison using utf-8. One-line fix.
Pro tip
Invoke this skill even for bugs you think you already understand. The structured hypothesis process routinely surfaces a different — and correct — root cause.
Related: When debugging containerised services, a solid understanding of how Docker executes commands is essential. See Docker Command Explained: Architecture, Flags & Internals for the internals you need when logs are not enough.
Skill 4: Writing Plans — Implementation Blueprints Before Code
What it does
The writing-plans skill creates a detailed, step-by-step implementation plan before any code is written. The plan is saved as a Markdown file in your repository and committed to git. Each task is broken into 2–5 minute steps with exact file paths, complete code blocks, and the exact commands to run. The plan becomes the source of truth for the implementation.
This skill exists because complex features fail at the planning stage — not because of bad code, but because the implementation was never properly thought through. A written plan forces you to discover dependencies, sequence your work correctly, and catch missing requirements before they become bugs mid-implementation.
When to invoke
- Before implementing any feature with more than three distinct steps
- When coordinating changes across multiple files or services
- When the feature will take more than an hour to implement
How to invoke
Say use writing-plans to plan [feature] after brainstorming has produced an approved spec.
Real example
# Rate Limiter Implementation Plan

**Goal:** Add sliding window rate limiting to the Express API.

### Task 1: Write RateLimiter tests
Files:
- Create: tests/test_rate_limiter.py

- [ ] Write failing test for basic request counting
- [ ] Write failing test for window expiry behaviour
- [ ] Run tests to confirm they fail
- [ ] Commit: "test: add rate limiter test suite"

### Task 2: Implement RateLimiter class
Files:
- Create: src/middleware/rate_limiter.py

- [ ] Implement check() with sliding window logic
- [ ] Run tests to confirm they pass
- [ ] Commit: "feat: implement sliding window rate limiter"Before vs After
Before: You start coding and discover three hours in that you needed Redis but your test environment does not have it configured.
After: The plan identifies the Redis dependency in Task 1 and adds a local mock setup step before any implementation begins.
Pro tip
The plan file becomes living documentation. Future contributors — and future you — understand why the implementation is structured the way it is, not just what it does.
Skill 5: Git Workflow — Meaningful History Without the Overhead
What it does
The git-workflow skill handles the complete commit, branch, and pull request flow using coordinated agents. It stages the right files, writes meaningful commit messages that explain the why not just the what, names branches consistently, and creates PR descriptions that give reviewers everything they need to understand the change.
Git hygiene is the part of development that gets the least attention and causes the most friction during code review. Commit messages like “fix stuff” or “wip” make git history useless. PRs without descriptions slow review down. The skill removes all of that cognitive overhead.
When to invoke
- After completing a feature or bug fix and you are ready to commit
- Before creating a pull request
- When you want consistent, meaningful git history across a team
How to invoke
Say use git workflow after completing your implementation, or use /git-workflow.
Real example
# The skill stages only the relevant files — not everything
git add src/middleware/rate_limiter.py tests/test_rate_limiter.py

# Writes a commit message that explains the WHY, not just the WHAT
git commit -m "feat(api): add sliding window rate limiter

Prevents API abuse by limiting requests to 100/min per user.
Uses Redis sorted sets for O(log n) sliding window tracking.

Closes #247"

# Creates a PR with a structured, reviewer-friendly description
gh pr create \
  --title "Add sliding window rate limiter to API middleware" \
  --body "## Summary
- Add RateLimiter middleware with sliding window algorithm
- Configure per-route limits via @rate_limit decorator
- Fail-open when Redis is unavailable

## Test plan
- [ ] Unit tests pass (pytest)
- [ ] Load test: 101st request returns 429
- [ ] Redis failopen: requests pass when Redis is down"Before vs After
Before: git commit -m "rate limiting" — completely useless context six months from now.
After: A commit message that tells you why this was added, what problem it solved, and which issue it closed.
Pro tip
The skill checks which files are actually related to the change. It will not accidentally stage your
.envfile or unrelated work-in-progress files.
Related: To get more from git alongside this skill, see 15 Advanced Git Tricks Developers Love Using. For PR creation directly from the terminal, Install and Use the GitHub CLI (gh) on Ubuntu covers the setup.
Skill 6: Requesting Code Review — Catch Issues Before Human Review
What it does
The requesting-code-review skill runs a structured pre-merge review that checks your implementation against the original spec and coding standards. It looks for drift (code that solves a different problem than specified), missed requirements, security issues, and quality concerns — before the code reaches a human reviewer.
Pre-merge AI review is not a replacement for human review — it is a filter. It catches the obvious things so that human reviewers can focus on architecture, business logic, and judgment calls. A reviewer who is not pointing out missing null checks is a reviewer who can actually help.
When to invoke
- After completing a feature implementation, before opening a PR
- After a significant refactor
- Any time you want a sanity check against the original requirements
How to invoke
Say use requesting code review after completing your implementation.
Real example
Reviewing rate_limiter.py against spec and coding standards...

✓ Core algorithm: Sliding window implementation matches spec
✓ Test coverage: Happy path and limit boundary tested

⚠ Missing: No test for Redis connection failure
  Spec requires fail-open behaviour (requests pass when Redis is down)
  Current code raises ConnectionError — this will take the API offline
  Fix: Wrap Redis calls in try/except, return True on RedisError

⚠ Missing: Rate limit headers not set on response
  Spec requires X-RateLimit-Remaining and X-RateLimit-Reset headers
  These are absent from the middleware return value

ℹ Suggestion: Extract window calculation to a pure function
Would allow independent unit testing of the time logicBefore vs After
Before: The Redis fail-open requirement is missed, discovered in production the first time Redis goes down and every request starts returning 500.
After: Caught before the PR is opened. Fixed in 10 minutes rather than in an incident.
Pro tip
Run this skill against the spec file, not just the code. It checks whether you built what you said you would build — which is a different question from whether the code is correct.
Related: If your code review process needs to include security checks, Secure AI Coding in Practice: A DevSecOps Checklist for 2026 provides a structured checklist you can run alongside Claude’s review.
Skill 7: Verification Before Completion — Evidence, Not Assertions
What it does
The verification-before-completion skill prevents false “done” claims. Before Claude tells you that tests pass, a bug is fixed, or a feature is complete, it must run the verification commands and show you the actual output. It cannot claim success from reading code — only from running it.
This matters because AI assistants have a well-documented tendency to claim things work based on the code looking correct, without actually verifying. A test file that runs zero tests can look identical to one that runs fifty. The skill enforces the discipline of evidence before assertion.
When to invoke
- Before any claim that work is complete, tests pass, or a bug is fixed
- Before committing or creating a pull request
- Whenever you want to be certain — not just reasonably confident
How to invoke
Say use verification before completion, or configure it to trigger automatically before any “done” claim.
Real example
# Without the verification skill:
Claude: "I've fixed the window expiry bug. The comparison logic
now correctly handles timezone offsets."
# Tests are still failing — Claude read the fix as correct
# without actually running the test suite.

# With the verification skill:
Claude: Running verification before claiming completion...

$ pytest tests/test_rate_limiter.py -v
FAILED tests/test_rate_limiter.py::test_window_expiry_utc
AssertionError: expected True, got False

Found secondary issue: window uses server local time, not UTC.
Redis timestamps are stored in UTC. Applying fix...

$ pytest tests/test_rate_limiter.py -v
5 passed in 0.34s

All tests passing — task complete.Before vs After
Before: You merge code because Claude said the tests passed. You find out they did not when your CI pipeline fails ten minutes later.
After: You only hear “tests pass” when tests actually pass. The output is shown, not summarised.
Pro tip
This skill is the safety net for all the others. It ensures that TDD’s green phase is actually green, that the code review’s fixes were actually applied, and that the git workflow is committing working code.
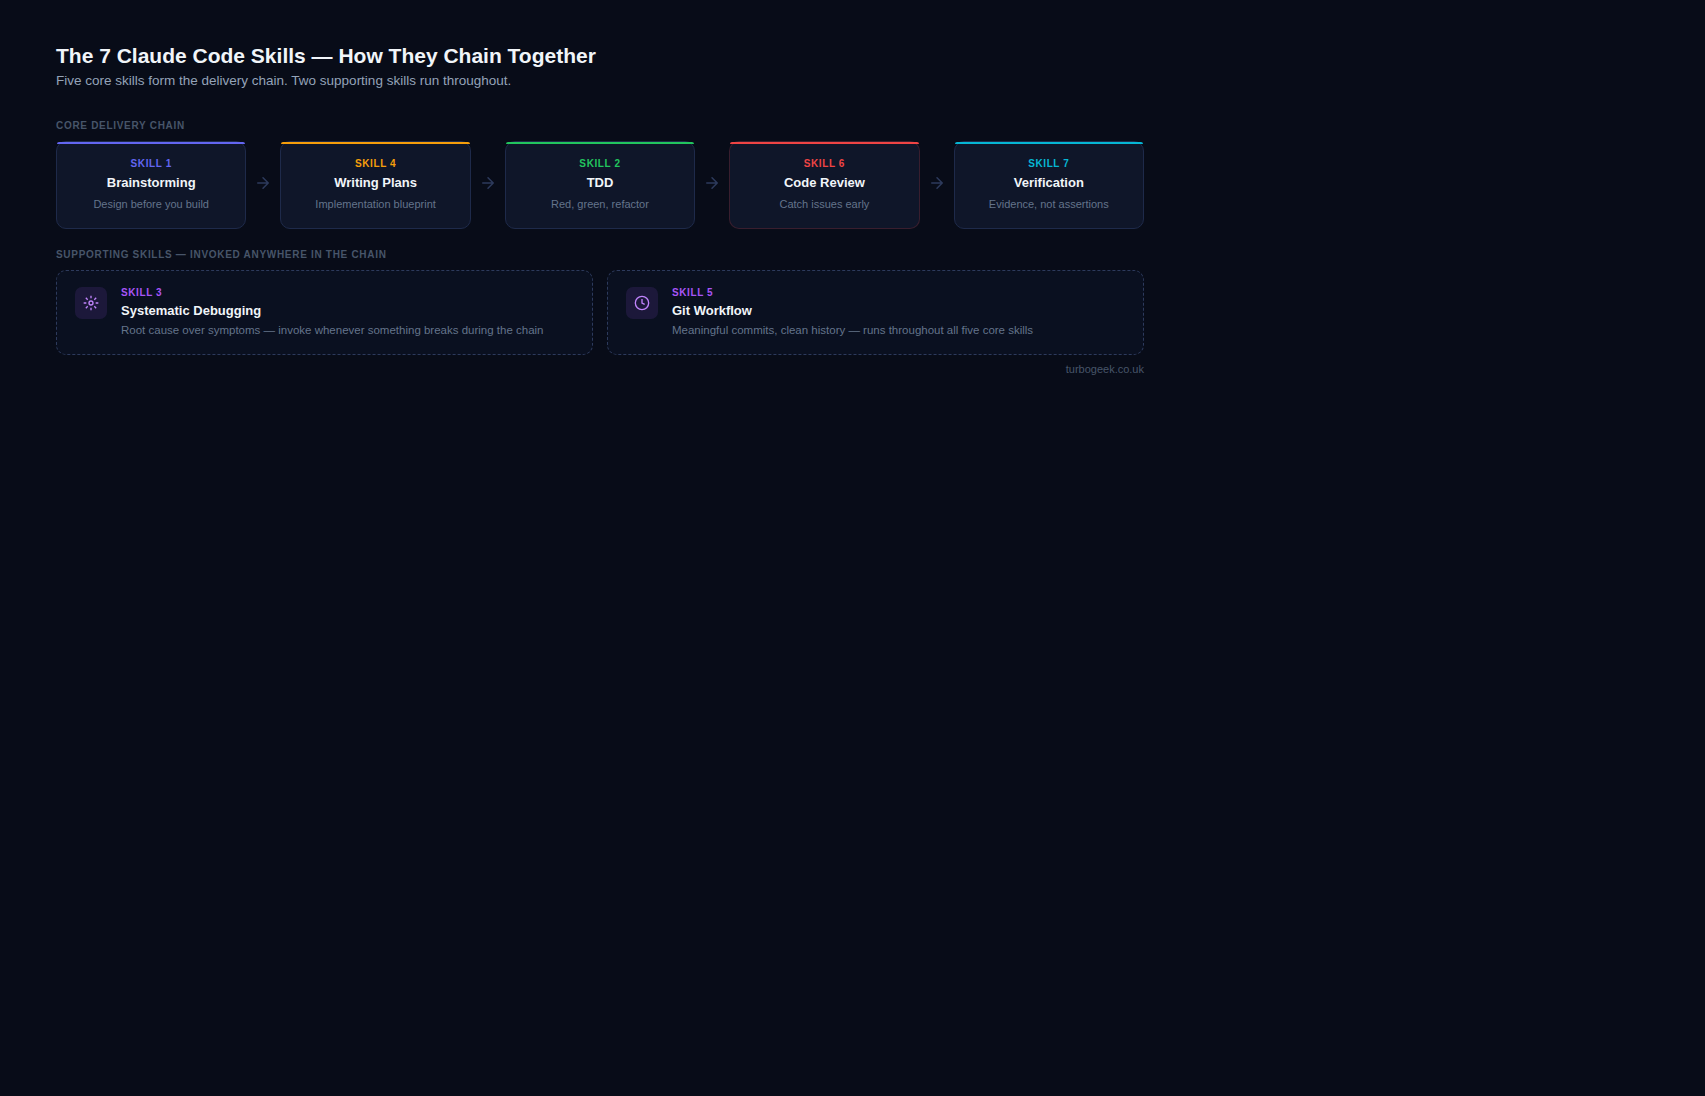
Putting It All Together
These seven skills work best as a chain. The natural flow for any feature is: brainstorm the design → write a plan → implement with TDD → review before merging → verify before shipping. The git workflow skill handles commits at each step. The debugging skill is ready whenever something breaks.
Start with just one. If you have never used Claude Code skills before, start with brainstorming — spend a week invoking it before every non-trivial task. The discipline of designing before building pays back its time investment within days.
Each of these skills is available in Claude Code today. Invoke them by name, and Claude will load the behaviour and follow it through your session. The difference between a Claude Code user who uses skills and one who does not is not a small gap — it is the difference between a powerful autocomplete and a disciplined engineering partner.
Have a favourite Claude Code skill we did not cover? Share it in the comments below.
Leave a Reply