

TL;DR
- WSL2 runs a real Linux kernel inside a lightweight Hyper-V VM, integrated with Windows Explorer and the network stack.
- Install with one command:
wsl --installon Windows 10 21H2+ or Windows 11. - Pick your distro from the Microsoft Store or
wsl --install -d Ubuntu-24.04. - Configure resource limits in
%USERPROFILE%\.wslconfig; reload withwsl --shutdown.
What is configuring WSL2 on Windows?
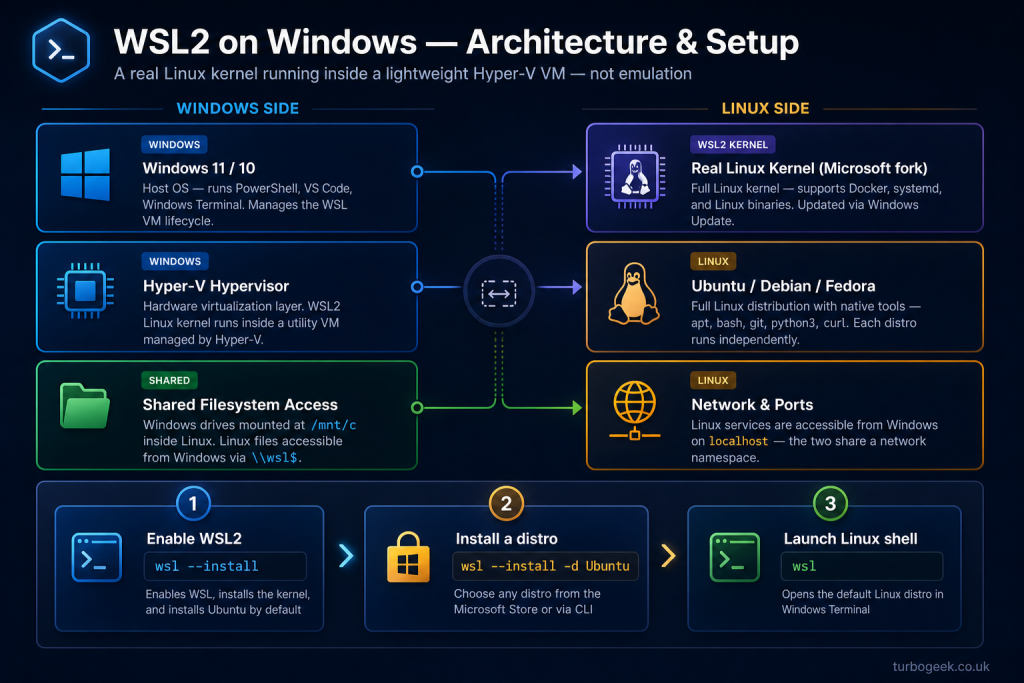
WSL2 (Windows Subsystem for Linux, version 2) runs a full Linux kernel in a managed VM that integrates with Windows. Unlike WSL1 (which translated Linux syscalls), WSL2 boots an actual Linux kernel — file performance, system call compatibility and Docker support are all dramatically better.
WSL2 is the right answer for Windows-based developers who need Linux tooling. Files in your distro’s filesystem run at native speed; files mounted from Windows (/mnt/c) are slower because of the cross-OS boundary. Keep your code in the WSL filesystem (~/projects) for best performance.
Prerequisites
- Windows 10 21H2+, Windows 11, or Windows Server 2022+.
- Hyper-V capable hardware (modern 64-bit CPU with SLAT).
- Administrator access (for the initial install).
- About 2 GB free disk for the distro plus space for what you install inside it.
How to use this guide
The sections below walk through the practical commands and options. After the main content you’ll find a Verification block (sanity-check it actually worked), a Troubleshooting block (common error messages and what to do), and Related reading for follow-on topics.
As you can probably tell from my blog, I normally use Linux as my daily driver. However, for the company I work for, I have now been asked to get compliant which means that my work Linux desktop is going back into storage, and I have been sent a corporate Windows 11 Lenovo Thinkpad. I hated WSL1, it was slow and clunky and the integration with DevOps tools like git, code IDE, and CICD was painful.
The good news is that Microsoft has now implemented native Linux Kernel support in Windows 11 and I must say that the experience is much better than I expected.
In this procedure, you will learn how to install and enable WSL2 in Windows 11. Install the Ubuntu shell, configure git and I will include a few tips to get it working well if you are coming from a Linux layer. Each step will include the way to do the work 1) via the Windows GUI 2) via the command line (PowerShell)
Step 1 – Enable Windows Subsystem for Linux
GUI Method
Open the Windows Features:
- Type “Features” in the Windows search bar and open it.
Enable WSL:
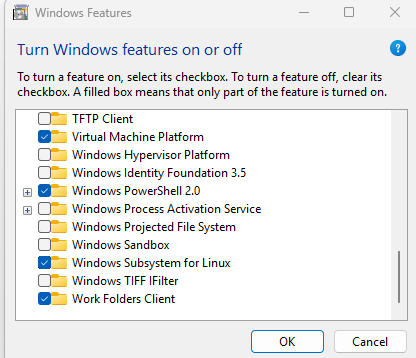
- Scroll down and find “Windows Subsystem for Linux”.
- Check the box next to it.
- Click “OK”.
Restart Your Computer:
- Windows will prompt you to restart your computer. Click “Restart Now”.
Command Line Method
Open PowerShell as Administrator:
- Type “PowerShell” in the Windows search bar.
- Right-click on “Windows PowerShell” and select “Run as administrator”.
Enable WSL:
- In the PowerShell window, type the following command and press Enter:
dism.exe /online /enable-feature /featurename:Microsoft-Windows-Subsystem-Linux /all /norestartEnable Virtual Machine Feature (for WSL2):
- Type the following command and press Enter:
dism.exe /online /enable-feature /featurename:VirtualMachinePlatform /all /norestartRestart Your Computer:
- Type the following command and press Enter:
shutdown /r /t 0Step 2 – Install Your WSL2 Linux Distribution
Now you need to install a Linux distro (Kernel) on your Windows 11 machine. In this example I will be using Ubuntu.
Open PowerShell as Administrator:
- Type “PowerShell” in the Windows search bar.
- Right-click on “Windows PowerShell” and select “Run as administrator”.
List Available Distributions:
Use the following command to see the available Linux distributions you can install:
wsl --list --onlineThis will display a list of distributions available from the Microsoft Store.
You should see output similar to this:
wsl --list --online
The following is a list of valid distributions that can be installed.
Install using 'wsl.exe --install <Distro>'.

NAME                            FRIENDLY NAME
Ubuntu                          Ubuntu
Debian                          Debian GNU/Linux
kali-linux                      Kali Linux Rolling
Ubuntu-18.04                    Ubuntu 18.04 LTS
Ubuntu-20.04                    Ubuntu 20.04 LTS
Ubuntu-22.04                    Ubuntu 22.04 LTS
Ubuntu-24.04                    Ubuntu 24.04 LTS
OracleLinux_7_9                 Oracle Linux 7.9
OracleLinux_8_7                 Oracle Linux 8.7
OracleLinux_9_1                 Oracle Linux 9.1
openSUSE-Leap-15.6              openSUSE Leap 15.6
SUSE-Linux-Enterprise-15-SP5    SUSE Linux Enterprise 15 SP5
SUSE-Linux-Enterprise-15-SP6    SUSE Linux Enterprise 15 SP6
openSUSE-Tumbleweed openSUSE TumbleweedInstall Your Chosen Distribution:
- Use the
wsl --install -d <Distribution Name>command, replacing<Distribution Name>with the name of the distribution you want (e.g., Ubuntu, Debian). For example, to install Ubuntu, you would use:
wsl --install -d Ubuntu(Optional) Specify a Specific Version:
- If you want to install a specific version of a distribution, some distributions allow you to add a version number. For example, to install Ubuntu 22.04
wsl --install -d Ubuntu-22.04Wait for the Installation:
- WSL will download and install the distribution. This might take a few minutes depending on your internet speed.
Launch and Set Up:
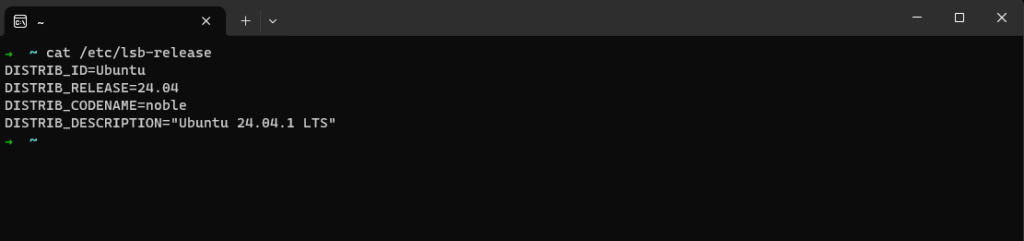
- Once the installation is complete, the distribution will launch automatically. You’ll be prompted to create a username and password for your Linux environment.
Step 3 – Using WSL2 on Windows 11
Step 3 – Using WSL2 on Windows 11
WSL2 provides a significant improvement over the original WSL by utilizing a lightweight virtual machine to run the Linux kernel. This results in better performance, improved system call compatibility, and overall a more authentic Linux experience within Windows.
Understanding the Abstraction Layer
WSL2 acts as an abstraction layer between Windows and your Linux distribution. This means that your Linux environment operates in its own isolated space, with its own file system, processes, and network interfaces. However, WSL2 allows for seamless interoperability between the two operating systems:
- File System Access: You can easily access your Windows files from within your Linux environment and vice versa. This enables you to work on projects that span both operating systems without complex file sharing configurations.
- Network Connectivity: WSL2 shares the network connection of your Windows host, allowing your Linux applications to access network resources as if they were running natively on Windows.
- Command-Line Integration: You can run Linux commands directly from the Windows Command Prompt or PowerShell, and Windows commands from the Linux terminal.
Installing Git in WSL2
Git is a distributed version control system that is essential for software development and other collaborative projects. Here’s how to install it in your WSL2 distribution:
Update Package Lists:
- Open your Linux terminal (e.g., Ubuntu).
- Run the following command to update the package lists:
sudo apt updateInstall Git:
- Run the following command to install Git:
sudo apt install gitVerify Installation:
- Check the Git version to confirm the installation:
git --versionOpening File Explorer from WSL2
You can directly open a File Explorer window from your WSL2 environment to browse the current directory:
explorer.exe .This command launches File Explorer and displays the contents of the current directory within your Linux distribution.
That’s it, thank you for reading. Look out for more posts as I rediscover Windows WSL as my daily driver. Got a question? Ask in the comments section below.
Verification
Sanity-check the change actually worked:
wsl --status— shows default distro, version (should be 2), kernel version.wsl -l -v— lists installed distros with their version.- Open a distro shell, run
uname -r— confirms a real Linux kernel.
Troubleshooting
“WSL2 requires an update to its kernel component” — Run wsl --update (Windows 11) or download the kernel update package linked from the error message (Windows 10).
Memory usage grows and never releases — WSL VM holds memory until you wsl --shutdown. Set memory=4GB in %USERPROFILE%\.wslconfig to cap it.
Network access from WSL fails behind corporate VPN — Switch to mirrored networking mode: networkingMode=mirrored in .wslconfig (Windows 11 22H2+ only).
Authoritative sources
References: Microsoft — Install WSL, Advanced settings configuration.
Leave a Reply