
You already have a clean Windows 11 developer setup. This spin-off takes the next step: configure your laptop for AI-assisted development, local agent workflows, WSL2 projects, coding CLIs, memory, skills, and MCP servers.
The goal is not to install every AI tool you can find. The goal is to build a predictable workstation where Windows runs desktop apps, WSL2 hosts repositories and Linux tooling, and AI coding agents can safely read, edit, test, and verify real projects.
TL;DR – Windows 11 AI Developer Setup
- Use Windows for GUI tools – Cursor, Obsidian, browsers, Windows Terminal and system drivers belong on the Windows side.
- Use WSL2 for code – keep repositories under
~/code, not under/mnt/c. - Install Claude Code and Codex where the repo lives – if your projects live in WSL2, install the CLIs inside WSL2.
- Add memory and context deliberately – claude-mem, skills and MCP servers are useful, but each one changes what the agent can see or do.
- Verify the workflow – check WSL2, Node, Python, Git, Claude, Codex, Cursor Agent and MCP before calling the machine ready.
| Layer | Use it for | Main tools |
|---|---|---|
| Windows 11 | Desktop apps, drivers, browser auth, notes | Cursor, Obsidian, Windows Terminal, GPU driver |
| WSL2 | Linux repos, shell tools, tests, package managers | Ubuntu, Git, Node, Python, Claude Code, Codex CLI |
| Agent memory | Cross-session context and project recall | claude-mem, AGENTS.md, project notes |
| MCP | Controlled access to external tools and live data | Context7, Playwright, GitHub, docs servers |
| Skills | Repeatable specialist workflows | Review, test, docs, security, browser verification |
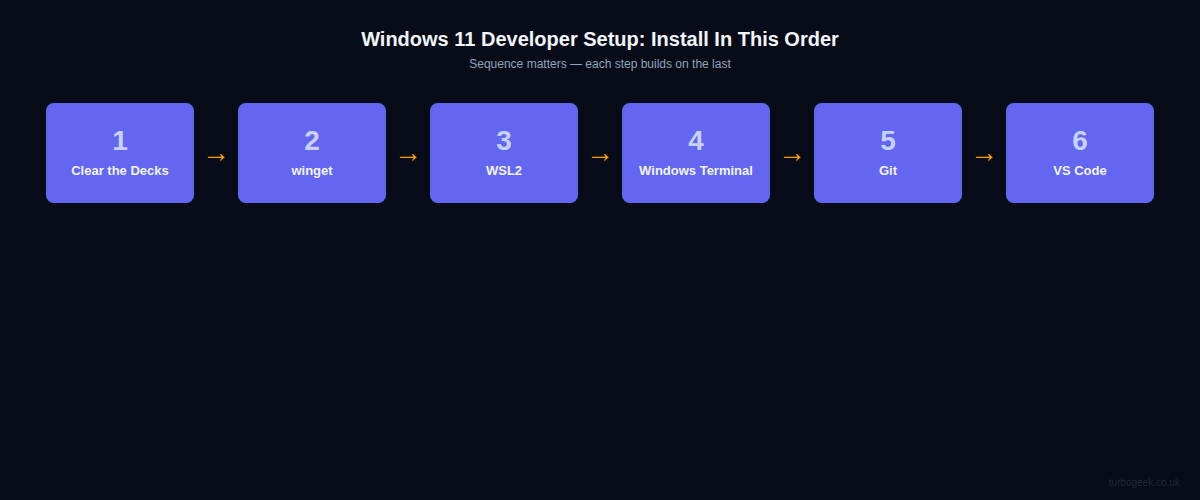
1. Start With the Windows and WSL2 Split
The cleanest AI developer setup is: Windows handles the desktop, and WSL2 handles the development environment. Once AI agents are involved, they need to run commands in the same environment where your project runs.
Use Windows for graphical applications, identity flows, browser logins, file sync tools, and GPU drivers. Use WSL2 for repositories, package managers, tests, local services, and terminal agents. If a tool edits files or runs project commands, install it in WSL2 unless the project is genuinely Windows-native.
2. Update Windows, Drivers, and WSL
Before installing agent tooling, update Windows and your graphics driver. For AI coding, the GPU is not always critical. For local model experiments, embeddings, small inference jobs, or ML notebooks, it can matter. If the laptop has an NVIDIA GPU, install the latest Windows NVIDIA driver first, then let WSL2 expose CUDA support through the Windows host driver.
Run this in an elevated PowerShell or Windows Terminal session:
# Update packages managed by winget
winget upgrade --all

# Update WSL and restart WSL instances
wsl --update
wsl --shutdown

# Check installed distributions and versions
wsl --list --verboseIf you have an NVIDIA GPU, check it from Windows first:
nvidia-smiThen check it again from inside WSL2 after Ubuntu is installed:
nvidia-smi

# If nvidia-smi is not on PATH, try the WSL library path
/usr/lib/wsl/lib/nvidia-smiImportant: Do not install a Linux NVIDIA display driver inside WSL2. NVIDIA’s CUDA on WSL guide makes it clear that the Windows host driver is exposed in WSL2, and that installing a separate Linux driver within the distro is the wrong approach.
3. Install or Refresh WSL2
If WSL2 is not installed yet, use the standard Microsoft flow. On a fresh Windows 11 machine, this is still a one-command install followed by a restart and first-run Ubuntu setup.
# Run in PowerShell as Administrator
wsl --install -d Ubuntu

# After restart
wsl --list --verbose
wsl --updateNow open Ubuntu and install the basic Linux tooling. This gives Claude Code, Codex CLI, Cursor Agent, MCP servers and normal build tools a stable home.
sudo apt update && sudo apt upgrade -y
sudo apt install -y build-essential ca-certificates curl git jq unzip python3 python3-venv python3-pip pipx

mkdir -p ~/code ~/ai ~/notes
cd ~/codeKeep active repositories under ~/code or another folder inside the WSL filesystem. Repositories under /mnt/c/Users/... are slower and more likely to hit file watching, symlink, and permission issues.
4. Install Node for AI CLIs and MCP Servers
Many agent tools and MCP servers depend on Node. Claude Code supports multiple install paths, Codex now has a standalone installer, and Playwright/Context7 MCP are commonly run with npx. You still want a clean Node LTS in WSL2.
# Install nvm, then install the current Node LTS
curl -fsSL https://raw.githubusercontent.com/nvm-sh/nvm/v0.40.3/install.sh | bash
source ~/.bashrc
nvm install --lts
nvm use --lts

node --version
npm --version
npx --versionIf your organization standardizes Node another way, that is fine. The important part is that node, npm and npx work inside WSL2, because that is where the agent will run project commands.
5. Install the Windows-Side Apps with winget
Install GUI applications on the Windows side. Cursor is the editor, Obsidian is the notes vault, Windows Terminal is the shell host, and Git for Windows is useful for Windows-native tools even if your main Git identity lives inside WSL2.
# Run in PowerShell
winget install --id Microsoft.WindowsTerminal --exact
winget install --id Microsoft.PowerShell --exact
winget install --id Git.Git --exact
winget install --id Microsoft.VisualStudioCode --exact
winget install --id Anysphere.Cursor --exact
winget install --id Obsidian.Obsidian --exactIf a package ID changes, search first:
winget search Cursor
winget search Obsidian
winget search ClaudeFor the plain Windows developer baseline, use the original Windows 11 Developer Setup. This AI setup assumes that the base is already clean.
6. Configure Git in WSL2
Do not rely on the Windows Git configuration for Linux repositories. Set Git identity, default branch, and line endings inside WSL2.
git config --global user.name "Your Name"
git config --global user.email "[email protected]"
git config --global init.defaultBranch main
git config --global core.autocrlf input

ssh-keygen -t ed25519 -C "[email protected]"
cat ~/.ssh/id_ed25519.pub
Add the public key to GitHub, GitLab, or your Git host, then verify SSH from WSL2:
ssh -T [email protected]7. Install Claude Code
Claude Code should be installed where the repo lives. If your repositories are under WSL2, install Claude Code inside WSL2. Anthropic’s current recommended WSL/Linux installer is the native install script:
# Run inside WSL2
curl -fsSL https://claude.ai/install.sh | bash

# Start Claude Code from a project folder
cd ~/code/your-project
claudeClaude Code can also be installed with npm, and Anthropic still documents that path, but the native installer avoids several global npm permission problems:
npm install -g @anthropic-ai/claude-code
claude doctorIf you prefer native Windows for Windows-native repositories, Anthropic also documents a WinGet install:
winget install Anthropic.ClaudeCodeFor a deeper Claude Code setup, see Claude Code: Practical Guide, Is Claude Code Safe?, and Claude Code Skills Custom Commands.
8. Install Codex CLI
Codex CLI is OpenAI’s local terminal coding agent. For this setup, install it inside WSL2 so it can work directly with Linux project folders and tools.
# Run inside WSL2
curl -fsSL https://chatgpt.com/codex/install.sh | sh

# Start Codex from a repository
cd ~/code/your-project
codexThe first run prompts you to authenticate with a ChatGPT account or API key, depending on your setup. OpenAI’s current Windows guidance says Codex can run natively on Windows or inside WSL2; choose WSL2 when your workflow already lives in Linux.
After login, verify the CLI and inspect MCP support:
codex --version
codex mcp --helpUse Codex in a Git repository, not in a random downloads folder. The agent can edit files and run commands, so version control is the undo button.
9. Install Cursor and Cursor Agent CLI
Cursor has two roles in this setup. The Windows desktop app is your AI editor. Cursor Agent CLI is a terminal agent you can run from WSL2 for prompt-driven coding tasks.
Install the desktop app on Windows:
winget install --id Anysphere.Cursor --exactInstall Cursor Agent CLI inside WSL2:
curl https://cursor.com/install -fsSL | bash
source ~/.bashrc

cursor-agent login
cursor-agent statusIf you want a shell command that opens the Cursor editor, use Cursor’s command palette to install the shell command, then test it from the terminal where you expect to work:
cd ~/code/your-project
cursor .For comparison and workflow guidance, see How to Use Claude Code and Cursor Together and Cursor: The AI IDE That Writes Code Alongside You.
10. Install Obsidian for the Human Memory Layer
Agents are useful, but you still need your own notes. Obsidian works well because a vault is just a folder of Markdown files. Keep it on the Windows side so the desktop app, sync provider, and browser workflows behave normally.
winget install --id Obsidian.Obsidian --exactCreate a simple vault structure for AI development:
AI-Dev-Vault/
  00-inbox/
  10-projects/
  20-prompts/
  30-runbooks/
  40-mcp/
  50-decisions/
90-archive/Use Obsidian for decisions, project context, repeatable prompts, postmortems, and command snippets. Do not use it as a dumping ground for secrets, API keys, customer data, or private credentials. AI tooling gets more useful when your notes are clean and safer when sensitive material is not casually available.
11. Install claude-mem for Persistent Agent Memory
claude-mem is useful when you want Claude Code to remember project context across sessions. Install it through its plugin installer or the Claude Code plugin marketplace, not with a plain global npm install.
# Recommended interactive installer
npx claude-mem installOr install from inside Claude Code:
/plugin marketplace add thedotmack/claude-mem
/plugin install claude-memThe important distinction: npm install -g claude-mem installs the SDK/library, but it does not register the plugin hooks or start the worker service. Use the documented installer.
Memory tools need discipline. Store observations about architecture, decisions, commands, and project history. Do not store passwords, tokens, client secrets, private customer records, or anything you would not want surfaced automatically in a future coding session.
12. Add AGENTS.MD Project Instructions
Every serious AI-assisted repository should have a checked-in project instruction file. For Codex, AGENTS.md It is the standard place to explain how to build, test, review, and work safely in the repo.
# AGENTS.md

## Build and test
- Install dependencies with the repo's documented package manager.
- Run focused tests before broad test suites.
- Never skip failing tests without documenting the failure.

## Safety
- Do not commit secrets, tokens or local environment files.
- Do not run destructive git commands unless explicitly requested.
- Prefer small, reviewable changes.

## Project context
- Source lives in ./src.
- Tests live in ./tests.
- Use the existing formatter and lint rules.For a more complete template, use the How to Write the Perfect AGENTS.md file.
13. Recommended Skills for an AI Developer Laptop
Skills are reusable workflows for agents. Do not install a huge skill library on day one. Start with a focused set to improve quality and reduce repeated prompting.
| Skill type | Why it helps | Typical trigger |
|---|---|---|
| Project onboarding | Reads the repo shape before changing code | “Explain this repo” |
| Test runner | Uses the right local test workflow | “Fix the failing tests” |
| Code review | Finds regressions before commit | “Review my diff” |
| Security scan | Checks secrets, dependencies and risky config | “Scan this repo” |
| Docs lookup | Pulls current official docs instead of guessing APIs | “Use current docs” |
| Browser verification | Uses Playwright screenshots and DOM checks | “Verify this UI” |
| Release notes | Turns commits into useful changelogs | “Draft release notes” |
Codex supports local and distributed skills, and the built-in $skill-installer can install curated skills when available. The best custom skills are short, specific, and attached to real workflows: testing, release notes, WordPress publishing, infrastructure review, SAST, DAST, or container scanning.
Related: 7 Practical Claude Code Skills That Will Transform Your Development Workflow.
14. Recommended MCP Servers
MCP servers connect agents to tools, browsers, docs, issue trackers, repositories, and data sources. This is powerful, but it is also an access-control decision. Add the MCP servers one by one and verify what each server exposes.
| MCP server | Use it for | Risk level |
|---|---|---|
| Context7 | Current library/framework docs | Low |
| Playwright | Browser checks, screenshots, UI testing | Medium |
| GitHub | Issues, pull requests, repo metadata | Medium to high |
| Filesystem | Specific extra folders outside the repo | Medium |
| Obsidian or notes | Read-only notes and runbooks | Medium |
| Cloud/provider MCP | AWS, Azure, GCP, monitoring, databases | High |
A good starter MCP pair is Context7 plus Playwright. Context7 reduces stale API mistakes. Playwright lets agents inspect real pages instead of guessing from screenshots.
Add Context7 to Codex:
codex mcp add context7 -- npx -y @upstash/context7-mcpAdd Context7 to Claude Code:
claude mcp add context7 -- npx -y @upstash/context7-mcpAdd Playwright to Codex:
codex mcp add playwright -- npx -y @playwright/mcp@latestAdd Playwright to Claude Code:
claude mcp add playwright -- npx -y @playwright/mcp@latestFor Cursor, the MCP configuration is shared between the desktop editor and cursor-agent. Add servers through Cursor settings or a project/global mcp.json, then verify from the CLI:
cursor-agent mcp list
cursor-agent mcp list-tools playwrightAvoid adding broad filesystem, database, or cloud MCP servers globally on day one. Start read-only where possible. Prefer project-scoped configs for project-specific access.
15. Add Basic Secret Hygiene
AI agents make it easier to edit and move fast. That also makes accidental exposure of secrets easier. Add basic guardrails before you start delegating work.
# Useful global ignores for local machine files
mkdir -p ~/.config/git
cat >> ~/.config/git/ignore <<'EOF'
.env
.env.*
*.pem
*.key
*.p12
*.pfx
.claude/
.codex/
.cursor/
EOFUse repository-level .gitignore for project-specific files and a secret scanner such as Gitleaks before pushing. For a broader treatment, read Secrets Management for AI-Assisted Development.
16. Verification Checklist
Run the checks from the environment where you expect the tools to work. If your projects live in WSL2, run most of these inside WSL2.
# Windows PowerShell
wsl --list --verbose
wsl --update

# WSL2
cd ~/code
node --version
npm --version
python3 --version
git --version
ssh -T [email protected]

# AI CLIs
claude doctor
codex --version
cursor-agent status

# MCP
codex mcp --help
cursor-agent mcp list
Then do a real workflow test:
mkdir -p ~/code/ai-setup-test
cd ~/code/ai-setup-test
git init
printf '# AI setup test\n' > README.md
git add README.md
git commit -m "Initial test repo"

claude
codex
cursor-agent "summarise this repository"If all of that works, the laptop is ready for AI-assisted development: WSL2 owns the project, Windows owns the apps, the agents can run in the right environment, and MCP/skills/memory are installed deliberately instead of casually.
Common Mistakes
- Installing every agent globally on Windows – if the repo lives in WSL2, install terminal agents in WSL2.
- Working under
/mnt/c– it is convenient, but slower and more fragile for Linux tooling. - Using MCP as a toy store – every MCP server expands what the agent can see or do.
- Skipping Git before agent work – use commits as checkpoints before large changes.
- Letting notes become secret storage – Obsidian and memory tools should not contain credentials.
- Trusting generated install commands blindly – check official docs for tools that move quickly.
Related TurboGeek Guides
- Windows 11 Developer Setup: The Complete Guide From a Fresh Install
- How to Configure WSL2 on Windows
- How to Create a Shortcut to Ubuntu WSL on Windows 11
- The AI Coding Tools Cheat Sheet
- Claude Code vs Cursor: Which AI Coding Tool Is Right for You
- How to Use Claude Code and Cursor Together
- Secrets Management for AI-Assisted Development
Frequently Asked Questions
Should I install Claude Code and Codex on Windows or WSL2?
Install them where the repository and build tools live. For most web, cloud, DevOps, Python, Node, and Linux-targeted work, that means WSL2. Use native Windows only for Windows-native projects.
Do I need an NVIDIA GPU for AI development on Windows 11?
No. AI-assisted coding tools run on cloud models and mostly require CPU, RAM, disk space, and a reliable internet connection. A GPU matters if you want local ML experiments, local inference, or CUDA-based notebooks.
Should I use Obsidian or Claude-mem for memory?
Use both for different jobs. Obsidian is your human-readable notebook. Claude-mem is a machine-assisted session memory for Claude Code. Keep secrets out of both.
Which MCP server should I install first?
Start with Context7 for current documentation. Add Playwright next if you build web UIs. Add GitHub, cloud or database MCP servers only after deciding what access the agent should have.
Is Cursor Agent CLI the same as the Cursor editor command?
No. cursor Usually opens the editor from a terminal. cursor-agent is the command-line agent. Install and test both if you want desktop editing and terminal automation.
Authoritative Sources
- Microsoft Learn: Install WSL
- Microsoft Learn: GPU acceleration for ML in WSL
- NVIDIA CUDA on WSL User Guide
- Claude Code Docs: Getting started
- OpenAI Developers: Codex CLI
- OpenAI Developers: Codex on Windows
- OpenAI Developers: Codex MCP
- OpenAI Developers: Codex Skills
- Cursor Docs: CLI installation
- Cursor Docs: CLI authentication
- Obsidian Help: Download and install Obsidian
- Claude-Mem Docs: Installation
- Playwright MCP: Installation
- Context7 MCP: Up-to-date code docs
Leave a Reply