
A secret leak is rarely just a bad commit. It becomes key rotation, audit noise, broken automation, and a scramble to work out whether the credential was already abused. That is why secret scanning earns its place so early in a DevSecOps rollout.
Gitleaks works well because it can scan both git history and the working tree. Those are different jobs. One tells you what debt already exists. The other catches the mistake before it spreads through branches, pull requests, and deployment pipelines.
TL;DR
- Run Gitleaks against git history and the current directory because they solve different problems.
- Trust the local command first, then add the official GitHub Action to your PR path.
- Use baselines and ignore files sparingly; revoking exposed credentials matters more than suppressing the alert.
- A passing scan is not enough if the leaked secret is still active.
| Scope | Best for | Command |
|---|---|---|
| Git history | Old leaks and commit ranges | gitleaks git . |
| Working tree | Local checks before commit | gitleaks dir . |
| CI gate | Pull request scans | gitleaks/gitleaks-action@v2 |
| Baseline report | Known debt tracking | gitleaks git --report-path gitleaks-report.json |
Start here: Start with Why you need both history and working tree scans. That is the distinction that prevents most weak secret-scanning rollouts.
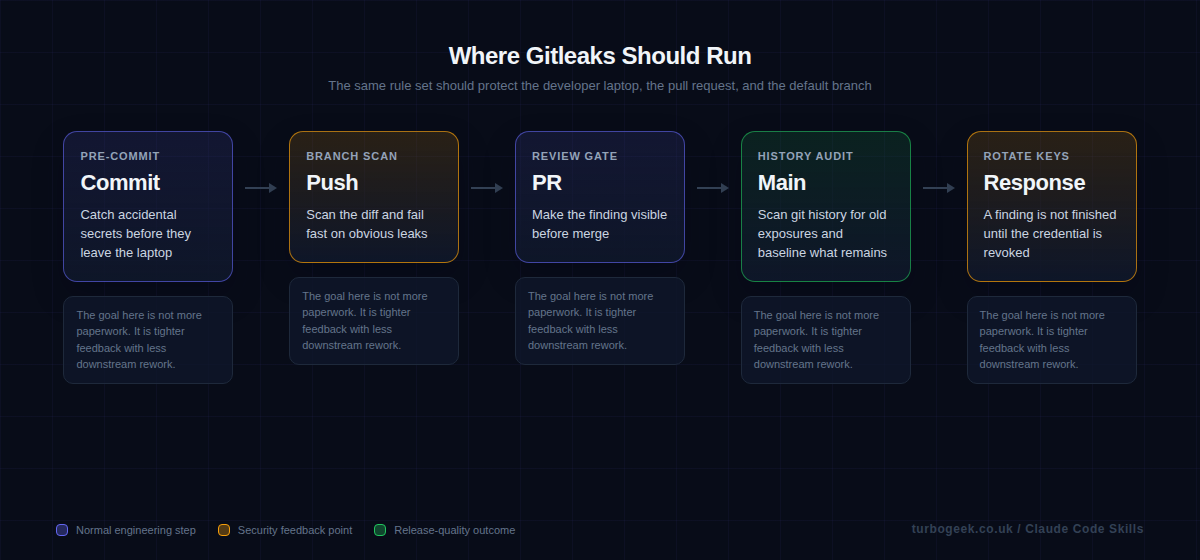
Step-by-step: install Gitleaks, scan history, then block new leaks
Secret scanning works best when you separate two jobs: finding the old damage already in git history, and blocking the next accidental leak before it lands in a pull request. Do both in that order.
macOS
- Install Gitleaks with
brew install gitleaks. - Verify the install with
gitleaks version. - Use the history and working-tree scans below once the binary is available.
Linux
- Open the latest Gitleaks release and download the Linux archive for your architecture.
- Extract it with
tar -xzf gitleaks_*.tar.gzand move the binary into your path withsudo install gitleaks /usr/local/bin/gitleaks. - Verify the install with
gitleaks version.
Windows
- Open the latest Gitleaks release and download the Windows zip for your architecture.
- Extract it into a folder such as
C:\Tools\gitleaks. - Add that folder to your Windows
PATH, open a new PowerShell window, and rungitleaks version. - Continue with the same
gitleaks gitandgitleaks dircommands below once the CLI is available.
- Install Gitleaks locally first so you can see what it finds before CI starts failing builds.
- Run a full
gitscan and save the report. That becomes your baseline if the repository already contains historical leaks. - Run a
dirscan on the current working tree for quick local checks before commit. - If the repo already has old findings, keep the baseline file for a short period so CI only fails on new leaks while you rotate old credentials.
- Add the same scan to GitHub Actions on pull requests and pushes.
- Treat every real finding as a credential-rotation job, not just a line to suppress.
If you want the least surprising GitHub Actions setup, call the CLI directly in the workflow. The separate gitleaks-action@v2 exists, but organization-owned repositories need a GITLEAKS_LICENSE for that action.
name: secret-scanning

on:
  pull_request:
  push:
    branches: [main]

jobs:
  gitleaks:
    runs-on: ubuntu-latest
    steps:
      - uses: actions/checkout@v4
        with:
          fetch-depth: 0
      - name: Install Gitleaks
        run: |
          curl -sSL https://github.com/gitleaks/gitleaks/releases/download/v8.30.1/gitleaks_8.30.1_linux_x64.tar.gz -o gitleaks.tgz
          tar -xzf gitleaks.tgz gitleaks
          sudo install gitleaks /usr/local/bin/gitleaks
      - name: Scan repository
        run: |
          gitleaks git . \
            --report-format sarif \
            --report-path gitleaks.sarif \
            --exit-code 1
      - name: Upload SARIF
        if: always()
        uses: github/codeql-action/upload-sarif@v4
        with:
sarif_file: gitleaks.sarifWhat a finding actually looks like — Gitleaks emits structured JSON you can pipe into a triage tool, a ticket system or a Slack channel. Here is a sanitized example, plus the exact response sequence (rotate first, suppress second, edit third):
Pinning v8.30.1 in the install snippet above is current as of late March 2026; check the releases page when you bump.
Why you need both history and working tree scans
A history scan answers the uncomfortable question: what is already in this repository? That matters because teams often add secret scanning only after the repo has years of commits behind it. If you ignore history, you have no idea whether the pipeline is protecting a clean codebase or hiding old exposures beneath a shiny new badge.
A working-tree scan solves a different problem. It stops the accidental commit before it becomes team-wide debt. That is why the strongest setup uses both: history for truth, working-tree checks for prevention.
Start local with the CLI and a report file
The local command is the fastest way to build trust. Developers can run it against the repository, see the findings, and understand what the tool is actually doing before it ever blocks a pull request. That also gives you a chance to decide whether you need a baseline for known historical debt.
If the first experience with Gitleaks is a red CI job that nobody understands, the team will treat it as security theatre. If the first experience is a local scan with a report file and a clear remediation path, the rollout feels like engineering hygiene.
Add the official GitHub Action once the local workflow is understood
The official GitHub Action is the right next step because it gives you pull-request visibility without inventing your own wrapper. The key point is not the YAML. It is the decision about where the finding appears and who is expected to act on it.
Once the action is live, pair it with clear secret-management practice. If a finding is real, rotate the credential and move that value into an environment or secret store. Your existing post on GitHub environment secrets is a natural companion here.
Handle false positives carefully and handle real leaks aggressively
Every secret scanner has edge cases. A sample token in documentation or a test fixture may trigger. The wrong response is to create a huge ignore list immediately. The better response is to check whether the data is real, then either rotate it or justify the suppression in a way the next reviewer can understand.
When the finding is real, the scan is only step one. The actual work is revocation, replacement, and cleanup. That is where tools like AWS-Vault security best practices help, because they reduce the chance that long-lived credentials leak into a repo in the first place.
Example workflow
Start with the local commands, then enforce the same expectation in GitHub Actions.
Local scan of git history with a saved report:
gitleaks git .
gitleaks git --report-path gitleaks-report.jsonOfficial GitHub Action on push and pull request:
name: gitleaks
on: [pull_request, push, workflow_dispatch]

jobs:
  scan:
    runs-on: ubuntu-latest
    steps:
      - uses: actions/checkout@v4
        with:
          fetch-depth: 0
      - uses: gitleaks/gitleaks-action@v2
        env:
GITHUB_TOKEN: ${{ secrets.GITHUB_TOKEN }}FAQ
Should I scan git history or just new commits?
Do both. History tells you what debt already exists, while new-commit scanning prevents fresh mistakes from spreading. Treat them as complementary controls, not substitutes.
What if Gitleaks finds an old test key?
Confirm whether it is still valid. If it is dead and clearly synthetic, document the suppression. If it still works, treat it as a live exposure and rotate it.
Does secret scanning replace proper secret management?
No. Secret scanning is a safety net. Proper secret management, short-lived credentials, and environment-secret workflows reduce how often you need that safety net to save you.
Related: Managing GitHub Environment Secrets & Variables via CLI and How to Install AWS-Vault on Linux both reduce the chance that credentials ever end up in your repo to begin with.
Leave a Reply