
TL;DR
- What changed: Windows 11 KB5079473 (March 2026) adds Sysmon as a native optional feature.
- How to enable: Check the feature with PowerShell first, then enable it via PowerShell, Settings, Intune, GPO startup script, or your endpoint-management tooling.
- Important UI note: Searching the Added features list in Windows Settings only searches features already installed. "No features found" there does not prove Sysmon is unavailable.
- Who benefits: Sysadmins running supported Windows 11 builds who want Sysmon telemetry without maintaining a separate Sysinternals package.
If you have been managing Windows endpoints for any length of time, you already know Sysmon. Microsoft’s System Monitor has been the gold standard for endpoint telemetry since Mark Russinovich first released it as part of the Sysinternals suite. It gives you process creation logs, network connections, file changes, registry modifications, and DNS queries — the kind of visibility that turns a blind spot into a detection surface.
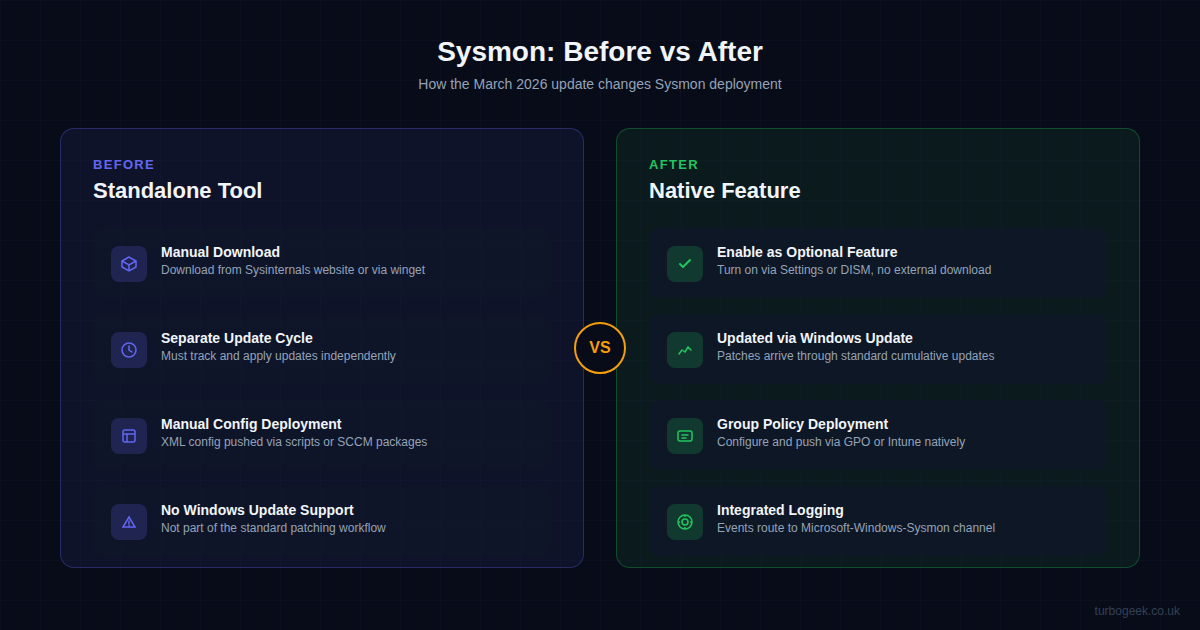
The problem has always been deployment. Sysmon was a standalone binary that you had to download, install, configure with an XML file, and keep updated separately from Windows itself. For a ten-machine lab, that is fine. For a thousand-endpoint estate, it is a packaging and patching headache that many teams simply never got around to solving properly.
That changes now. With the March 2026 cumulative update (KB5079473), Microsoft has made Sysmon a native optional feature in Windows 11. No more downloading binaries. No more separate update cycles. You enable the Windows feature, install the Sysmon service, apply your XML configuration, and it is serviced through Windows Update like other in-box components.
Here is everything you need to know to take advantage of it.
What Changed in KB5079473
The March 2026 cumulative update for Windows 11 adds Sysmon to the Windows optional features catalogue. This is not a watered-down version or a rebranded tool — it is the same Sysmon engine, the same event schema, and the same XML configuration format that you already know. The difference is how it gets onto the machine and how it stays updated.
Microsoft has integrated Sysmon into the Windows servicing model. That means:
- Installation: Enable it as a Windows optional feature rather than downloading a standalone installer.
- Updates: Built-in Sysmon binary updates arrive through the normal Windows quality update process.
- Configuration: XML configs can still be applied with
sysmon -cand deployed using GPO, Intune, scripts, or your existing endpoint-management platform. - Event channel: Logs write to
Microsoft-Windows-Sysmon/Operational, as with the standalone version.
The standalone Sysinternals version still works and remains the right answer for systems where the built-in optional feature is not available. Microsoft’s current documentation is also explicit that built-in Sysmon and standalone Sysmon are not supported side-by-side on the same device, so check for an existing service before enabling the native feature.
How to Enable Native Sysmon
There are several ways to enable the built-in Sysmon, but the most reliable first step is PowerShell. The Settings UI can be misleading, because one of its search boxes only searches optional features already installed on the machine.
Important: "No features found" in Settings can be misleading
If you open Settings > System > Optional features and search while the dialog says Added features, Windows is only searching optional features that are already installed. If Sysmon is not installed yet, that search can show No features found even on a system where the feature is available to add.
Use the See available features view in that dialog, or use the PowerShell check below. PowerShell gives you a clear answer: enabled, disabled, or not present on this build.
Step 1: Check for an Existing Sysmon Install
Open PowerShell as Administrator and check whether standalone Sysmon is already installed:
Get-Service sysmon*If this returns an existing Sysmon service, review it before changing anything. Built-in Sysmon does not support coexistence with standalone Sysmon, so you need to migrate or remove the existing standalone installation before enabling the native feature.
Step 2: Check Whether the Built-In Feature Exists
Microsoft documents the built-in optional feature name as Sysmon. Check it directly:
Get-WindowsOptionalFeature -Online -FeatureName SysmonInterpret the result like this:
State : Enabledmeans the Windows optional feature is already enabled.State : Disabledmeans the feature is available but not enabled yet.- An unknown feature or not-found error usually means that Windows build, servicing level, or channel does not currently expose the built-in Sysmon optional feature. In that case, update Windows or use the standalone Sysinternals Sysmon package.
Step 3: Enable the Optional Feature
If the feature exists but is disabled, enable it:
Enable-WindowsOptionalFeature -Online -FeatureName Sysmon -AllThen install the Sysmon service with the default configuration:
sysmon -iYou can also install it with a configuration file immediately:
sysmon -i C:\Configs\sysmon-config.xmlMethod 1: Windows Settings
On an individual machine, open Settings > System > Optional features, then use View features or See available features to search the available optional features list. Search for System Monitor or Sysmon and install it if it appears.
If you only search under Added features and get no result, do not stop there. That view is only checking what is already installed.
Method 2: PowerShell / DISM
For repeatable local installs, scripts, images, or remote deployment, use PowerShell:
# Check whether the optional feature exists
Get-WindowsOptionalFeature -Online -FeatureName Sysmon

# Enable it if available
Enable-WindowsOptionalFeature -Online -FeatureName Sysmon -All

# Install the Sysmon service
sysmon -i
Method 3: Intune, Group Policy, or Endpoint Management
For estate-wide deployment, treat built-in Sysmon as a Windows optional feature plus a service/configuration step. Deploy the PowerShell commands above through Intune remediation scripts, a Group Policy startup script, Configuration Manager, your RMM tool, or your normal endpoint-management platform.
For configuration files, deploy the XML to a stable local path and then run sysmon -c against that file. Pilot the process first, because a badly tuned Sysmon configuration can generate a lot of events very quickly.
Applying a Configuration
Enabling Sysmon without a configuration file gives you default logging — process creation, process termination, and driver loads. That is useful but limited. The real power comes from a tuned configuration that captures the events you care about whilst filtering out the noise.
The native version accepts the same XML configuration format as standalone Sysmon. If you already have a configuration file, you can apply it immediately:
# Apply a Sysmon configuration file
sysmon -c C:\Configs\sysmon-config.xml

# Verify the active configuration
sysmon -c
If you do not have a configuration file yet, the community-maintained SwiftOnSecurity sysmon-config remains an excellent starting point. It provides sensible defaults with extensive filtering to reduce noise whilst capturing high-value security events.
For managed deployment, specify a consistent local configuration path or deploy the file first and then apply it with a management script. The Sysmon service can apply configuration updates without a reboot.
Key Event Types You Should Be Capturing
Whether you are new to Sysmon or refreshing your configuration, these are the event types that deliver the most value for security monitoring. Each one maps to real-world attack techniques that your SIEM or log analysis tool can alert on.
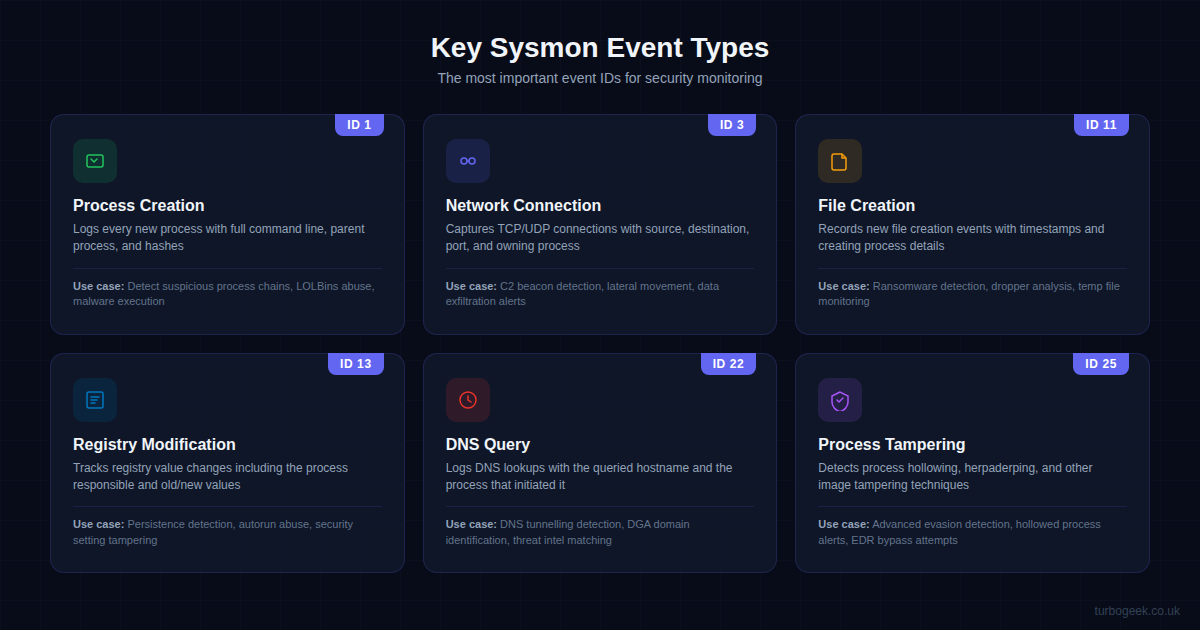
Event ID 1 (Process Creation) is the single most valuable Sysmon event. It logs the full command line, parent process, file hashes, and user context for every new process. This is how you spot living-off-the-land attacks, suspicious PowerShell invocations, and malware execution chains.
Event ID 3 (Network Connection) captures outbound TCP and UDP connections with source and destination details. Essential for detecting command-and-control beacons, lateral movement, and data exfiltration. Filter aggressively here — a busy workstation generates thousands of connections per hour.
Event ID 11 (File Creation) logs new files being written to disc, including the creating process. This is your early warning for ransomware, dropper payloads landing on disc, and suspicious files appearing in temp directories.
Event ID 13 (Registry Modification) tracks changes to registry values, which is critical for detecting persistence mechanisms. Attackers love registry run keys, service entries, and COM object hijacking — all of which show up here.
Event ID 22 (DNS Query) logs every DNS lookup with the querying process. This is invaluable for identifying DNS tunnelling, domain generation algorithm domains, and matching against threat intelligence feeds.
Event ID 25 (Process Tampering) detects advanced evasion techniques like process hollowing and herpaderping. These are the techniques that bypass traditional antivirus by replacing a legitimate process image with malicious code after the security check has passed.
Native vs Standalone: What Is Different
Functionally, built-in Sysmon is still Sysmon: same event model, same XML configuration approach, and the same Event Viewer channel. The differences are operational:
| Aspect | Standalone Sysinternals Sysmon | Built-In Sysmon |
|---|---|---|
| Installation | Download and run the Sysinternals installer | Enable the Windows optional feature, then run sysmon -i |
| Updates | Manual, package-managed, or Sysinternals feed | Windows quality updates |
| Configuration | sysmon -c or deployment script |
sysmon -c, deployed through endpoint management |
| Removal | sysmon -u |
Uninstall the service and disable/remove the optional feature |
| Coexistence | Use when the built-in feature is not available | Microsoft does not support coexistence with standalone Sysmon on the same device |
| Platform support | Broad Windows client/server support via Sysinternals package | Documented by Microsoft as a built-in optional feature for Windows 11 and Windows Server 2025; verify availability with PowerShell on each target build |
The practical limitation is availability. If Get-WindowsOptionalFeature -Online -FeatureName Sysmon cannot find the feature on a target machine, do not assume the Settings UI is the source of truth. Confirm the Windows build and update level, then fall back to standalone Sysinternals Sysmon where needed.
Practical Deployment Tips
Having deployed Sysmon across environments of various sizes, here are the practical considerations that will save you time:
Start with a Proven Configuration
Do not try to write a Sysmon configuration from scratch. Start with SwiftOnSecurity’s config or Olaf Hartong’s modular config, then customise from there. These community configurations represent thousands of hours of tuning and will save you from the most common noise problems.
Plan Your Log Volume
Sysmon generates a substantial amount of telemetry. A typical workstation with a well-tuned configuration produces 5-15 MB of logs per day. Multiply that across your estate and make sure your SIEM or log collector can handle the volume. If you are forwarding to a cloud SIEM, check your ingestion costs before enabling Sysmon on every endpoint.
# Check current Sysmon log size
wevtutil gl Microsoft-Windows-Sysmon/Operational

# Increase the maximum log size to 100 MB
wevtutil sl Microsoft-Windows-Sysmon/Operational /ms:104857600
Test Before You Deploy Widely
Enable native Sysmon on a pilot group first. Monitor the log volume, check for application compatibility issues, and validate that your SIEM is correctly parsing the events. Once you are confident, roll it out to the wider estate.
Combine with Windows Event Forwarding
If you are not already using Windows Event Forwarding, now is the time. Create a subscription that collects Sysmon events from all endpoints and forwards them to a central collector. This gives you estate-wide visibility without needing an agent-based SIEM on every machine:
# Create a WEF subscription for Sysmon events
wecutil cs SysmonCollection.xml

# Example subscription XML targets the Sysmon channel:
# <Query><Select Path='Microsoft-Windows-Sysmon/Operational'>*</Select></Query>
What This Means for Enterprise Security
Making Sysmon a native feature is a significant shift in Microsoft’s approach to endpoint visibility. For years, the security community has argued that Windows ships with insufficient built-in logging for threat detection. The default Windows event logs miss command-line arguments, lack network connection tracking, and provide no file integrity monitoring. Sysmon filled those gaps, but only for organisations that invested the effort to deploy it.
By making it a native optional feature that can be enabled with standard Windows management tooling, Microsoft has lowered the deployment barrier. Smaller organisations that lack dedicated security teams can now enable enterprise-grade endpoint telemetry without buying third-party EDR tools or building custom deployment packages.
This does not replace a proper EDR solution. Sysmon generates telemetry — it does not respond to threats, quarantine files, or block malicious processes. But it gives you the raw data that makes threat hunting and incident response possible. If you are forwarding these events to a SIEM with decent detection rules, you have a genuinely capable monitoring stack at no additional cost.
Quick-Start Checklist
If you want to get native Sysmon running this week, here is the shortest path:
- Confirm the device is fully updated and on a supported Windows build.
- Run
Get-Service sysmon*to check for an existing standalone Sysmon deployment. - Run
Get-WindowsOptionalFeature -Online -FeatureName Sysmonto confirm that the built-in optional feature exists on that machine. - If the feature is disabled, run
Enable-WindowsOptionalFeature -Online -FeatureName Sysmon -All. - Install Sysmon with
sysmon -i, or install it with your XML config usingsysmon -i C:\Configs\sysmon-config.xml. - Apply or update configuration with
sysmon -c. - Verify events in Event Viewer under Applications and Services Logs > Microsoft > Windows > Sysmon > Operational.
- Set up Windows Event Forwarding or configure your SIEM agent to collect Sysmon events.
- Build detection rules for your highest-priority event types, starting with Event IDs 1, 3, and 22.
Native Sysmon is one of those changes that sounds small but has an outsized impact. The technology was already proven — what was missing was a lower-friction deployment path. Just make sure you verify the feature with PowerShell first, because the Windows Settings optional-features search can make an uninstalled feature look like a missing one.
Leave a Reply