
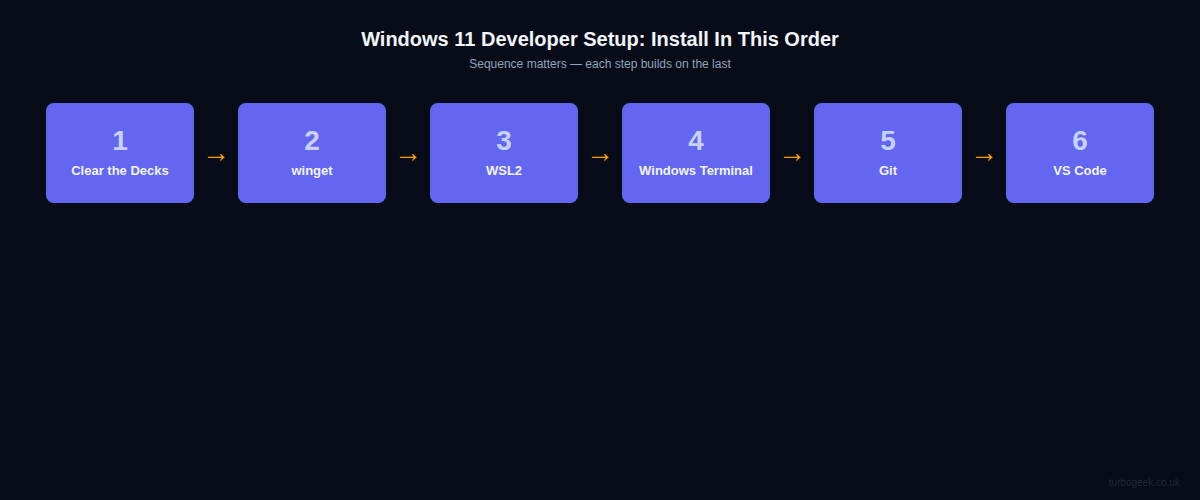
You’ve got a new Windows 11 machine. Before you install anything, get the base operating system under control, confirm your package manager, then build the developer stack in the right order. The sequence below gives you a clean Windows 11 developer setup with winget, WSL2, Windows Terminal, Git, and VS Code wired together properly.
TL;DR — Windows 11 Developer Setup
- Clean Windows first — update, remove noise, check privacy settings, and enable Developer Mode where needed.
- Use winget for Windows apps — install Terminal, Git for Windows, VS Code, PowerShell, and browser tooling by package ID.
- Use WSL2 for development — keep projects in Linux under
~/, not under/mnt/c/. - Configure Git inside WSL2 — set identity, line endings, default branch, and SSH keys where your code actually lives.
- Run VS Code against WSL2 — install the WSL extension, open projects with
code ., and run extensions in Linux context.
| Topic | When | Command |
|---|---|---|
| Confirm winget | Before installing tools | winget -v |
| Install WSL2 | Before cloning projects | wsl --install |
| Update Ubuntu | First WSL2 session | sudo apt update && sudo apt upgrade -y |
| Install Git in WSL2 | Before cloning repos | sudo apt install -y git |
| Open VS Code in WSL2 | From a project folder | code . |
Start here: if this is a fresh machine, begin with First 30 Minutes: Clean the Base System. Installing tools on top of a half-updated, noisy Windows image is how small setup problems turn into a day of debugging.
What Is a Windows 11 Developer Setup?
A Windows 11 developer setup is the split environment most modern Windows developers use: Windows runs the desktop apps, WSL2 runs the Linux toolchain, and VS Code connects the two. That gives you native Windows hardware support without giving up the Linux commands, file permissions, package managers, and server-like behaviour your projects usually expect.
The key is deciding which side owns each job. Install GUI applications such as VS Code, Windows Terminal, browsers, and Slack with winget. Install runtime tools such as Node, Python, Git, Go, Rust, and Docker helpers inside WSL2. Microsoft’s WSL docs make the same distinction: WSL lets you run Linux tools directly on Windows, and project files should live in the WSL filesystem for best performance.
First 30 Minutes: Clean the Base System
Run Windows Update fully before installing developer tools. Driver updates and security updates can trigger restarts, and you want those out of the way before WSL2, terminal profiles, or language runtimes are involved. Once updates are done, remove the consumer apps you know you will not use. Keep this conservative: remove obvious bloat, not Windows components you do not understand.
# Optional app cleanup: run in PowerShell
$apps = @(
  '*CandyCrush*',
  '*BingWeather*',
  '*BingNews*',
  '*Xbox*',
  '*MicrosoftSolitaire*'
)

foreach ($app in $apps) {
  Get-AppxPackage $app | Remove-AppxPackage
}Next, check privacy and developer settings. In current Windows 11 builds, Developer Mode may appear under Settings → System → Advanced → For developers; on older builds it appears under Settings → System → For developers. Microsoft documents Developer Mode as a setting for building, deploying, debugging, and testing apps, so enable it when your workflow needs symlinks, local app deployment, or development features.
winget: Install Windows Apps by Package ID
winget is the Windows Package Manager command-line client. It is available on Windows 11 through App Installer, though first login and Microsoft Store registration can occasionally delay availability. Start by confirming it works, then install packages by ID with --exact to avoid ambiguous matches.
# Confirm winget is available
winget -v

# Search by name or package ID
winget search Microsoft.VisualStudioCode

# Install core Windows-side tools
winget install --id Microsoft.WindowsTerminal --exact
winget install --id Git.Git --exact
winget install --id Microsoft.VisualStudioCode --exact
winget install --id Microsoft.PowerShell --exact

# Later: upgrade packages managed by winget
winget upgrade --allFor a repeatable build, put those installs into a small PowerShell script. Keep it boring. The point is not to create a clever bootstrap framework; the point is to make a new laptop predictable.
$packages = @(
  'Microsoft.WindowsTerminal',
  'Microsoft.PowerShell',
  'Git.Git',
  'Microsoft.VisualStudioCode'
)

foreach ($package in $packages) {
  winget install --id $package --exact --accept-package-agreements --accept-source-agreements
}

winget upgrade --allWSL2: Put Your Projects in Linux
WSL2 gives Windows a real Linux environment for development work. Microsoft’s current install path is still the simple one-command flow: run wsl --install from an elevated PowerShell session, restart when prompted, then create the Linux username and password for your distro.
# Run in PowerShell as Administrator
wsl --install

# After restart, check installed distros and WSL version
wsl --list --verbose

# Keep the WSL kernel current
wsl --update

# Optional: install a specific distro
wsl --install -d UbuntuOnce Ubuntu opens, update it immediately and install the basics. From this point on, treat the WSL2 terminal as your development home.
sudo apt update && sudo apt upgrade -y
sudo apt install -y build-essential curl git unzip ca-certificates
uname -aThe filesystem rule matters more than any theme or terminal setting: keep project files in the Linux filesystem, for example /home/YOUR_USERNAME/projects/my-app. Microsoft recommends this for performance. Avoid keeping active repositories under /mnt/c/Users/...; it works, but file I/O and watcher-heavy tooling such as Node builds are noticeably worse.
Windows Terminal: Make WSL2 the Default Profile
Windows Terminal is the right default shell host for this setup. It automatically discovers WSL distributions and multiple PowerShell versions, supports tabs and panes, and stores configuration in a JSON-backed profile model. Install it with winget if your Windows image does not already include it.
winget install --id Microsoft.WindowsTerminal --exactOpen Windows Terminal settings and set Ubuntu, or your chosen WSL distro, as the default profile. Set the default terminal application to Windows Terminal. If you want every new WSL tab to start in your Linux home folder, use \\wsl$\Ubuntu\home\YOUR_USERNAME as the starting directory or configure the profile command to launch WSL in ~.
Git: Configure It Where the Code Lives
Install Git for Windows for Windows-side integrations, but configure Git inside WSL2 for your actual development work. If your repositories live under ~/projects in Ubuntu, the Linux Git config, SSH agent, hooks, and line-ending behaviour are the ones that matter.
# Windows-side Git, useful for Explorer and Windows apps
winget install --id Git.Git --exact

# WSL2-side Git, used by your Linux project folders
sudo apt install -y git

# Run these inside WSL2
git config --global user.name 'Your Name'
git config --global user.email '[email protected]'
git config --global core.autocrlf input
git config --global init.defaultBranch main

# Generate an SSH key inside WSL2
ssh-keygen -t ed25519 -C '[email protected]'
cat ~/.ssh/id_ed25519.pub

# After adding the public key to GitHub or GitLab
ssh -T [email protected]
The core.autocrlf input setting is deliberate. It accepts existing line endings but does not convert Linux line endings to Windows CRLF on checkout. That is what you want when the application ultimately runs on Linux servers or containers.
VS Code: Connect the Editor to WSL2
VS Code should run the UI on Windows and the development server inside WSL2. The WSL extension is the bridge. The official VS Code WSL workflow is still simple: install the extension, open a WSL terminal, move into a Linux project folder, then run code ..
# Install VS Code on Windows
winget install --id Microsoft.VisualStudioCode --exact

# Install the WSL extension
code --install-extension ms-vscode-remote.remote-wsl

# From inside WSL2, open a Linux project folder
mkdir -p ~/projects/example-app
cd ~/projects/example-app
code .When VS Code opens this way, the integrated terminal is your WSL2 shell, the path is a Linux path, and extensions that need runtime access install into the WSL side. That avoids the usual Windows/Linux mismatch where a linter, formatter, or language server points at the wrong executable.
- WSL extension:
ms-vscode-remote.remote-wsl - GitLens:
eamodio.gitlens - Prettier:
esbenp.prettier-vscode - ESLint:
dbaeumer.vscode-eslintfor JavaScript and TypeScript projects
Install Language Runtimes Inside WSL2
Keep language runtimes on the Linux side unless you have a Windows-specific reason not to. That means Node via nvm, Python tooling inside Ubuntu, Rust via rustup, and Go from the official Linux package or your distro package manager. This keeps local development close to the Linux environments used by CI and production.
# Node via nvm
curl -o- https://raw.githubusercontent.com/nvm-sh/nvm/v0.40.3/install.sh | bash
source ~/.bashrc
nvm install --lts

# Python basics
sudo apt install -y python3 python3-venv python3-pip
python3 -m venv .venv
source .venv/bin/activate

# Rust
curl --proto '=https' --tlsv1.2 -sSf https://sh.rustup.rs | shVerification Checklist
Before you call the machine done, check the actual workflow rather than just checking installed apps. Open a new Windows Terminal tab, land in WSL2, create a project folder under ~/projects, open it with VS Code, and confirm Git and SSH work from that Linux context.
wsl --list --verbose
cd ~/projects
git --version
ssh -T [email protected]
code .
If those commands work, you have the important pieces: Windows package management, a real Linux development environment, Git identity and SSH authentication, and VS Code attached to the same environment your code uses.
You’re Done — What’s Next?
You now have a clean Windows 11 base, a repeatable app install path, WSL2, a proper terminal, Git with sane line endings, and VS Code connected to Linux. The next step is stack-specific: Docker, databases, cloud CLIs, language runtimes, and secrets management.
Related: Is Your Windows Dev Environment a Mess? Here’s How to Fix It — use this if the machine already has tools installed and you need to clean it up rather than start fresh.
Related: Switching to Windows as a Developer: Make It Feel Like Home — a translation guide for macOS and Linux developers moving to Windows.
Related: 15 Practical DevOps Pipeline Hacks to Speed Up CI/CD — once the workstation is ready, tighten up the pipeline side too.
Frequently Asked Questions
Do I need WSL2 to develop on Windows 11?
Not always, but WSL2 is the right default for most web, cloud, DevOps, Linux, container, Python, Node, Go, and Rust work. If your code will run on Linux, developing inside Linux avoids path, permissions, shell, and line-ending problems before they start.
Should I use winget or Chocolatey?
Use winget first on a fresh Windows 11 setup. It is built into the modern Windows package-management path and is enough for the core tooling in this guide. Chocolatey is still useful for packages winget does not cover, but it should be an addition, not your first dependency.
Where should I store projects?
Store Linux-developed projects under the WSL filesystem, for example /home/YOUR_USERNAME/projects. Avoid putting active repositories under /mnt/c/Users/... unless you have a specific Windows-side reason. The performance difference becomes obvious with Node, Python virtual environments, large repositories, and file watchers.
Can I use this setup for .NET?
Yes, but .NET is the main case where Windows-native tooling may be preferable depending on the project. If you are building cross-platform services, WSL2 works well. If you are building Windows desktop applications, use the Windows-native SDK and Visual Studio or VS Code on the Windows side.
Leave a Reply