
Enabling Raspberry Pi SSH (Secure Shell) allows you to remotely access its command line interface from another device on the same network. Looking for more Raspberry PI Tips – check out our other Pi Tips.
Here’s a detailed step-by-step procedure on how to enable SSH on a Raspberry Pi:

Step 1 – Ensure Your Raspberry Pi is Online
Make sure you have finished setting up the Raspberry Pi. Ensure your Raspberry Pi is connected to a power source, a monitor, and a keyboard and is booted up with an operating system like Raspberry Pi OS (formerly Raspbian).
Step 2 – Access the Raspberry Pi Configuration Tool:
- Open the terminal on your Raspberry Pi. You can find it in the taskbar or access it by pressing
Ctrl + Alt + T. - Enter the following command to launch the Raspberry Pi Configuration Tool:
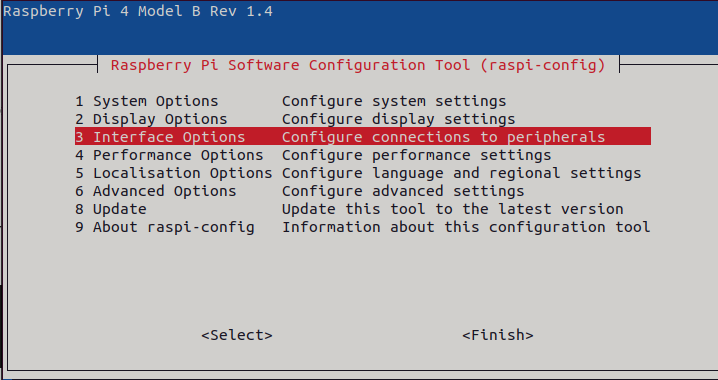
sudo raspi-configStep 3 – Enabling Raspberry Pi SSH:
- Once the configuration tool opens, navigate using the arrow keys to select
Interface Optionsand pressEnter.
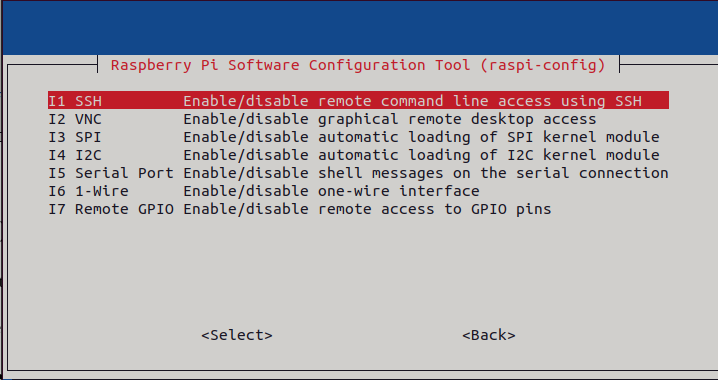
- Confirm your selection and the SSH server will be enabled on your Raspberry Pi.
Scroll down and select SSH. Press Enter.
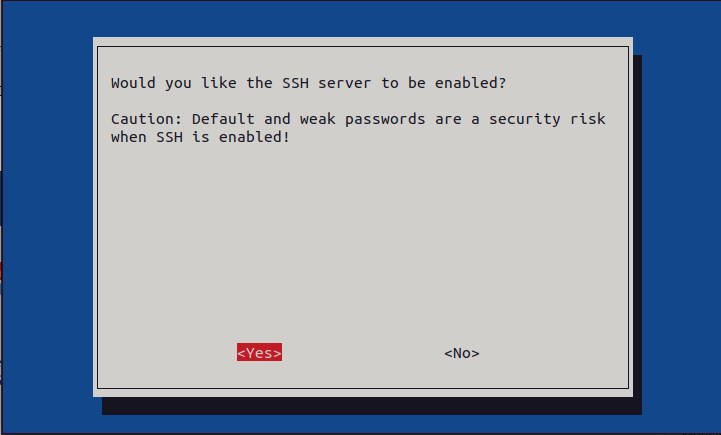
A prompt will appear asking, “Would you like the SSH server to be enabled?” Select Yes and press Enter.
Step 4 – Finding the Raspberry Pi’s IP Address (Optional):
- To connect to your Raspberry Pi via SSH, you’ll need its IP address. In the terminal, type:
hostname -I- This command will display the IP address of your Raspberry Pi on the local network.
Step 5 – Accessing Raspberry Pi SSH from another device:
- On your other device (computer or mobile phone), open a terminal or SSH client software.
- Use the following command to SSH into your Raspberry Pi. Replace
usernamewith your Raspberry Pi’s username andip_addresswith its IP address obtained in the previous step:
ssh username@ip_address

##For Example:
ssh [email protected]- You’ll be prompted to enter the password for your Raspberry Pi. Enter the password associated with the username. Note: on Raspberry Pi OS Bookworm (2023+) the username is set during first-boot setup via Raspberry Pi Imager — the legacy
piusername only applies to older images.
Step 6 – Accessing Raspberry Pi SSH using Hostname (Optional):
- If you’ve set up your Raspberry Pi with a hostname, you can SSH using the hostname instead of the IP address. For example:
ssh [email protected]Remember, enabling SSH provides remote access to your Raspberry Pi, so ensure that you use a strong password and keep your Pi’s software updated for security purposes.
This procedure allows you to enable SSH on your Raspberry Pi, granting remote access for convenient command line management and control. Check out our friends over at Raspberry Tips.