

OpenRig gives coding agents a shared way to organize work. A developer can assign a task to one agent, have another review the implementation, and keep the team running in separate terminal sessions on a Linux server. This is useful when a website change needs more than a single coding conversation: requirements, implementation, verification, and a clear handoff all need attention.
This tutorial explains how to install OpenRig on Ubuntu, connect it to Codex, configure a two-agent team, and use that team to make a small website improvement. The example follows a normal Git workflow, with a feature branch, reviewable changes, and a release decision made by the developer.
The commands target Ubuntu Server 24.04 LTS, Node.js 22, and OpenRig 0.7.10. OpenRig released version 0.7.10 on 8 November 2026. When following the article with another release, check its documentation and the installed command’s --help output before reusing the configuration. GitHub
What OpenRig does
OpenRig runs and coordinates coding agents through tools such as Codex and Claude Code. Its command-line interface is called rig. A background daemon keeps coordination state, while tmux hosts the agents’ terminal sessions. A project team is a rig; an addressable agent role is a seat. GitHub
This tutorial’s configuration creates two seats. The builder implements the agreed change. The reviewer inspects the requirements, code, and verification evidence. Both work in one development checkout, with the builder responsible for implementation edits.
Software development still follows a familiar sequence: define the requirement, plan the change, implement it, test it, review it,t and release it. OpenRig helps coordinate the agents involved. The developer remains responsible for accepting the result and deciding what reaches production.
Prerequisites
Use a development server or virtual machine with SSH access and an administrative account for installing packages. The agents will run under a separate, unprivileged account.
| Component | Starting point for this tutorial |
|---|---|
| Operating system | Ubuntu Server 24.04 LTS |
| Node.js | Version 22 |
| Terminal multiplexer | tmux 3.4 or later |
| Coding provider | Codex CLI with a working account and available model |
| Project | An existing website repository or a disposable copy of one |
| Suggested capacity | Four CPU cores, 8–16 GB RAM and enough disk for dependencies and builds |
The capacity figures are practical suggestions, not published OpenRig minimums. Larger application builds and browser tests may need more memory. Cloud model inference doesn’t require a local GPU, but it still consumes provider usage and may send supplied code context to that provider.
OpenRig documents Node.js 22 or 24 as supported versions. Its setup reference also warns about a crash in tmux 3.2a on Ubuntu 22.04 and recommends tmux 3.4 or later. Check the installed version even when using an existing server. GitHub
Step 1: Prepare the Ubuntu development account
From the administrative account, install the supporting tools:
sudo apt update

sudo apt install -y \
  ca-certificates curl git tmux jq ripgrep \
build-essential python3 pkg-config openssh-client bubblewrapThe package list includes bubblewrapwhich OpenAI recommends installing for Codex sandboxing on Linux. The troubleshooting section covers the additional AppArmor profile that Ubuntu 24.04 may need. learn.chatgpt.com
Keep the host patched through its normal maintenance process. Complete any required reboot before starting agent work.
Create a dedicated account:
sudo adduser --disabled-password --gecos "" rigdev
sudo chmod 700 /home/rigdev

sudo install -d -m 700 \
  -o rigdev -g rigdev \
  /home/rigdev/.ssh

sudoedit /home/rigdev/.ssh/authorized_keys

sudo chown rigdev:rigdev /home/rigdev/.ssh/authorized_keys
sudo chmod 600 /home/rigdev/.ssh/authorized_keysPaste your laptop’s SSH public key into authorized_keys. Keep the private key on the laptop. The development account does not need sudo or Docker-group membership for the steps below.
Note: If you have any issues with your Local SSH key, remember you need to create an SSH key (Windows or Linux) and add the PUBLIC KEY to /home/rigdev/.ssh/authorized_keys
Test a separate connection before closing the administrative session:
ssh rigdev@YOUR_DEV_SERVERReplace YOUR_DEV_SERVER with the server’s actual hostname or IP address.

Run the remaining server commands as rigdev, unless a step explicitly says otherwise.
Step 2: Install Node.js 22
Using nvm installs Node under the development account and avoids running global npm installation commands with sudo. The upstream installer currently uses nvm 0.41.0. github.com
touch ~/.bashrc

curl -fsSLo "$HOME/nvm-install.sh" \
  https://raw.githubusercontent.com/nvm-sh/nvm/v0.41.0/install.sh

less "$HOME/nvm-install.sh"
bash "$HOME/nvm-install.sh"

export NVM_DIR="$HOME/.nvm"
. "$NVM_DIR/nvm.sh"

nvm install 22
nvm alias default 22
nvm use 22

node --version
npm --version
tmux -VConfirm that Node reports a version beginning with v22 and that tmux is suitable. If the account deliberately usesXDG_CONFIG_HOME, follow the location reported by the nvm installer rather than assuming.~/.nvm.
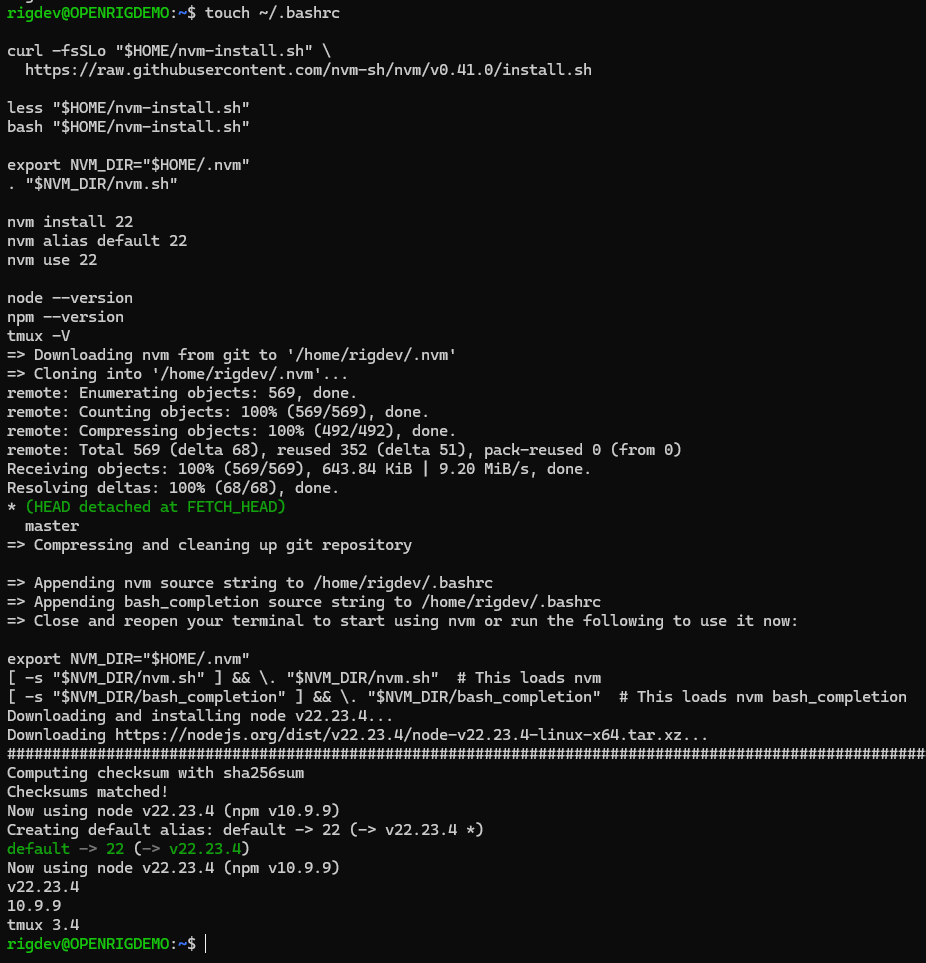
Open another SSH session and check that the tools remain on the path. Resolve shell startup problems before continuing; an installation that works only in the original terminal will cause problems when agents start in new sessions.
Step 3: Install and authenticate Codex
This example uses Codex for both agents, so it needs one coding-provider setup. Install the CLI and start device authentication:
npm install -g @openai/codex

codex --version
codex login --device-auth
codex login statusOpen the URL Codex prints in a browser on your laptop and enter the one-time code. You may need to enable device authentication in the account’s security settings or workspace permissions. OpenAI documents this route for headless environments. github.com
If device authentication is unavailable, connect with a forwarded browser callback port:
ssh -L 1455:localhost:1455 rigdev@YOUR_DEV_SERVERRun codex login inside that SSH session and open the printed URL in your local browser. learn.chatgpt.com
Check the native CLI before adding orchestration. Create an empty directory, launch. Confirm the selected model is available, then ask it to report the working directory. Exit after that check. Record the Codex version and model, so later troubleshooting has a useful baseline.
Authentication files belong in the provider’s protected configuration directory. Keep them outside the website repository. If you use API-key authentication, check its billing and usage limits separately.
Step 4: Install OpenRig
Install the release used by this tutorial:
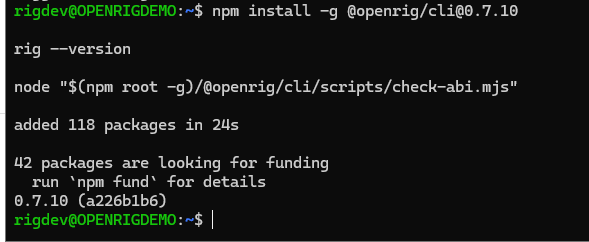
npm install -g @openrig/[email protected]

rig --version

node "$(npm root -g)/@openrig/cli/scripts/check-abi.mjs"
The final command checks the installed Node and native SQLite combination. Resolve a failure before launching agents. After changing Node major versions, reinstall OpenRig under the selected version and repeat the check.
On a reused account, back up existing tmux and coding-provider configuration first. OpenRig setup and agent launch can write managed settings, hooks, workspace trust,t and guidance. Preserve repository instructions when these managed sections are added. GitHub
Preview the setup changes:
rig setup \
  --providers codex \
  --no-herdr \
  --router-line no \
--dry-runApply them after reading the preview:
rig setup \
  --providers codex \
  --no-herdr \
  --router-line no

rig doctorThe flags have specific purposes:
--providers codexSelects the provider used here.--no-herdrKeeps the interface on SSH and tmux.--router-line noDeclines an additional skills-router line; other setup configuration changes still apply. GitHub
Verify command discovery in a fresh SSH session:
command -v node npm codex rig tmux
bash -lc 'command -v node rig'Step 5: Start OpenRig
Now that OpenRig and Codex are installed, start the OpenRig daemon:
rig daemon start --host 127.0.0.1 --port 7433Check its status:
rig status
rig ps --nodes --rig kernelOpenRig starts its built-in kernel, which includes an operator agent. The operator helps create and manage project teams.
If you previously started the daemon with --no-kernel and have no running project teams, stop it and start it again without that option:
rig daemon stop
rig daemon start --host 127.0.0.1 --port 7433The kernel starts with broader permissions than ordinary project agents. For this tutorial, use the dedicated rigdev account and a disposable project directory. Review the operator’s proposed commands and permissions before approving changes.
Once the kernel agents are ready, continue to the practical exercise.
Step 6: Create Your First Website Project
Instead of connecting OpenRig to an existing website, we’ll create one from scratch.
Our example will be a simple personal website with a homepage, navigation menu and a little CSS styling.
This gives us something real to work on without needing hosting, a domain name or a database.
6.1 Create the project directory
Connect to your Ubuntu server as rigdev and run:
mkdir -p ~/projects/my-first-website
cd ~/projects/my-first-websiteThis creates a directory for our website.
6.2 Create the homepage
Create an index.html file:
nano index.htmlPaste the following HTML:
<!DOCTYPE html>
<html lang="en">
<head>
  <meta charset="UTF-8">
  <meta name="viewport"
        content="width=device-width, initial-scale=1.0">
  <title>My First Website</title>
  <link rel="stylesheet" href="style.css">
</head>
<body>
  <header>
    <h1>My First Website</h1>
    <nav aria-label="Main navigation">
      <a href="#about">About</a>
      <a href="#contact">Contact</a>
    </nav>
  </header>

  <main id="main-content">
    <section id="about">
      <h2>About Me</h2>
      <p>
        Welcome to my website!
        I'm learning how to develop websites
        using OpenRig and AI coding agents.
      </p>
    </section>

    <section id="contact">
      <h2>Contact</h2>
      <p>More information coming soon.</p>
    </section>
  </main>

  <footer>
    <p>My First Website</p>
  </footer>
</body>
</html>Save the file using Ctrl+O, press Enter, then exit nano using Ctrl+X.
6.3 Add some CSS
Create a stylesheet:
nano style.cssPaste:
* {
  box-sizing: border-box;
}

body {
  margin: 0;
  font-family: Arial, sans-serif;
  line-height: 1.6;
  color: #222;
  background: #f4f6f8;
}

header {
  padding: 24px;
  background: #0077be;
  color: white;
  text-align: center;
}

nav a {
  display: inline-block;
  margin: 8px;
  padding: 4px;
  color: white;
}

main {
  max-width: 900px;
  margin: 30px auto;
  padding: 24px;
  background: white;
  border-radius: 8px;
}

section {
  margin-bottom: 30px;
}

footer {
  padding: 16px;
  text-align: center;
  background: #222;
  color: white;
}Save and exit.
6.4 Check your website files
Run:
ls -lahYou should see:
index.html
style.cssThat’s your first website!
There is no need to install WordPress, React, Next.js or any other framework for this exercise.
6.5 Create a local Git repository
Git allows us to track changes and undo mistakes. You don’t need a GitHub account to use it.
From the website directory, run:
git init -b mainSet a local identity for tutorial commits:
git config user.name "Tutorial Developer"
git config user.email "tutorial@localhost"Add the two files and save the starting version:
git add index.html style.css
git commit -m "Create initial website"Check the repository:
git statusYou should see a clean working tree.
We’ve now created a baseline. Later, we’ll see precisely what OpenRig’s agents changed.
Step 7: View Your Website in a Browser
Before involving OpenRig, let’s confirm our website works.
7.1 Start a local web server
Ubuntu already has Python installed from the prerequisites earlier in this tutorial.
From your project directory, run:
python3 -m http.server 8000 --bind 127.0.0.1Python starts a simple HTTP server on port 8000.
Leave that terminal running.
7.2 Connect from your computer
If Ubuntu is running on a remote server, open another terminal on your own computer and run:
ssh -N -L 8000:127.0.0.1:8000 rigdev@YOUR_SERVER_IPReplace YOUR_SERVER_IP with your server’s address.
This creates an SSH tunnel, allowing your browser to connect to the website without exposing port 8000 publicly.
Open:
You should see a simple blue header, a navigation menu, two sections and a footer.
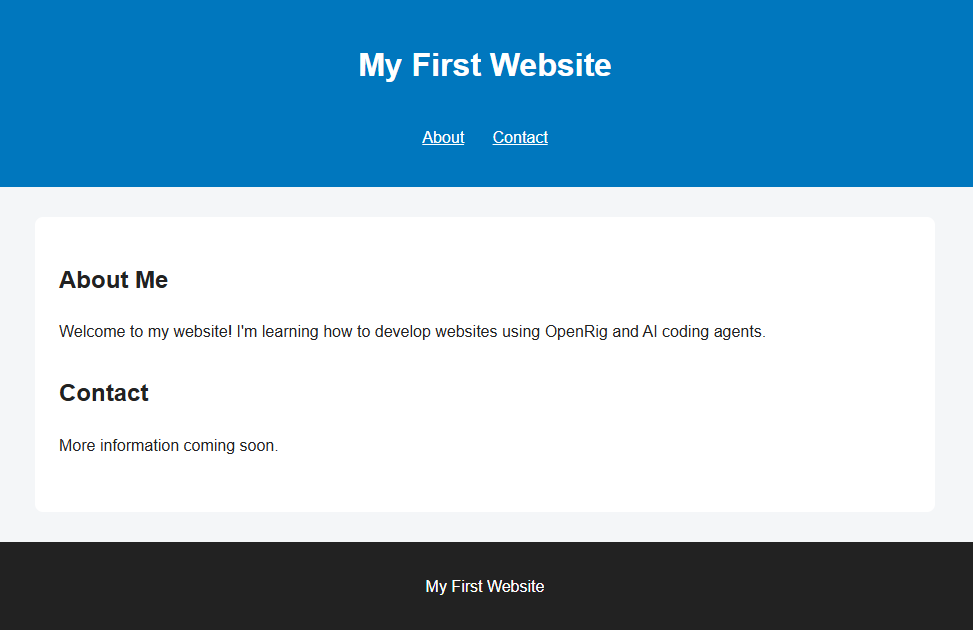
Your starting website is now running.
If you’re working directly on the Ubuntu machine rather than using SSH, open that address in its local browser.
Step 8: Create Your First OpenRig Agent Team
Now comes the interesting part.
We’ll ask OpenRig to organise two coding agents to work on our website.
One agent will implement changes, and the other will review the work.
8.1 Connect to the OpenRig operator
Open another SSH terminal connected to your Ubuntu server.
Check the kernel agents:
rig ps --nodes --rig kernel
To find the operator’s terminal session, run:
rig ps --nodes --rig kernel --json \
--fields logicalId,canonicalSessionName,tmuxAttachCommandFind the entry identified as operator.agent.
It includes a tmuxAttachCommand value. Run that command in your SSH terminal to connect to the operator’s conversation.

If you are already inside tmux, detach or open a separate SSH connection before attaching to the operator.
8.2 Tell OpenRig about your website
Once you’re speaking to the operator, enter:
I’ve created a simple HTML and CSS website at
/home/rigdev/projects/my-first-website.I want to use OpenRig to improve it.
Please prepare a small starter team with one coding agent and one reviewer, using my existing Codex installation for both.
Show me the proposed team configuration and permissions before launching it.
Use normal workspace permissions with approval prompts where required. Do not enable unrestricted access or install another coding provider.
Keep all work within this tutorial project. Do not publish or deploy anything.
The operator should inspect the project and propose a suitable configuration.
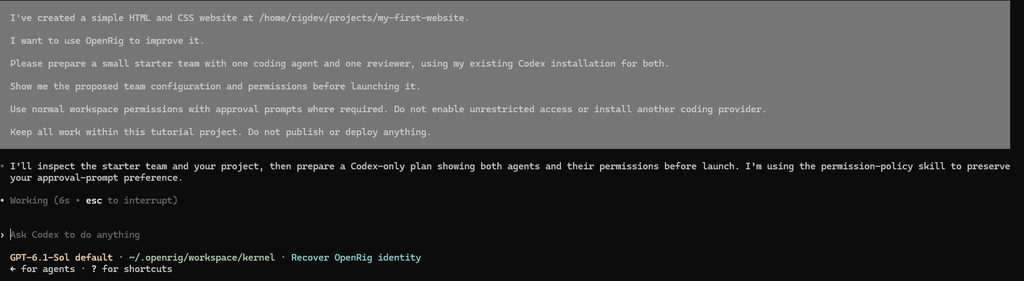
Review its proposal before authorising the team to start. In particular, check which agents and models it plans to use, which directories they can modify and whether their permissions match your expectations.
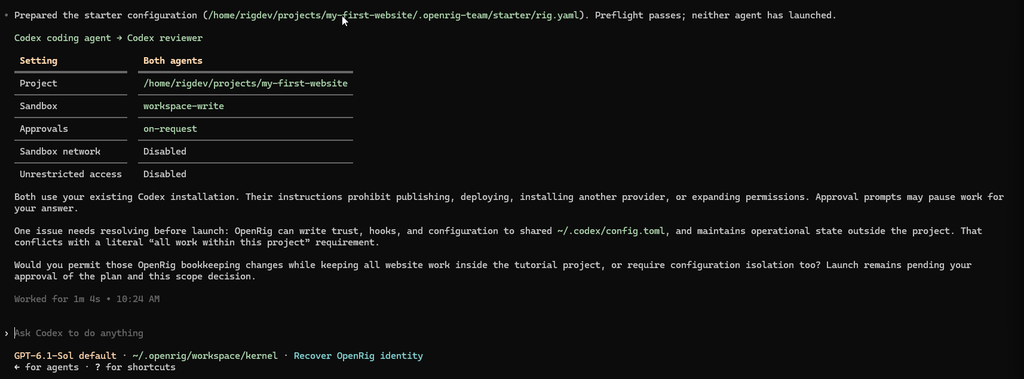

OpenRig’s standard starter team may use different coding providers by default. The operator can adapt it to a single installed provider.
Once the team has started, check its status. If it is named starter, run:
Note: It may be easier to open another terminal
rig ps --nodes --rig starterIf the operator chose another name, use that name instead.

The team should contain an implementation agent and a review agent. Both must finish startup before we give them a development task.
Note: Since we didnt install HERDR, you will need to open the enviroments on new terminals logged into the rigdev@your_server_ip
For Example:
env -u TMUX '/usr/bin/tmux' attach -t 'dev-build@starter'
env -u TMUX '/usr/bin/tmux' attach -t 'dev-review@starter'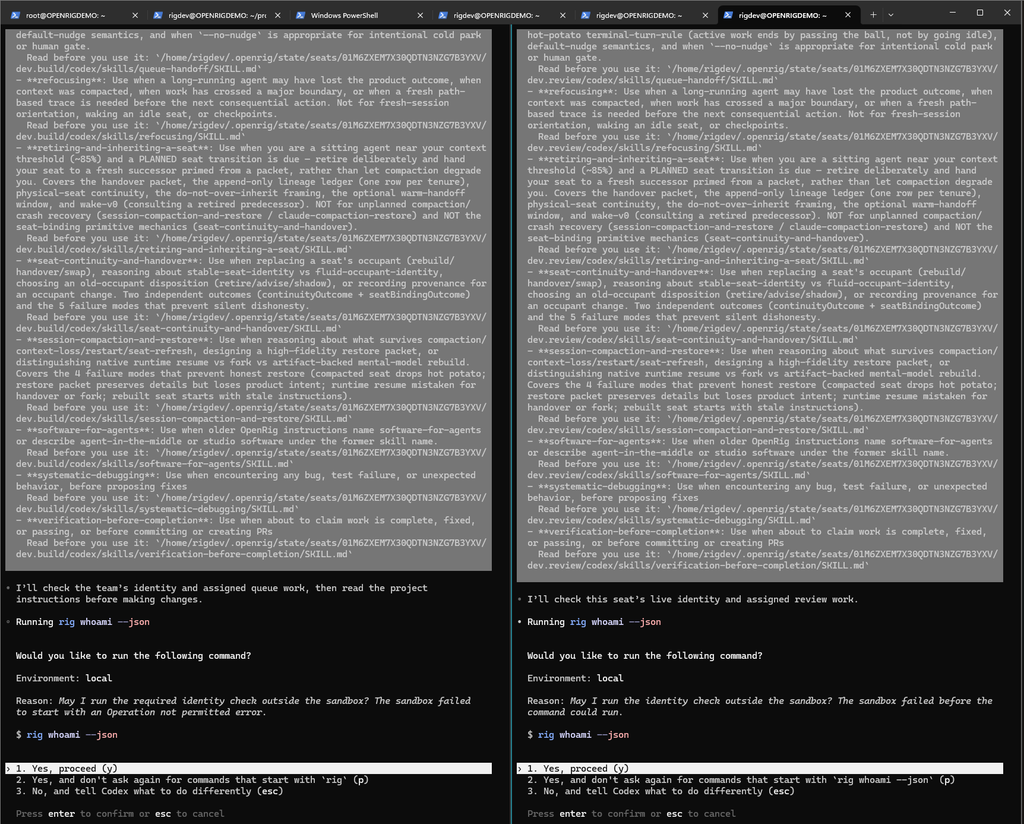
Top Top
If you hate having to give the agent permission to do anything everytime you can run this command to bypass permissions. USE WITH CAUTION – NEVER USE IN PRODUCTION
If you’re using the starter team, enable YOLO for its builder:
rig seat set-permissions dev-build@starter \
  --mode full_bypass \
  --reason "Isolated development environment" \
--operator rigdev@localAnd optionally its reviewer:
rig seat set-permissions dev-review@starter \
  --mode full_bypass \
  --reason "Isolated development environment" \
--operator rigdev@localStep 9: Give OpenRig Its First Development Task
Our basic website works, but it’s missing a useful accessibility feature.
We are going to ask the agents to add a Skip to main content link. This helps keyboard users bypass repeated navigation and reach the page’s main content.
It is a good first coding exercise because the change is small, easy to inspect and testable in a browser.
9.1 Describe the requirement
In the builder’s conversation, enter:
I want to improve the accessibility of our sample website.
Add a “Skip to main content” link that becomes visible when a keyboard user focuses on it.
It should allow users to bypass the header navigation and reach the main content.
First, inspect the existing HTML and CSS and explain what needs to change.
Implement the improvement using ordinary HTML and CSS. Avoid JavaScript and additional dependencies unless they’re genuinely necessary.
Ask the reviewer to check your changes.
Do not commit or deploy anything until I approve it.
This is an example of a small development requirement.
The builder should inspect the existing code and propose a change to the HTML, CSS or both.
9.2 Review the proposed changes
OpenRig can coordinate the implementation and review through its agents.
The reviewer should examine whether:
- The new link is keyboard-accessible.
- The link becomes clearly visible when focused.
- The destination points to the correct main-content element.
- Keyboard focus behaves correctly after activating the link.
- Existing navigation continues working.
- The change introduces no unnecessary dependencies.
The reviewer may identify problems and request corrections.
Let the agents finish their work before testing the result yourself.
9.3 Inspect the code changes
From another SSH terminal, navigate to the project:
cd ~/projects/my-first-websiteRun:
git status --short
git diffGit displays the changes made since the original commit.
You should expect a small number of changes related to the accessibility feature.
Check for any unrelated modifications. If the agents changed files beyond the agreed task, ask them to explain those changes.
Step 10: Test the Updated Website
Return to your browser:
Refresh the page.
Because we’re using a simple Python web server, there is no compilation or application rebuild required. The server reads the updated HTML and CSS files.
10.1 Test the improvement
Use the keyboard to test the new feature:
- Reload the page and start keyboard navigation using Tab.
- Confirm the skip link becomes visible when focused.
- Press Enter to activate the link.
- Confirm focus reaches the main content and the next Tab press follows the expected content order.
- Verify that the About and Contact links still work.
- Check the page at a narrow browser width.
A successful visual change is only part of the verification. The keyboard interaction must work as intended.
10.2 Review the results
You can ask the builder:
Summarise the changes made to the website.
Explain how the new skip link works, what the reviewer found and which checks were actually completed.
Identify anything that remains untested.
Do not make any further changes.
The response should make clear which checks the agents performed and which checks you performed manually.
This is the verification stage of our development exercise.
Step 11: Save Your First Completed Change
If you’re happy with the updated website, record the improvement using Git.
From the project directory:
git status
git diff --check
git diffReview the changed files.
When everything is satisfactory, stage only the intended files:
git add index.html style.css
git diff --cachedCommit the change:
git commit -m "Add accessible skip navigation"You now have two local versions of the website:
- The original HTML and CSS website.
- The updated website containing the accessibility improvement.
View the history:
git log --onelineYou haven’t needed GitHub, a domain name or a production server.
The entire exercise was completed on your Ubuntu development machine.
Step 12: Stop or Continue Your OpenRig Team
When you’ve finished the exercise, you can inspect the running agents:
rig status
rig ps --nodesTo stop the project team, use its actual name. For example:
rig down starterYou can keep the OpenRig daemon and kernel running if you intend to continue experimenting.
To shut everything down, stop the remaining kernel team and daemon after saving your work:
rig down kernel
rig daemon stopRemember that stopping the daemon alone does not necessarily stop existing agent terminal sessions.
Stop the Python web server by returning to its terminal and pressing Ctrl+C.
What have we achieved?
In this tutorial, you’ve:
- Installed OpenRig and connected a coding provider.
- Created a website from scratch using HTML and CSS.
- Previewed the website through a local HTTP server.
- Created a development team using OpenRig.
- Given the team a real coding requirement.
- Had another agent review the implementation.
- Tested the result in your browser.
- Saved the approved change using local Git.
This is a small example of a software development lifecycle, covering requirements, implementation, review, testing and version control.
Where to go next
With the basic workflow established, you can try more substantial tasks.
For example, ask the agents to make the layout responsive, introduce a mobile navigation menu, improve colour contrast or create a second page.
As the project grows, you can add automated tests, connect a remote Git repository and introduce a formal release process.
The important starting point is to keep each task small enough to inspect and verify. OpenRig provides coordination between the coding agents, while you retain control over the requirements and the finished code.
Leave a Reply